MichaelG
-
Posts
997 -
Joined
Content Type
Profiles
Forums
Store
Blogs
Events
Downloads
Supra Articles
Gallery
Everything posted by MichaelG
-
Tell them they are talking rot mate When i had my J-Spec TT a couple years back, the clutch went, i got a standard clutch plate, cover and release bearing all from Toyota and it wasnt more than £200 i dont think. I think it was like £180 odd but cant remember now. I certainly remember being pleasantly surprised at the price though My flywheel had a "heat spot" on it when i went to change the clutch but as i was selling the car i didnt bother with the flywheel. I think u only need to do that if its badly worn / scraped or distorted out of shape. Michael
-
They will have valued it at that simply because its an Import. A guy i know wrote off his L-Reg Impreza WRX Import with 45k on clock and they offered him £2000 !! He held out though and got £4500. The car will be "seen" in their eyes as a write-off because with that damage it is obvious the chassis leg will have been damaged. In that case they will base that 50% of the value of the car is £2250 and it will cost a shedload more to repair a J-Spec than that so they formally write it off. Someone will probably be able to repair it for a lot less than that if they are in the know though. My mate does damaged repairables for a living, and itd amazing the damage i see and he fixes the most unfixable of cars at prices you wouldnt believe! Michael
-
The girlfriends brother lives in North London, and he has a VR6 Golf, cost him £900 to get it serviced, belts done, front subframe bushes, wheel bearings etc.....thats about £200 more than it would have been up here in Aberdeen........seems like everything is more expensive the nearer you are to London
-
I used a local guy up here who does Airbrushing of Motorbikes, Car Restoration, Damaged Repairables and all bodywork etc, this was on my first Supra, he did my front bumper, side skirts, rear spats, and rear veilside wing, primed sprayed and fitted for £400 and the job was immaculate. Is it always that expensive down south ? or is £650 a good price ??
-
Sorry but i think it looks awful
-
Does anyone know where i can get any DVD's with proper *proper* drag race meets in Japan ? I have the High Performance Imports Version 1 / 2 / and 5 on DVD and they are superb, will be buying 3 and 4 soon. They have all the HKS Drag meets in Japan with 9 second Supras and GTR'S etc, but my appetite is growing and its frustrating knowing that so much Drag Racing goes on over there yet there is so little available on DVD ! Anyone got any idea? Michael PS............Its 12:47 am and i am bored so thought i would ask
-
GROUP BUY, GROUP BUY !!!!
-
Not seen the stainless ones from THOR can someone post up a pic please ? How about a group buy on the ones from Miami !!?
-
Tell me about it, i tooted my horn one day at a mate walking down the street and he folded with laughter lol I fitted air horns to my girlfriends new Mini Cooper and it sounds decent ! :littled: especially in a multi story carpark lol
-
Anyone else get the feeling Keith made his comment to keep on the right side of the missus ?? lol
-
Give us a bit more info mate, how frequent / loud is it and where does it seem to be coming from ? Is it on accelaration / cornering / slowing down / in all gears or just some ? Michael
-
Thanks a lot people, couldnt have asked for a better response. He's my pride and joy, and money aint an option when it comes to him. So i think i will go with either PetPlan or E & L as i did actually have just both their flyers here at the time of asking. This forum again proves its worth Thanks very much ! Michael
-
A bit "off" even joking about it..........but thats Americans for you........they are invincible. Well put together, but if he has that much time on his hands he must be sha66ing his sister in the trailer the rest of the day !
-
Plain Jane or not, shes not exactly shabby....... I just think shes pretty damn fine actually...........shes not OTT either
-
Complete "How to" Fit Clear Front Indicators Guide
MichaelG replied to MichaelG's topic in Supra Chat
No probs, ur very welcome ! I have spoken to Ian C and he will be making it a Permanent Article in the Technical Articles Section within the next few days ! -
I've got the black bits.........they look ok actually.
-
boneyard - LOL !! Will post a better pic in a mo. how_supra - Yeah hes a cracker.......best money i have ever spent !!
-
Feck..........and trying to find a battery the right size for the tray wont be easy
-
Just wondered for those of you on here who have a Dog, if you have it insured who is it with, how much is the premium a month and have you had any good/bad experiences with them paying out ? I have bought a Dobermann Puppy, hes 12 weeks old now (see pic below) I need to get him insured with a reliable company who wont fark me off when/if i come to make a claim (which i hopefully wont need to) Cheers guys and girls. Michael *Updated with new better pic*
-
Mmmmmmm rather Personally i have seen a lot worse every day of the week on some of the things in the High Street ! Shes a professional model at the end of the day.........would be interesting to see if any of the females on here can fault anything with her make up?
-
Two out of the six small "caps" on the cells of my car battery have started very small bubbles/leaks on them last week........nothing major, just like pop the bonnet and theres a small leak on two of the cells every few days...... Do i need to replace the battery or can i just top up the Cells that are leaking with De-Ionised water as has been suggested to me ? Cheers Michael
-
Complete "How to" Fit Clear Front Indicators Guide
MichaelG replied to MichaelG's topic in Supra Chat
I have indeed, but not heard back......am sure it can be moved if need be. Just thought i would get it up anyways as a few folk have been waiting for me to get my finger out Michael Rogue - No problem, hope its of use ! -
Dude are you crazy or just drunk ? lol
-
After reading the various threads and confusion over fitting clear facelift front indicators to MKIV Supras.......i decided to do it myself and document each stage. I was asked by various members to post up descriptions and pictures of my work and results and have done this in a self made "How to" Guide on the Forum in the MKIV Technical Section. Clear Indicator Guide Hope this is of some help, and comments on my sidelight idea are welcome as well as any questions you may have. Its really not that difficult Thanks Michael
-
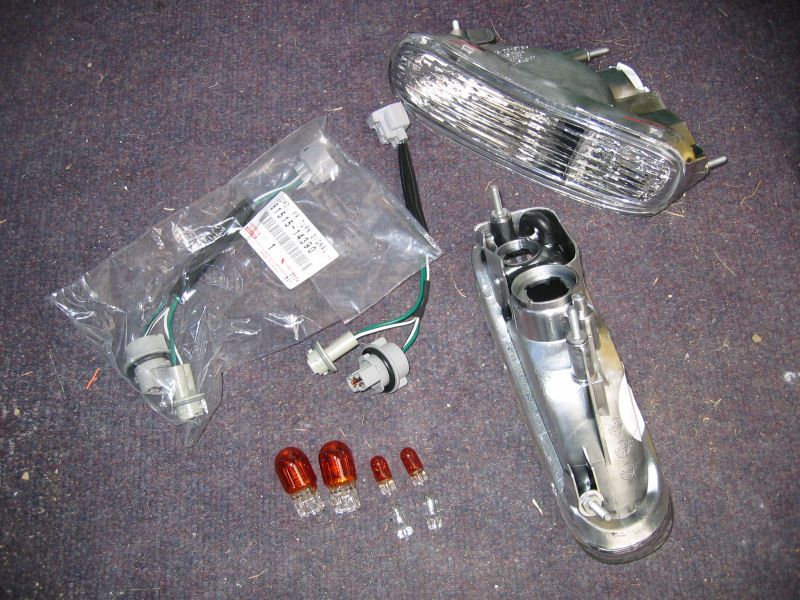
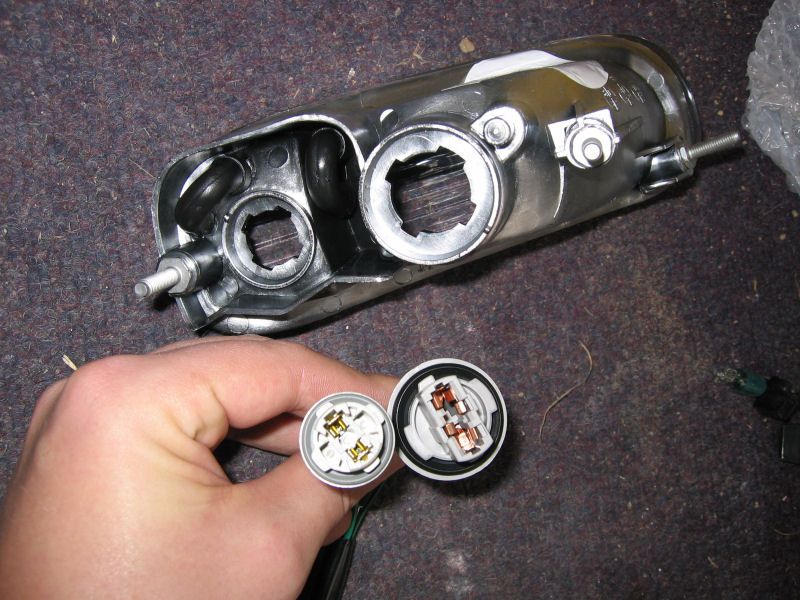
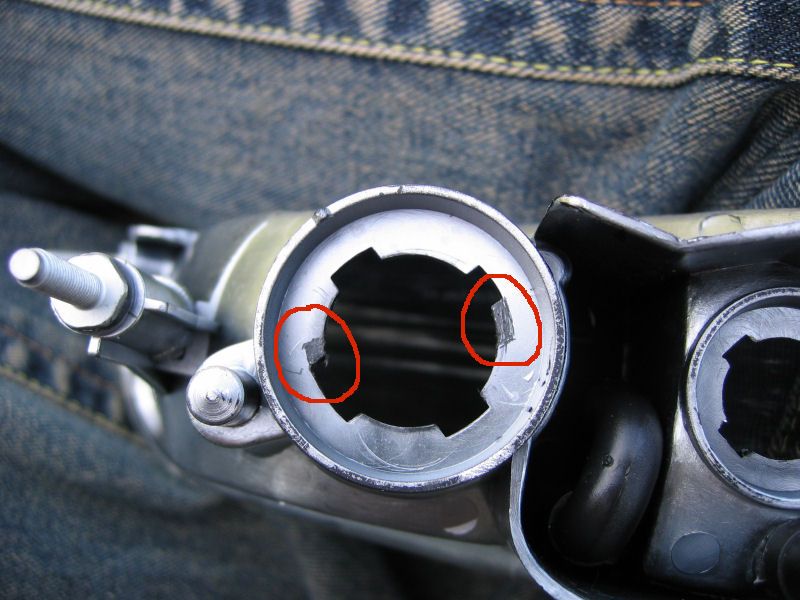
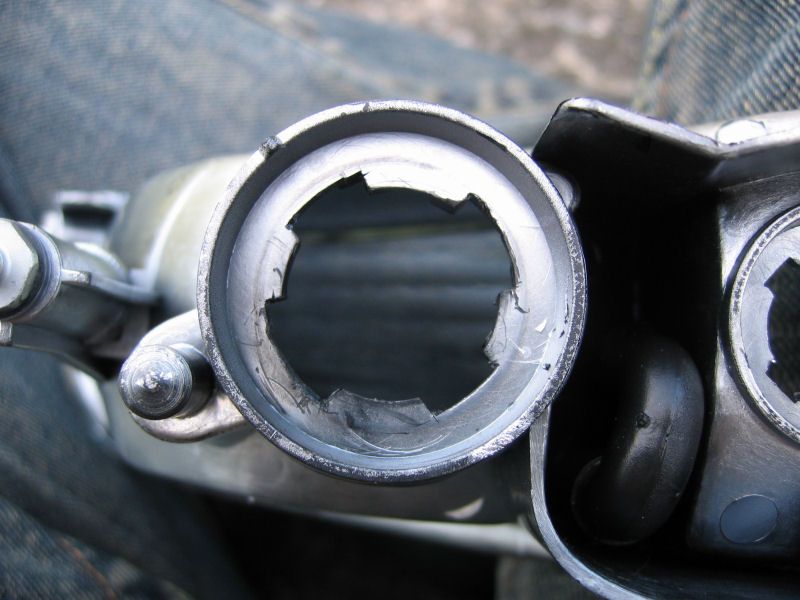
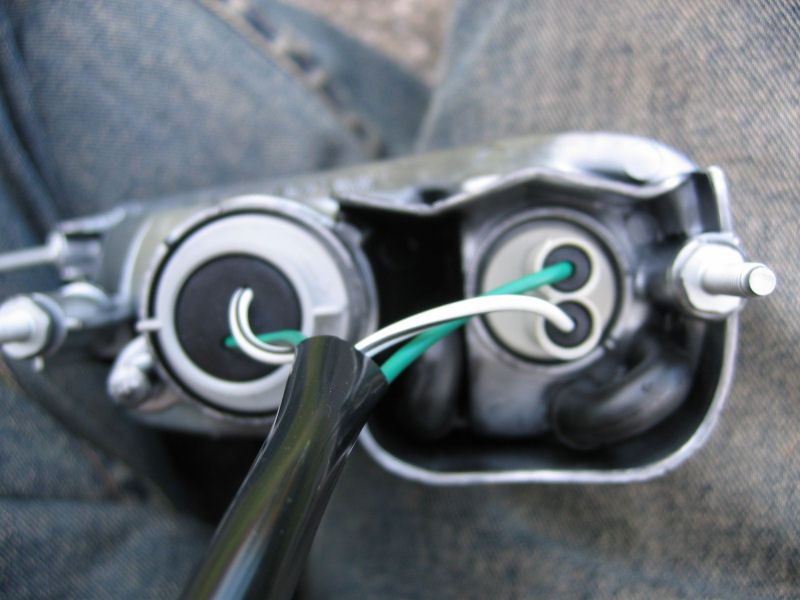
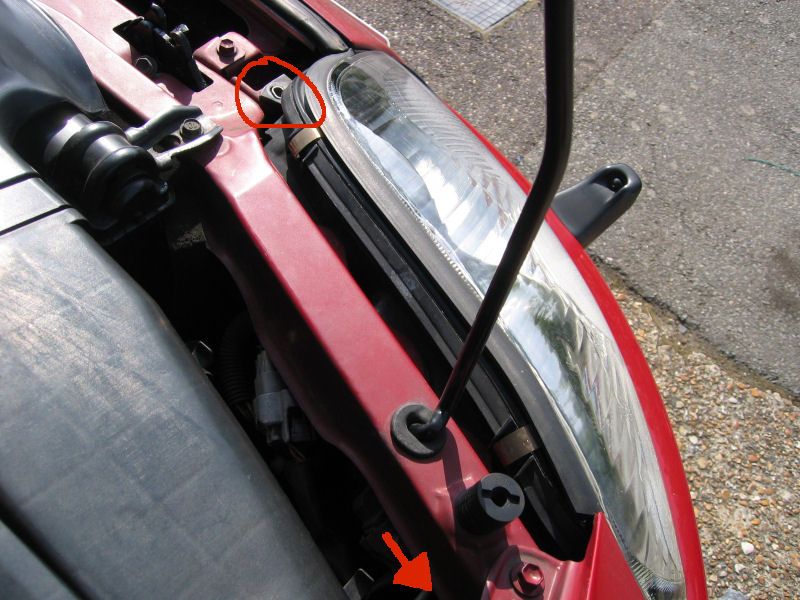
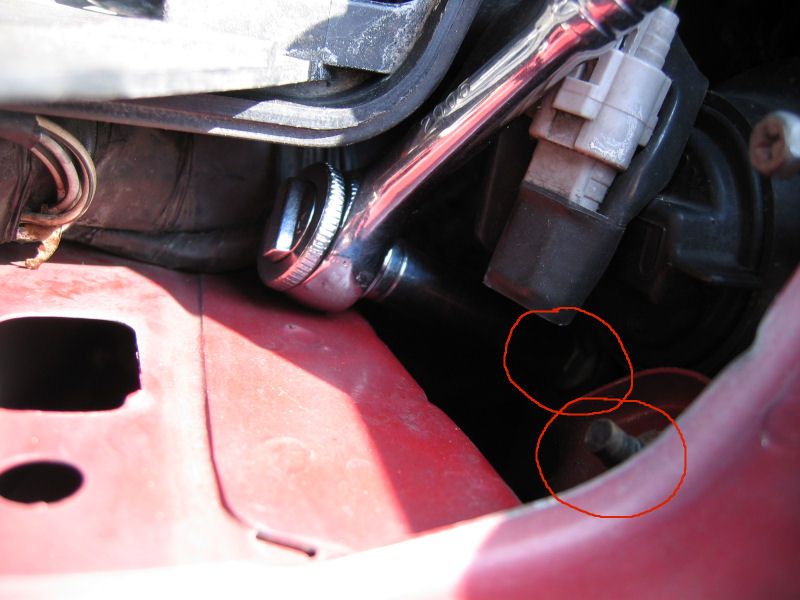
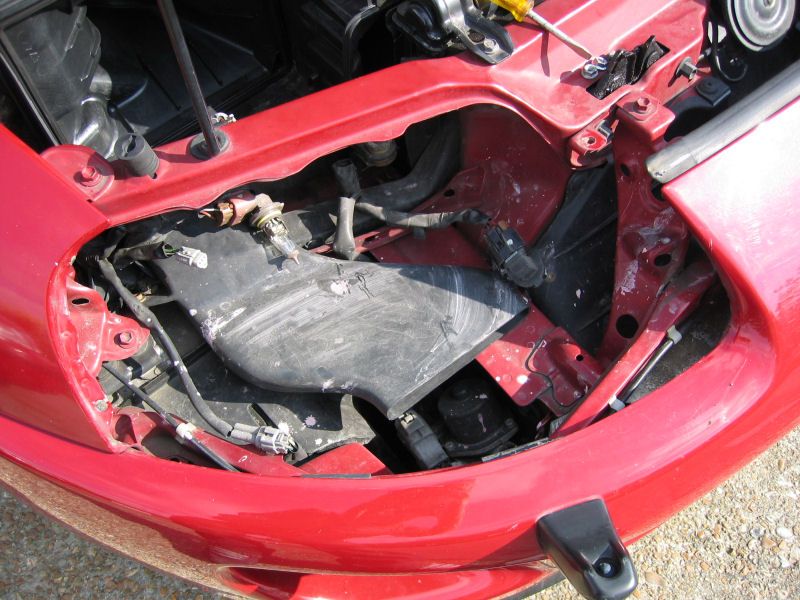
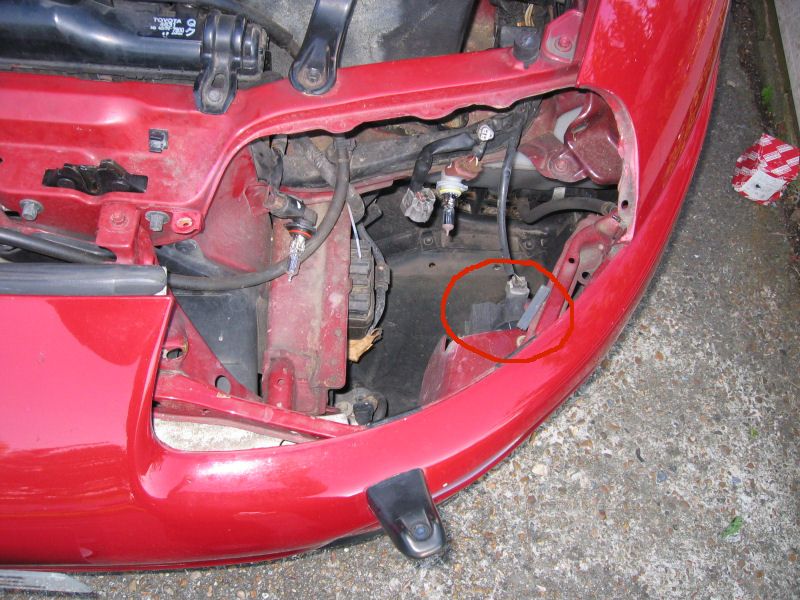
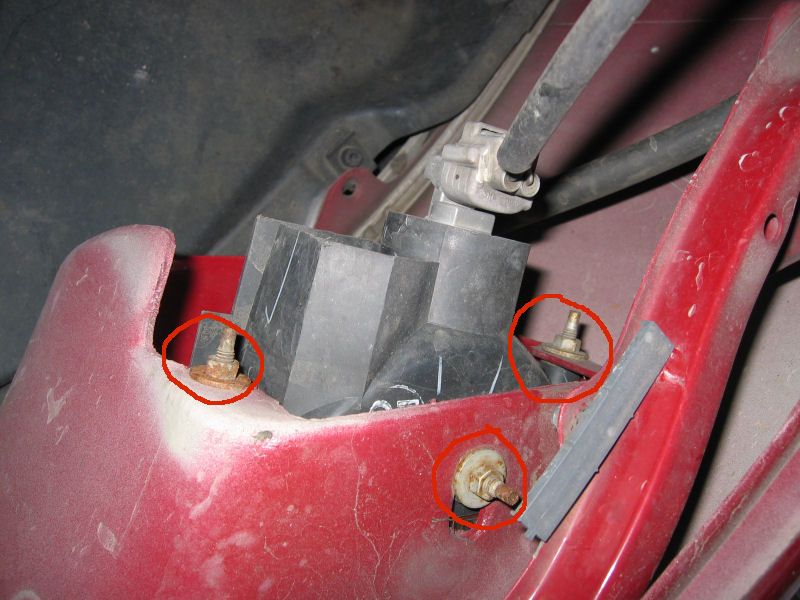
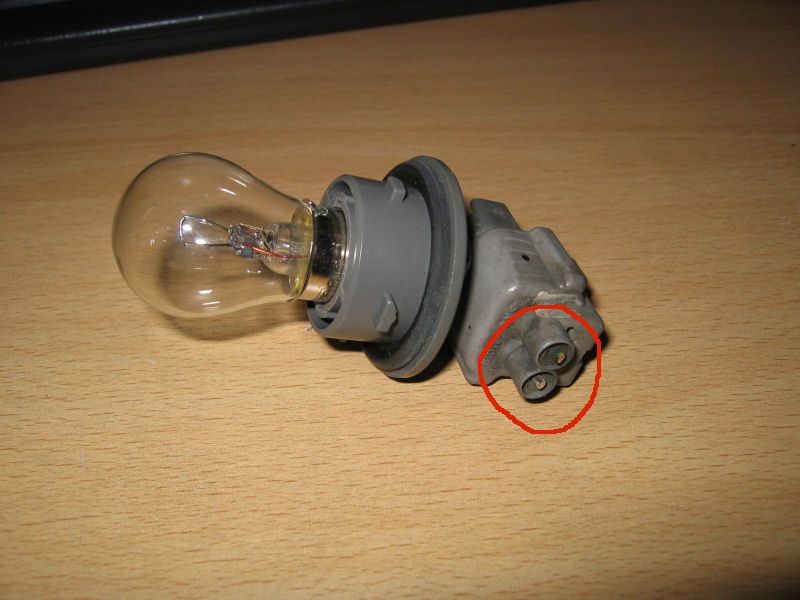
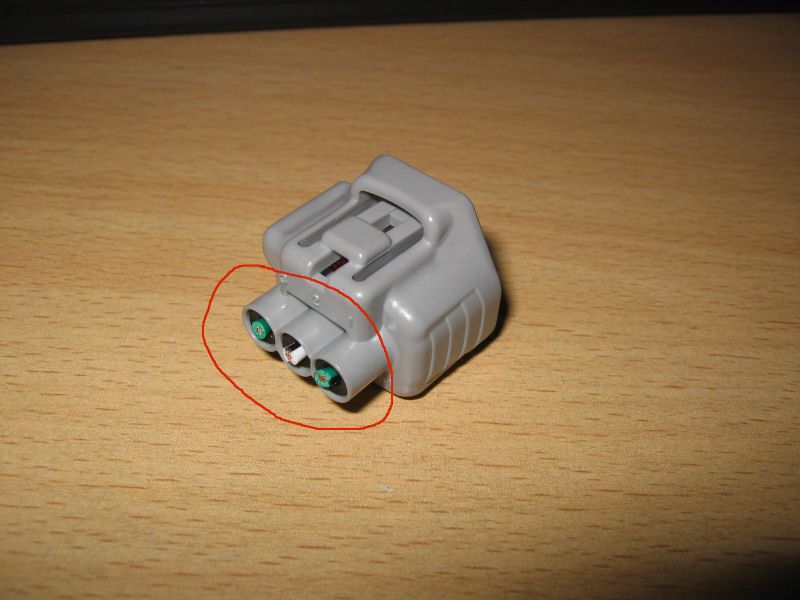
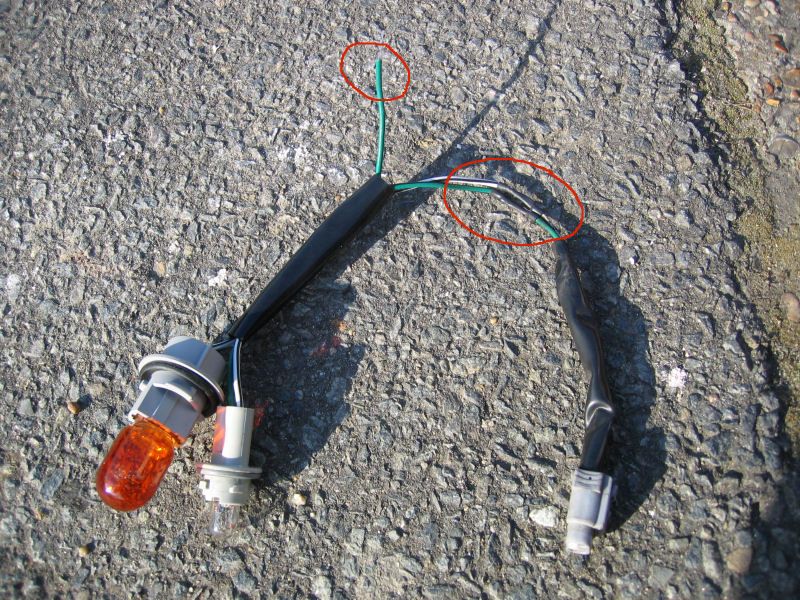
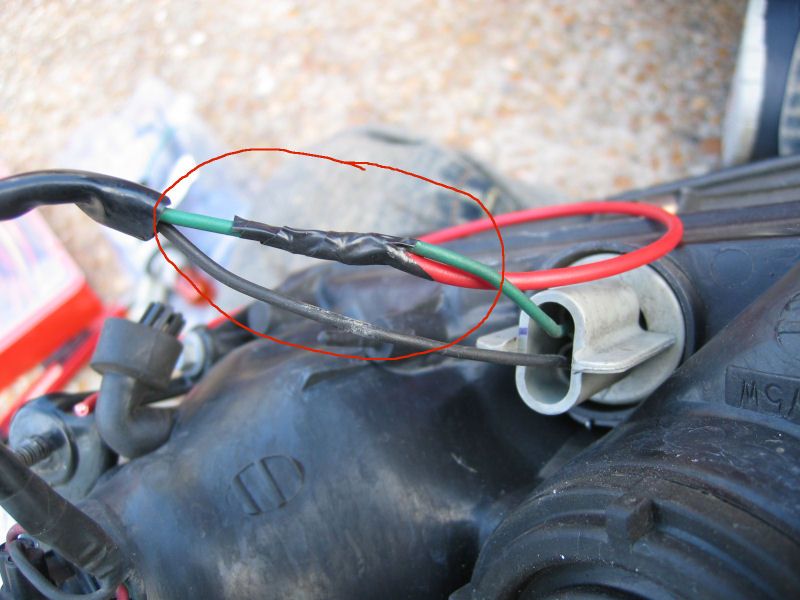
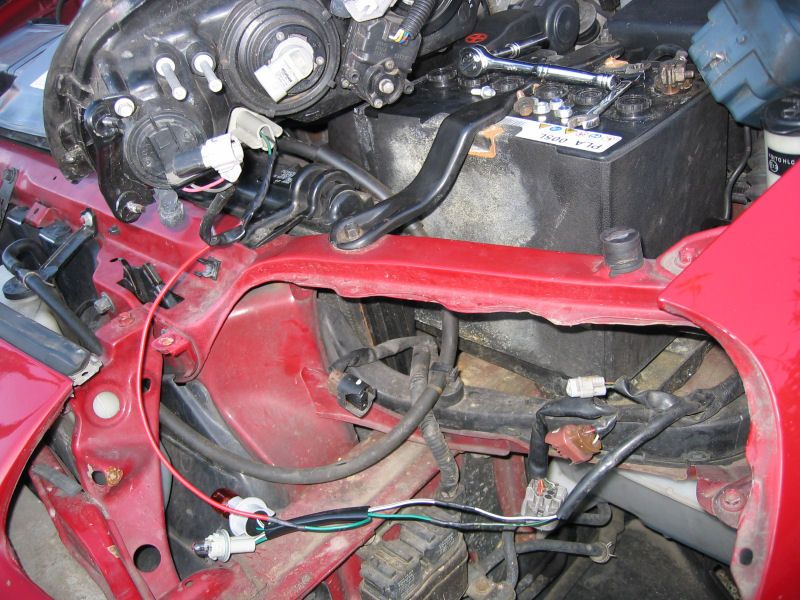
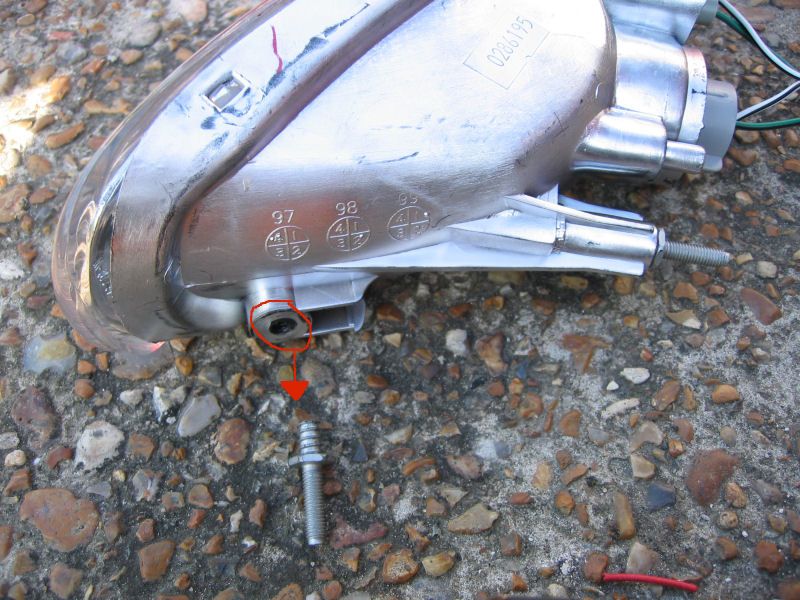
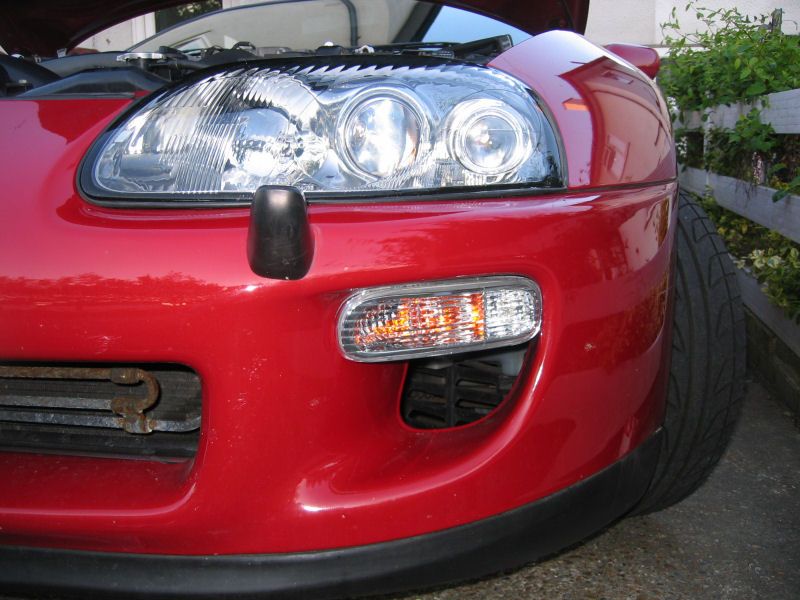
How to fit Facelift front indicators PDF Version - http://www.mkivsupra.net/vbb/attachment.php?attachmentid=105236&d=1265985241 This is a short guide with photos on how to fit the facelift clear front indicators that you will find on ebay from the US. You can have these lights as all indicators or as indicators and extra sidelights, the wiring is only slightly different for each way and I’ll explain that later on. I decided to have the extra sidelights as I think it looks cool :o) What you will need: Two facelift lenses Two facelift looms from Toyota, part number 81515-14390 A soldering iron and some solder Wire cutters Black insulating tape and if possible some 3mm heat shrink 8mm and 10mm spanner (ratchet spanners would be very handy!) 10mm socket and ratchet may come in useful Two 21w orange bulbs Two 5w orange bulbs (for indicators) or Two 5w clear bulbs (for sidelights) Two 30cm lengths of red wire suitable for a 5w current draw (if going for sidelights) What to do: Firstly, on the passenger side lens you will need to make some alterations. The bigger of the two bulb holders will not clip in as the lugs on it are a different shape. I used a stanley knife and small sidecutters to enlarge the lug holes as in the pictures below. The back of your lens should now look a little more like this. Once this is done, double check that your looms fit in to the lenses ok. Now you need to remove your headlights from the car. I’ll concentrate on the drivers side, but the passenger side is just the mirror of it. Each headlight has one bolt and two nuts holding it in. The bolt is toward the middle of the car on the headlight and the two nuts are just inside from the wing. These two nuts aren’t easy to get to, especially the lower of the two. On the drivers side you can remove the airbox cover and filter if you still have them to give you more room. On the passenger side I had to remove my alarm siren to give me space to get there. Removing the battery would also give you extra room. You should now be able to unplug the headlight loom from the back of the headlight unit. Some of the clips are a bit of a pain to get off, but it’s best to leave all the bulbholders in the headlight and unclip the loom from them. You should be left with the following. The drivers side is the trickiest of the two as the ducting for the airbox and for the intercooler (if you still have it) are very much in the way of a couple of the nuts for the indicator unit. The indicator unit on my car had three nuts holding it to the bumper. Two are at the back and one is on top. If you look at the passenger side first you’ll see them quite clearly and can then pinpoint them on the drivers side. I found the nut nearest the outside of the car was very hard to get to from behind the ducting and I didn’t want to remove all that. This is where the ratchet spanner came in very handy! Once you get the three nuts off then the indicator unit will drop out and you can unplug the single bulb holder from it. Now you need to start chopping the wiring, this is where you have two options. To start with, you need to chop the old bulb holder off as close to the bulb holder as possible to give you plenty of wire to work with. The drivers side loom will unplug so you can work on it easily but the passenger side is wired in to the car unfortunately, strange! You also need to cut the plug off of the new wiring loom you bought from Toyota. You will then have the three bare wires from the new loom and two bare wires from the existing loom. If you want both sides of the new light to be indicators, you need to wire up both the green wires on the new loom to the green wire with black stripe on the old loom, and both the white wires with black stripe to each other. If you want the smaller side of the light to be a sidelight then you need to leave out the solid green wire and just solder both the green wires with black lines together. See the following picture. You can see I have soldered the wires together and then covered with heat shrink which is very good for keeping a good connection. At this point if you are having all indicators then you can start to put everything back in, in the opposite way to it coming out. I advise you to test the lights work by plugging them in and turning the hazards on before mounting them in the lenses and putting everything back, just to check the wiring! However, if you are wiring up some sidelights as well you need to tap in to the wire on the loom for the headlight. This is very simple and won’t take much longer. Identify the sidelight wire on the back of the headlight loom. It should be a solid green wire as in the picture below. Use some wire cutters or a knife very carefully and strip about half inch (15mm) of the sheathing off without cutting the wire. Solder your red wire to the green wire coming from your new indicator lens loom and tape up with insulating tape to make neat. Then, feed the wire up through the bumper and solder to the green wire coming from the sidelight on the loom from your headlight. Here you can see the passenger side wired up ready to go back in. Again, once all the wiring is done, test all the lights to make sure they work as they should and then start to reassemble everything in exactly the reverse of taking it out. To put the new lenses in you will need to remove the third bolt from the casings as in the following picture as there is no hole on the pre-facelift bumper for it. You should now have clear facelift lenses instead of the horrible orange ‘blobs’! Good luck with the fitting! Guide credited to i-macca and MichaelG TechGuide - Howto_ Fitting facelift front indicators.pdf