
Cam27
-
Posts
337 -
Joined
Content Type
Profiles
Forums
Store
Blogs
Events
Downloads
Supra Articles
Gallery
Everything posted by Cam27
-
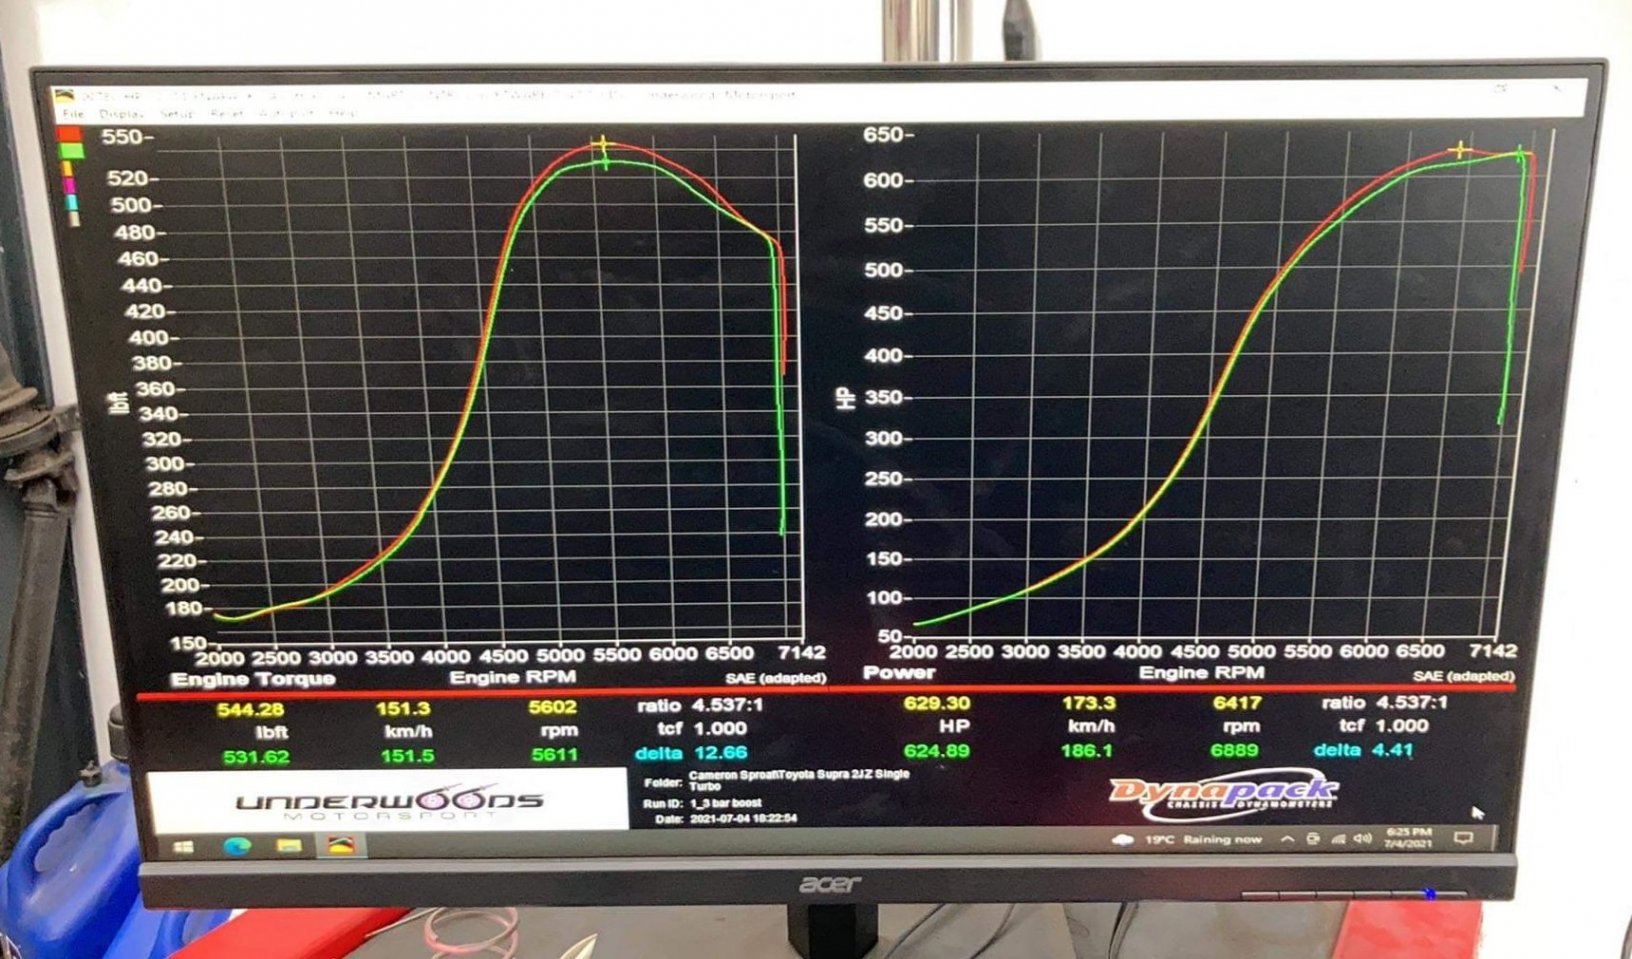
Engine Type - 2JZGTE single turbo Engine Spec - HKS 256/264 camshafts, ARP head studs, 4" intercooler, 3" boost pipework, Radium fuel system with ID1050X injectors and Walbro 525lph hellcat pump, Whifbitz manifold, Turbosmart 40mm twin wastegates. Engine was completely refreshed before mapping all new anciliaries and gaskets, still on stock bottom end. Turbo - HKS T04R T4 divided single turbo, rebuilt as 'hybrid' with oversized billet compressor wheel and 360 thrust washer. Fuel Used - Shell V-Power Exhaust - Custom system: 3" downpipe, 3.5" exhaust with HKS silent hi power back box, twin screamers Transmission - V161, A02B ECU - Link G4X Supralink Mapped By - Scott at Underwoods Motorsport Dyno Used - Dynapack 4000 hub dyno Power figure - 629whp at the hubs Torque figure - 544lbft Boost Pressure - 1.3 bar
-
Unfortunately I wasn't able to receive the fuel plumbing kit from Radium, after two months and still not even shipped I cancelled the order and decided to make it myself. I ordered a a stock Toyota filter, Whifbitz brackets and the necessary hose and fittings. The hoses are teflon with stainless braid and a plastic sheath (like braided brake lines). The feed is 8an and return is 6an. I had to make a bracket for the filter as they are discontinued, but overall I am really pleased with how it turned out. I also made the wiring harness for the fuel pump and got that fitted. I mounted the fuse and relay close to where the oem fuel pump ecu would normally sit. I wanted to test the system so connected the pump to the battery momentarily, all is good and tight. I also picked up a clutch. I was planning on running a HKS LA twin but saw Sheefa was selling his low milage OS Giken triple plate for a really good price so snapped that up. Maybe slightly overkill for me, but better than not enough torque holding capacity! It also came with the movement reversal kit. As it stands, I have pretty much finished all I can do with the car now. In October it's due to be collected for final work and mapping. On the list is to fit the clutch, gearbox and prop, fabricate a new downpipe and screamers and the on to wiring the Ecu
-
I went from worn oem rubber bushes to fully poly bushed. Mostly strongflex yellow but some superpro purple, the feel and handling of the car is much better, more direct. The ride isn't harsh either which was a pleasant surprise.
-
On to the front side of the fuel system, I opted for Injector Dynamics ID1050X injectors and a Radium top feed rail. I had already fitted the plugs to the loom previously so the injectors were plug and play. The rail has 2 ports on the side. The first one I fitted a Radium fuel pulsation damper (a great addition in my view, as th fpd is usually lost when fitting an aftermarket rail) and the 2nd port I fitted a fuel pressure sensor. I opted for Radium's direct mount pressure regulator, which mounts directly to the fuel rail's outlet port on a swivel fitting, keeping everything really compact and neat. The rail is designed to work with the oem spacers, but as the IDs are longer body injectors, the oem spacers were too short, but easily remedied by some longer ones. I ordered Radium's fuel plumbing kit to complete the system, which consists of fuel lines, filter, filter bracet abd fuel line brackets. It was a nightmare to try and order in the first place, and was meant to have a 2 week lead time. Now 5 weeks later it still hasn't shipped, Covid causing problems with getting orders out, so I will have to patiently wait I guess. I did get my modified cartch tank fitted though, and also picked up a pretty cool VP Racing fuel can
-
It's been a little while since I have updated this thread, but I have been steadily making progress. The past couple of months have been spent mainly fitting the fuel system. I'm a big fan of Radium Engineerig's products, so decided to build the system using pretty much all their stuff. First off was the triple pump hanger, which has a built in jet pump on the return line which draws from the sub tank. I was going to run twin Walbro 450s but eventually I opted for a single Walbro 525 'Hellcat' pump, which should flow plenty, but if not I can always add another. I wanted to keep the system and wiring as simple as possible, as well as keep the fuel cool. I also have the Radium wiring kit to install, which has heavier wiring, a relay and a beefy fuse.
-
I had bought the mrs a new DSLR camera for her birthday a couple months back, and I thought it would be rude not to get some good shots of the engine bay now it is coming together
-
Last month I used my time during the lockdown to crack on with the engine bay. My goal was to start finishing a lot of the systems as I am getting closer to completion. First up was the cooling system. I ran in to an issue where the lower water neck and boost pipe were too close, so I ordered an adapter plate to rotate the water neck 90 degree. It did the trick but was a pain to fit! I received a nice delivery which included a Koyo radiator, HKS cap, Whifbitz carbon shroud and polished upper pipe. The Koyo rad is excellent quality, although expensive. The mounting tabs on the carbon shroud were out by a fair way so I had to open them up with the dremmel to get a good fit. I applied some foam tape between the rad and shroud to fill the gaps and maximise airflow. After fitting the rad and shroud along with the new upper pipe I fitted a new oem lower hose, which I cropped to work with the turned lower neck. I filled the system with Toyota red coolant and added some water wetter, which probably will make no difference, but thought I would give it a try. I filled the block through the upper pipe (turned up the way like a spout) so there is less bleeding to do when the engine runs. The only thing is didn't account for is with everything being bigger the boost pipe sits very close to the shroud, it's snug, but ok...just! With the coolant system filled and no leaks it was to the boost pipework. I bought a mounting bracket for the boost solenoid from SRD which did the job nicely! I soldered plugs to the solenoid and the old wires for the stock wastegate vsv, which i will assign to the link to keep the wiring neat. I also got my Turbosmart bov welded to the boost pipe on the intercooler outlet and Murray clamps fitted to the joiners. With the cooling and boost sorted next up was the power steering. I ordered a mocal 13 row cooler kit from SRD, and made mounting brackets from alloy angle. I am really pleased with how it is fitted, hopefully will get plenty of air fed through the opening in the front bumper. System was filled with Motul dexiii. I got a few other jobs done as well; Filled the engine with Fuchs Titan Pro S 10W50 Made up new -10an breather lines Pulled the engine loom through to the passenger footwell. That is a total nightmare to do yourself, not really a one man job! I had made the cabin side pretty with new tape wrap, which i had to remove to get enough flex to pull through! Anyway glad it's done now.
-
I just installed the SRD kit
-
I had one on my W58 and it was great mate, but can't say I've heard anything about the 6 speed version. Spec's blurb claims it can hold serious torque so I was looking at getting one, maybe not now! Maybe speak to Whiffin, i remember seeing he fitted one to a single turbo car a while back?
-
Soarer rear subframe is completly different, tge lower arms are longer so different shape.
-
Thank you buddy. The fan is off just now as the paint started to flake on it which is annoying, I will have to redo it.
-
Thanks very much mate, appreciate it. It is a labour of love haha. The garage is perfect for me, I am lucky it is close to my house as well!
-
Carrying on with the jobs this week, i managed to get the brake system fully plumbed and bled. A bit awkward getting the long lines in behind the engine but it's done now. Turns out i was sent the wrong clutch hose by accident, a half length instead of full length, so got that installed as well. My car never had a factory heat sheild on the clutch master cylinder so I ordered one, only to find the mounting holes were filled in!? Anyway i drilled and tapped them out and got that installed as well. Also got new single turbo heater hoses from Whifbitz, much neater than how they were before. I decided it was time to start getting the car back together, so the front wings, headlights, sideskirts, rear bumper and tailights were all mounted. I also fitted the new hockey sticks i have had sitting. I was pleased to find that the come with all the mounting clips and screws, handy! I order the plenum side boost pipework from Whifbitz. They are slightly larger than the throttle body, but not by much. I got them installed and quite happy with the fit. I think I will have to mount the bov down beside the intercooler. I wanted a bigger air filter, as i had accidently squished the old one anyway! I order a 12" k&n and it was ridiculously big so was never going to fit! Ordered another one, 9" this time and it barely fits, but not at the angle I want so will have to modify the pipe, again! That will have to wait for next month now as the car is tucked up for the next few weeks while I am away working.
-
Thanks mate, it's the intake pipe so under no pressure. If it was a boost pipe I would:thumbs:
-
The past few days I have been plugging away with putting the car back together. A lot of hours spent on the wiring, and also got the AC system all buttoned up with new seals in the connections. I gave the painter a box of things to paint when he did the engine bay but he forgot so I got them media blasted and had some rattle cans made up to paint them myself. Pretty pleased how they came out, especially since the weather has been cold and wet! I have also started making job lists to keep track of where I am at lol, must be getting old! So on with fitting things, got the brake booster in with new gaskets and formed vac hose I have had waiting in my box of new oem stuff for ever, brake master cylinder with new throttle cable bracket. Also picked up 2 litres of Motul 660 fluid which is very pricey but supposed to be the best. I ordered a braided clutch line but it is too short which is annoying. I got the boost pipes fitted from the turbo to intercooler, it was a tight fit but the squeezed in. I ordered a bunch of Murray constant tension clamps for the boost pipes to minimise the risk of boost leaks. I have the intake side on order so they should be here this week. I was down at Scott's today and picked up a Turbosmart race port BOV that will be welded on the pipe from the outlet of the intercooler. The inlet pipe I got for the turbo was too long, so chopped it on the bandsaw whilst I was there. Excuse the squished filter in the picture, I was too rough with it lol. I have ordered a bigger one to fill the space better.
-
With the car home it was on to the fun part of fitting all the shiney new bits. Started off with new side vents and retainers, Pas banjo bolts, bonnet catches and AC condenser and filter drier. Next up was running the engine bay loom, which I was dreading, but went ok actually. Also got some other stuff in such as clutch master cylinder, pas reservoir, battery tray etc. Then it was time to get the engine back in I had to remove the intercooler again as the hoist wouldn't reach with it on! Anyway it went in quite smoothly, with minimal scratching of the new paint lol. I test fitted the intercooler pipework, which is very tight, and will require the lower water neck to be turned as it is in the way of the rad hose. I am really chuffed with how it's coming together, the engine has spent 6 months on the stand so good to have it back where it belongs.
-
Today was the day I had been looking forward to for some time, the day the car came home! But first there was a couple of jobs to button up. First up was replacing the driveshaft bolts and washers, as the old ones were very rusted. The diff was also filled with oil, some very expensive Motul SAE 75W40. Then was on to the fuel tank. I knew the breather pipe would need replaced as it was rotted in the same place as all Supras, so we made a new on from 6mm cupra-nickel pipe. Also some nice new tank straps. I had to order these from Toyota as I needed them quickly. They were more than double the price compared to Amayama (including the shipping and customs from Japan!) and that was with my discount! Not very impressed, where do they get their prices? It was a good day to take some nice shots of the new underside, I love it! The car is back home in my garage now so will have great fun in the next few days putting it back together:)
-
Got the rear subframe installed today, along with the brake lines and diff. Not far off finishing off now, just the fuel tank, rear brakes and wheels to go on. Not sure whether I will put the rear bumper and lights back on, as they will jist have to come off again for paint. Anyway, really making progress now! Underside is mint. It will be time to bring the car home when I get home next week to get the engine in.
-
Cheers folks, it is frustrating having to spend so much time and money to sort it out, but i think if it was left another couple of years the shell would have been gone. At least it is all sorted now and not have to worry about it anymore. My car will never be out in the rain again haha.
-
With the fabrication work complete, the car was then masked. The untreated metal was primed and the cavities filled with clear Waxoyl. The entire underside was then coated with Upol Raptor, which I am really pleased with. That pretty much brings us up to date. It has been quite a stressfull few weeks, and very expensive due to the labour intensive nature of the job, which has wiped out my respray budget. Realistically setting me back 6 months for the car being back on the road. I am looking at this time next year to aim to be done. Next steps are the rear subframe to be reinstalled, along with the fuel tank, then bring he car home to start bolting stuff back in the engine bay and dropping the motor back in! Speaking of which, i have been slowly working on that too
-
With the outer sills cut away, we could see exactly what we were dealing with, which was rusting from inside the cavities basically. The lower sills were then also cut out and the gussets removed. Then followed many hours of labour with a grinder, wire wheel and belt sander to clean and prepare the metal and get rid of 100% of any sign of rust. There were also a couple spots on the rear arches that needed repaired. After cleaning, the metal was treated for rust. After that it was on with fabrication, I am very fortunate my mechanic is very skilled at this type of work!
-
It was the plan after the engine bay was painted to restore the underside of the car. Clean up all rust and underseal etc. When I removed the sideskirts I realised it would be much more involved than that (the big aero skirts cover a lot of the sills). The first warning sign was a bubble in the paint on the outer sill, which when poked with a finger turned in to a hole... Basically, the inner and outer sills were rotten. We decided it absolutely had to be fixed properly, so that meant cutting the sills out and replacing them with new ones which were fabricated by my mechanic. Que a LOT of pictures, they tell the story better than words, I will start with the rusty shots. Needless to say I was completely horrified at the state of the sills, and more than a little embaressed. Although, the damage was done in the 20 years prior to my ownership. So we will swiftly move on, and show the story of the Supra becoming rust free and good as new underneath!
-
I have had a spare rear subframe knocking about for a year or two now, so I finally got my finger out and had it blasted and powdercoated. The engineering firm had a hard time getting the old bushes out so didn't charge me as it took longer than expected! I had ordered a full set of rear arms apart from the uppers, new droplinks, nuts, bolts and adjusting washers. With the old subframe out the car (will get to that in a minute) the poly bushes for the front mounts and diff were transferred over. I got new subframe rear mounts as the old ones were really rusty, as well as new bolts and hardware. Also transferred the driveshafts and hubs.
-
Whilst the car was away getting painted, I was getting on with sorting out the drivetrain. The V161 came with a short shifter fitted which made shifts terrible! I went a bit overboard and ordered new parts for the entire shifter assembly, the difference is night and day! Next up was the replacement diff, Which was opened up, inspected, cleaned, painted and resealed. It feels great, nice and tight and smooth.
-
It's been a while since I have updated this thread, so I will split this in to a few posts as there has been a lot going on! First off, with the engine bay completely stripped it was the ideal time to get it resprayed. There was some rust repair to do on the radiator support first. Really happy with how it turned out!
