sunny
-
Posts
69 -
Joined
Content Type
Profiles
Forums
Store
Blogs
Events
Downloads
Supra Articles
Gallery
Everything posted by sunny
-
loll exactly my thoughts. Going to upgrade to a bigger set very soon. Is there any specific ones that people recommend that fit straight onto the na rail without changing clips etc?
-
yea i was really happy with the result. just need to do small bits here and there and it'll be ready to drive for once
-
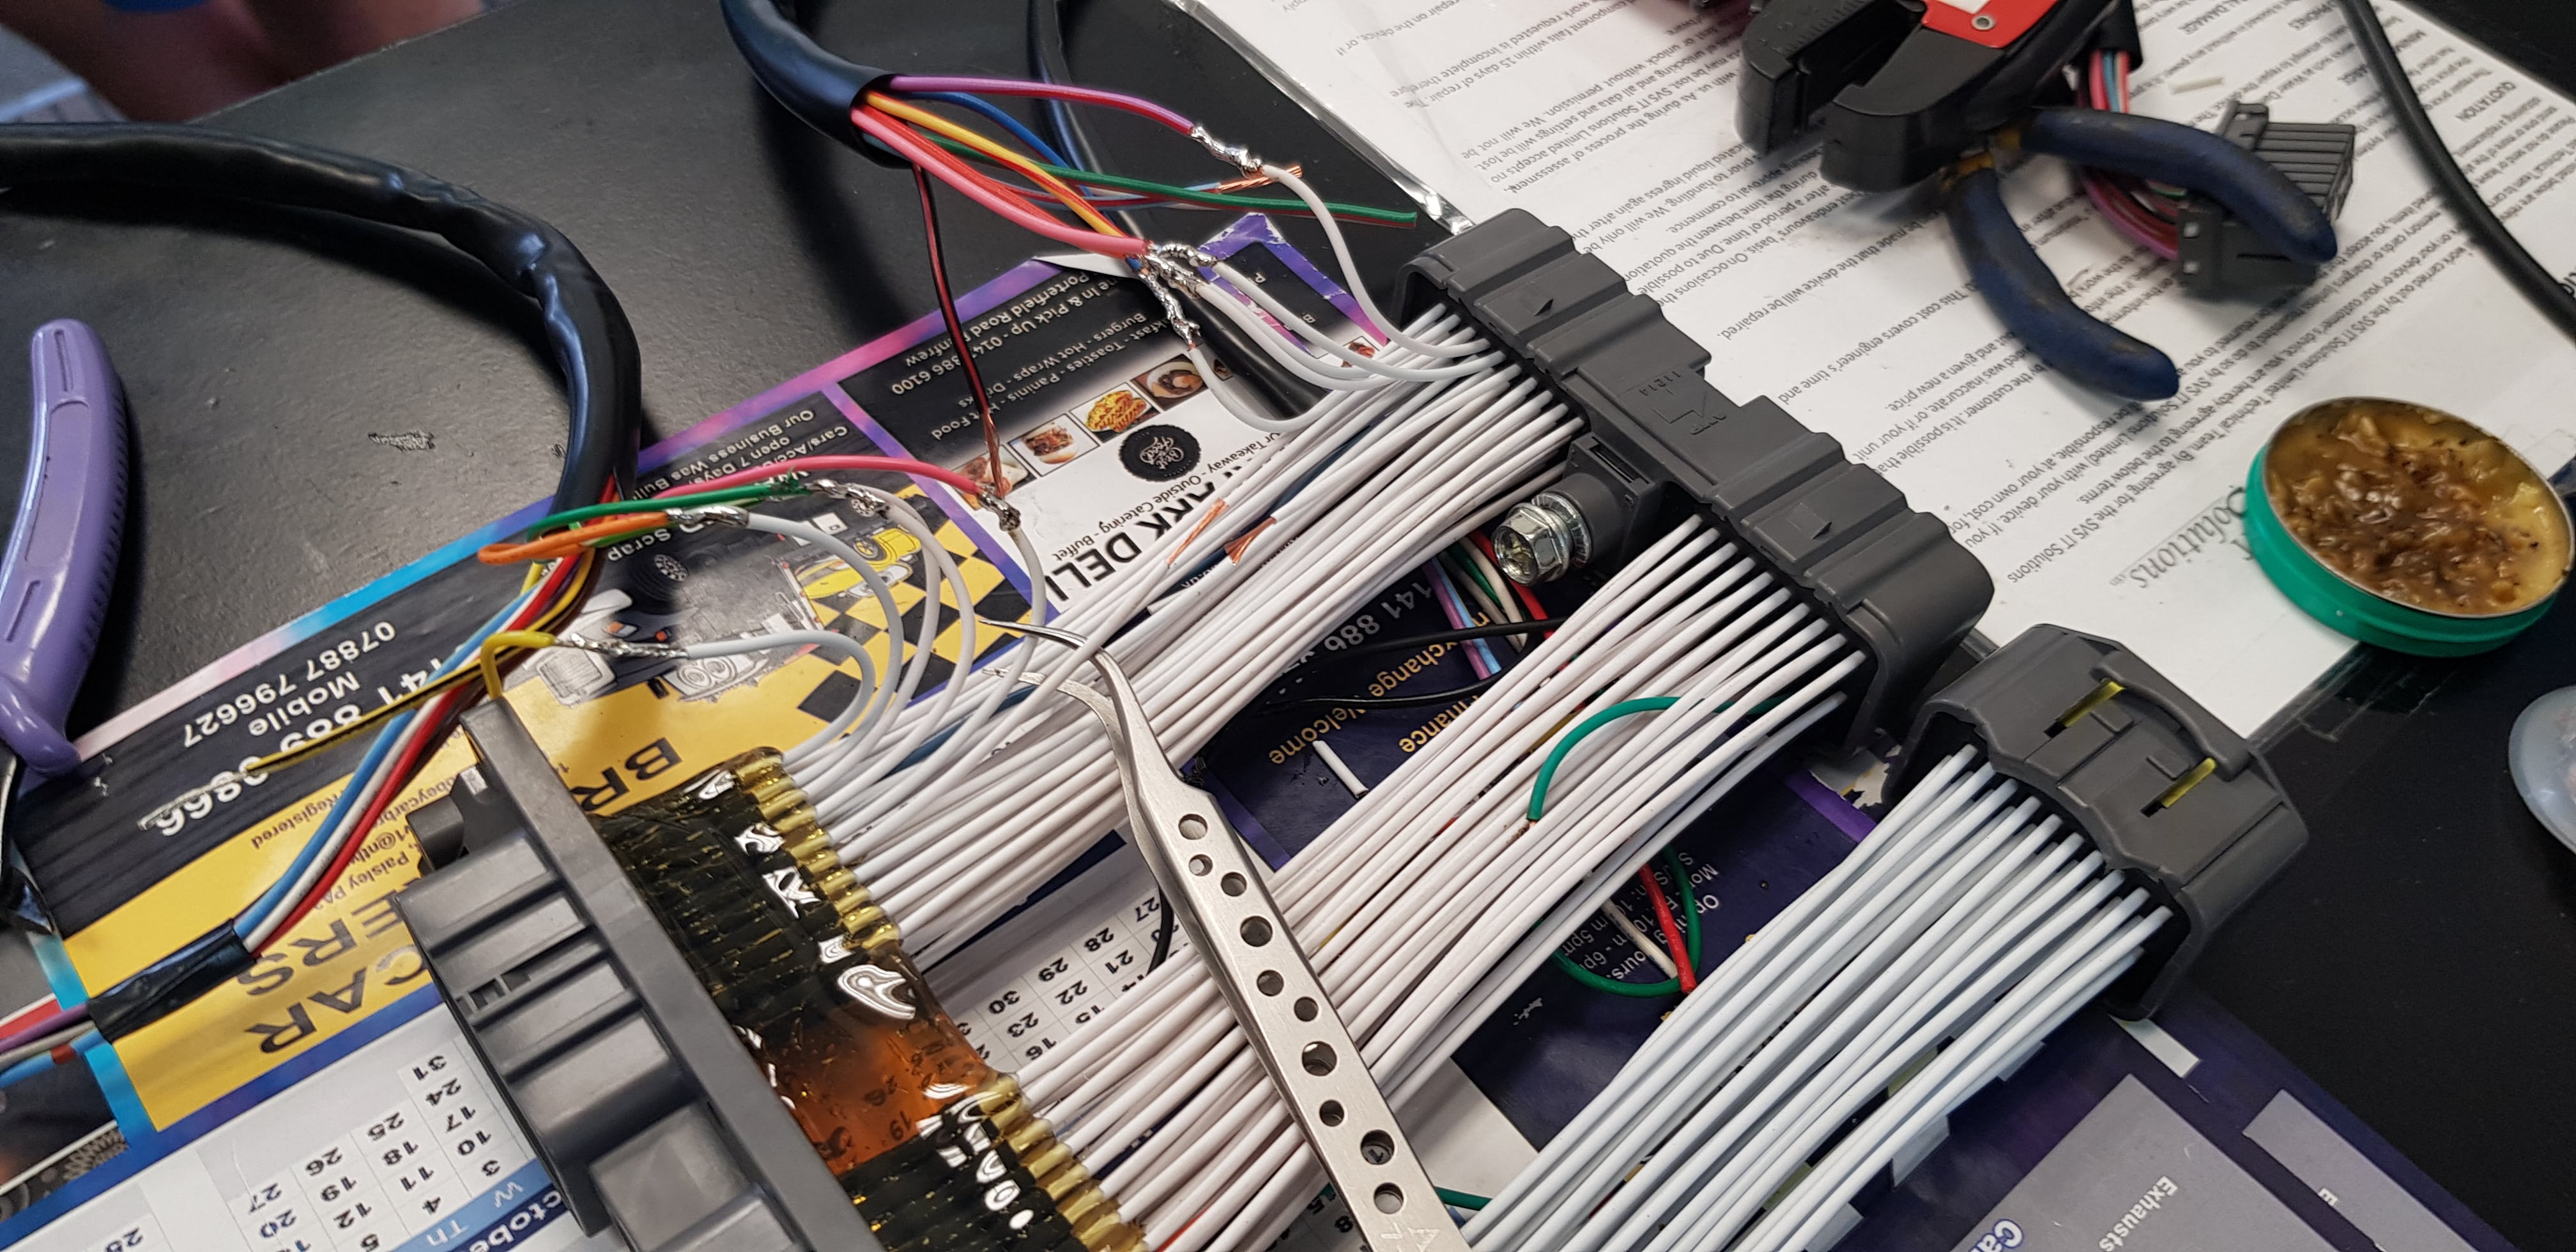
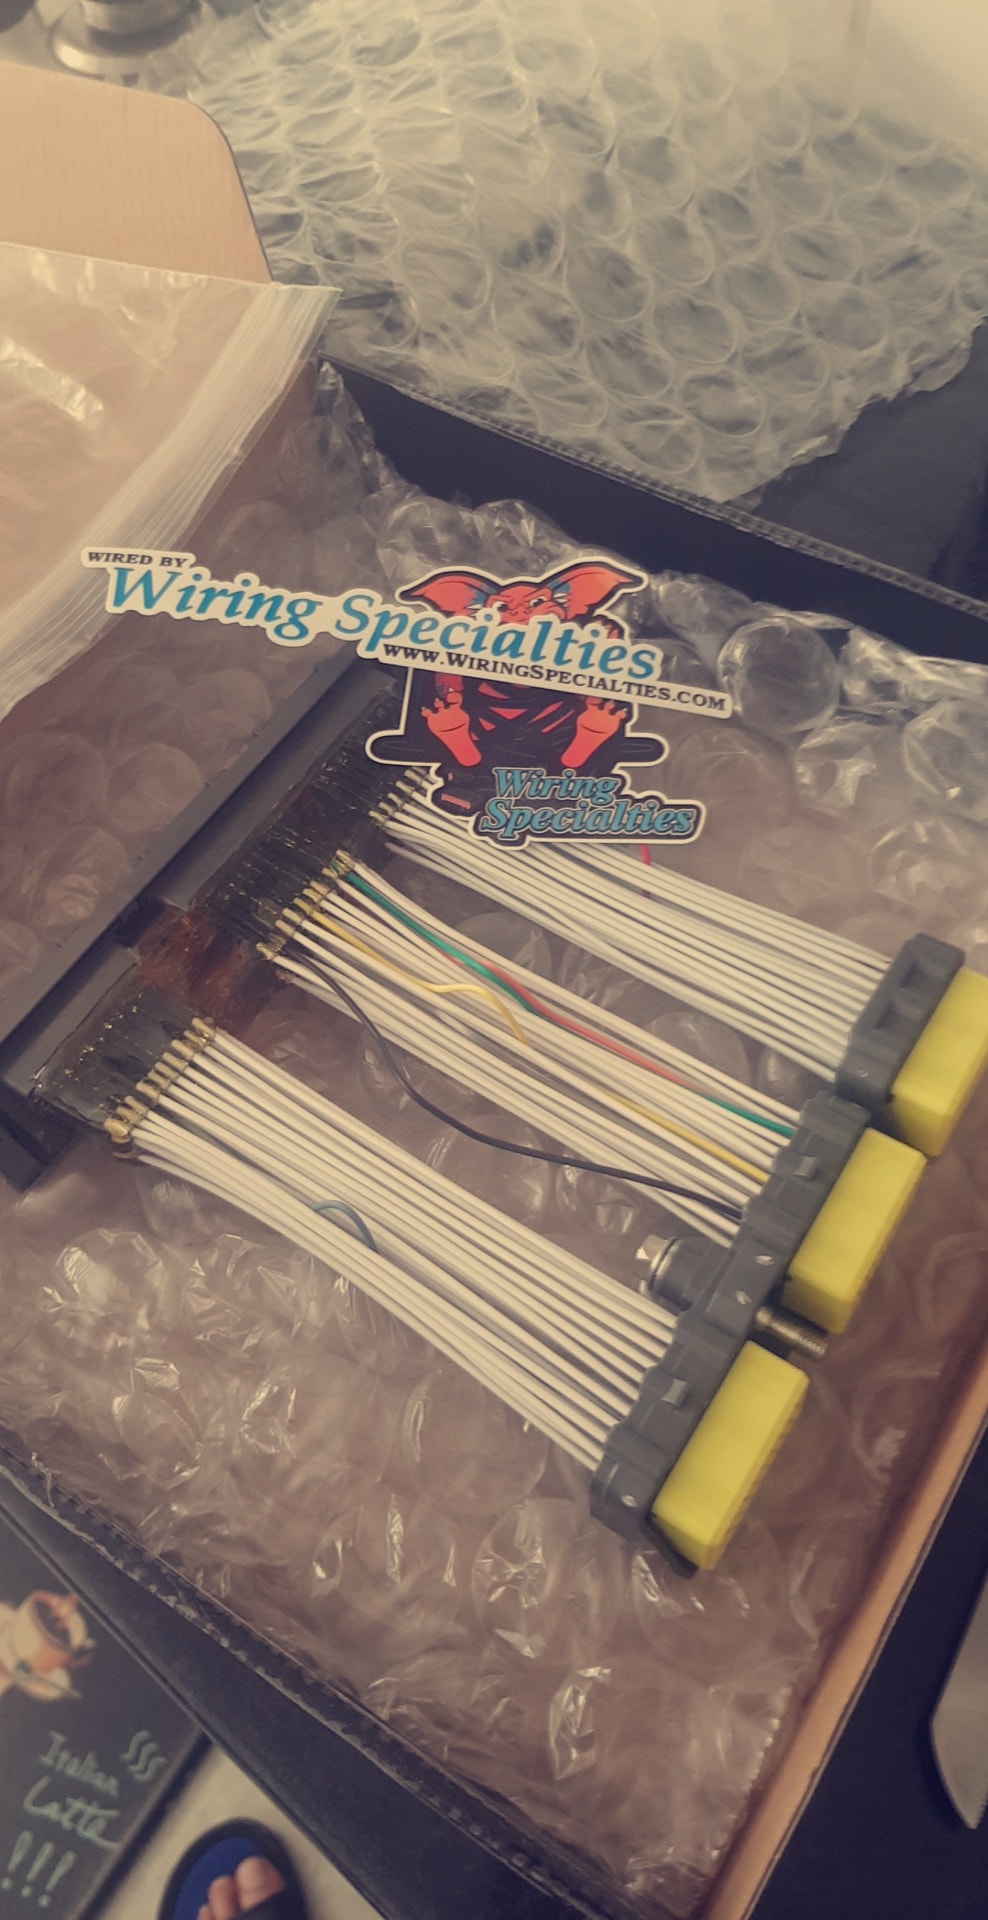
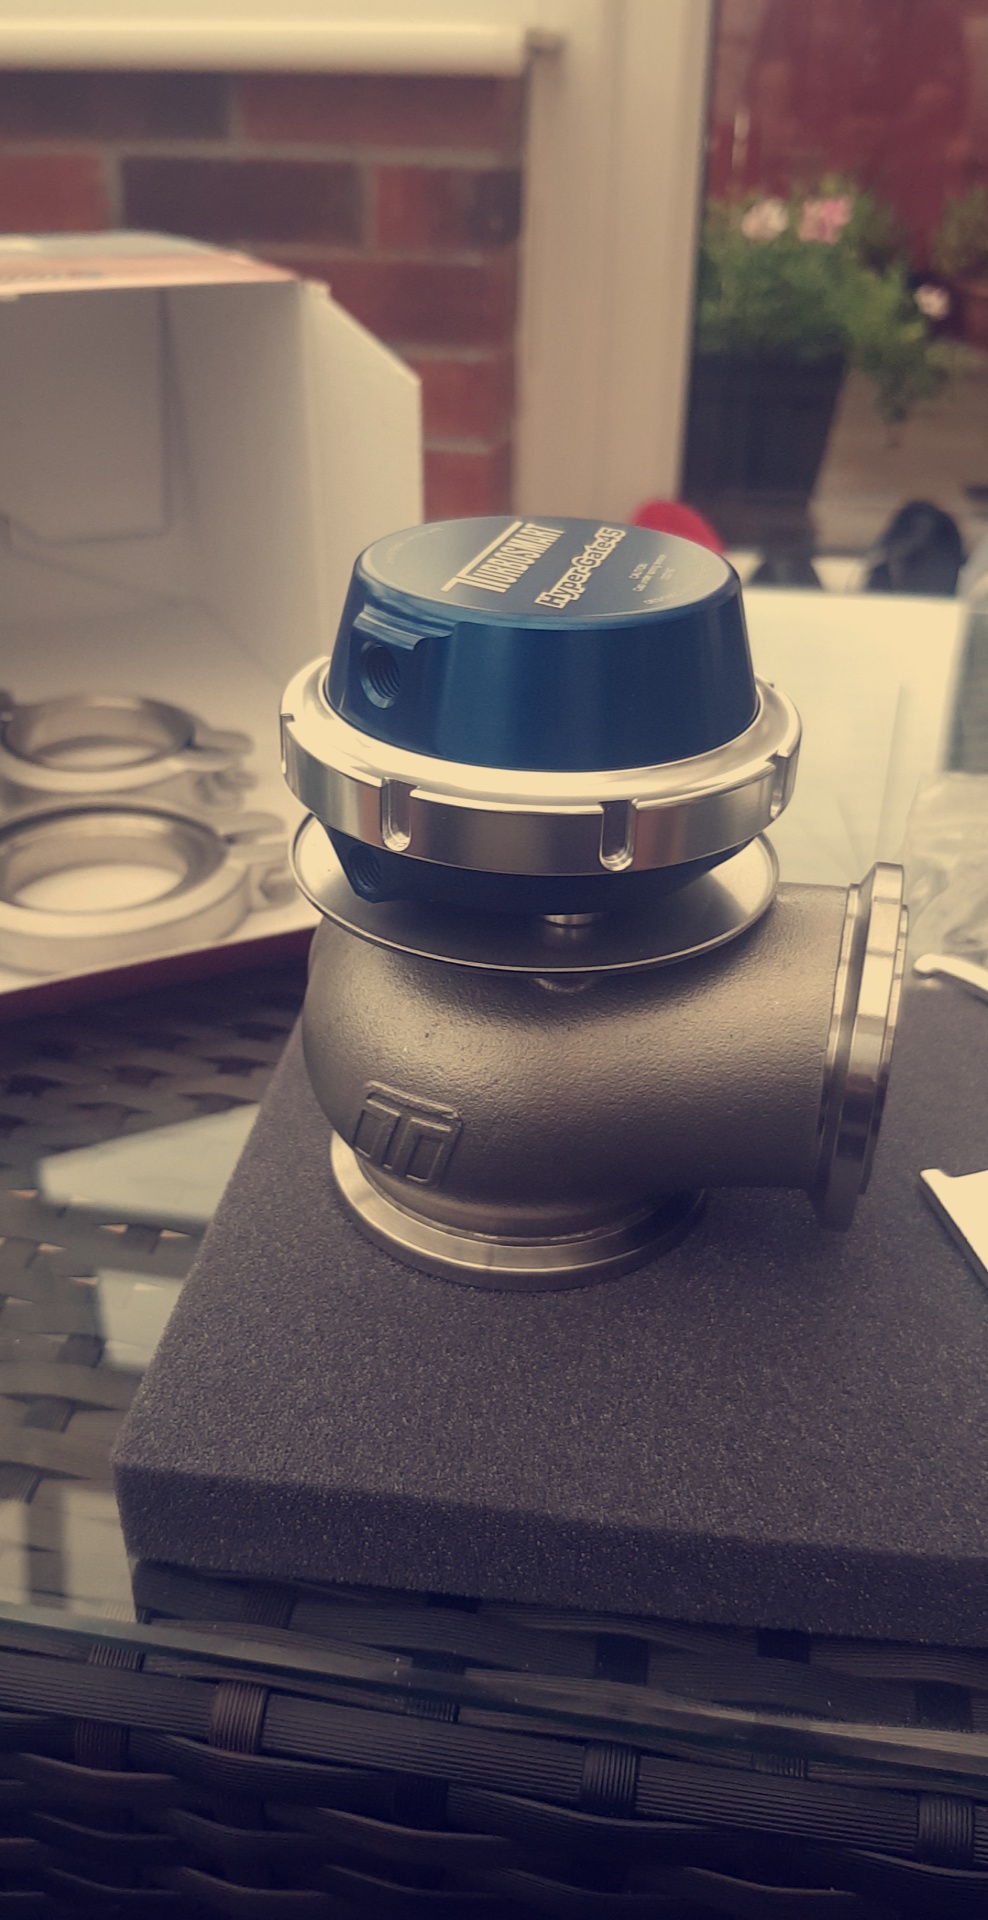
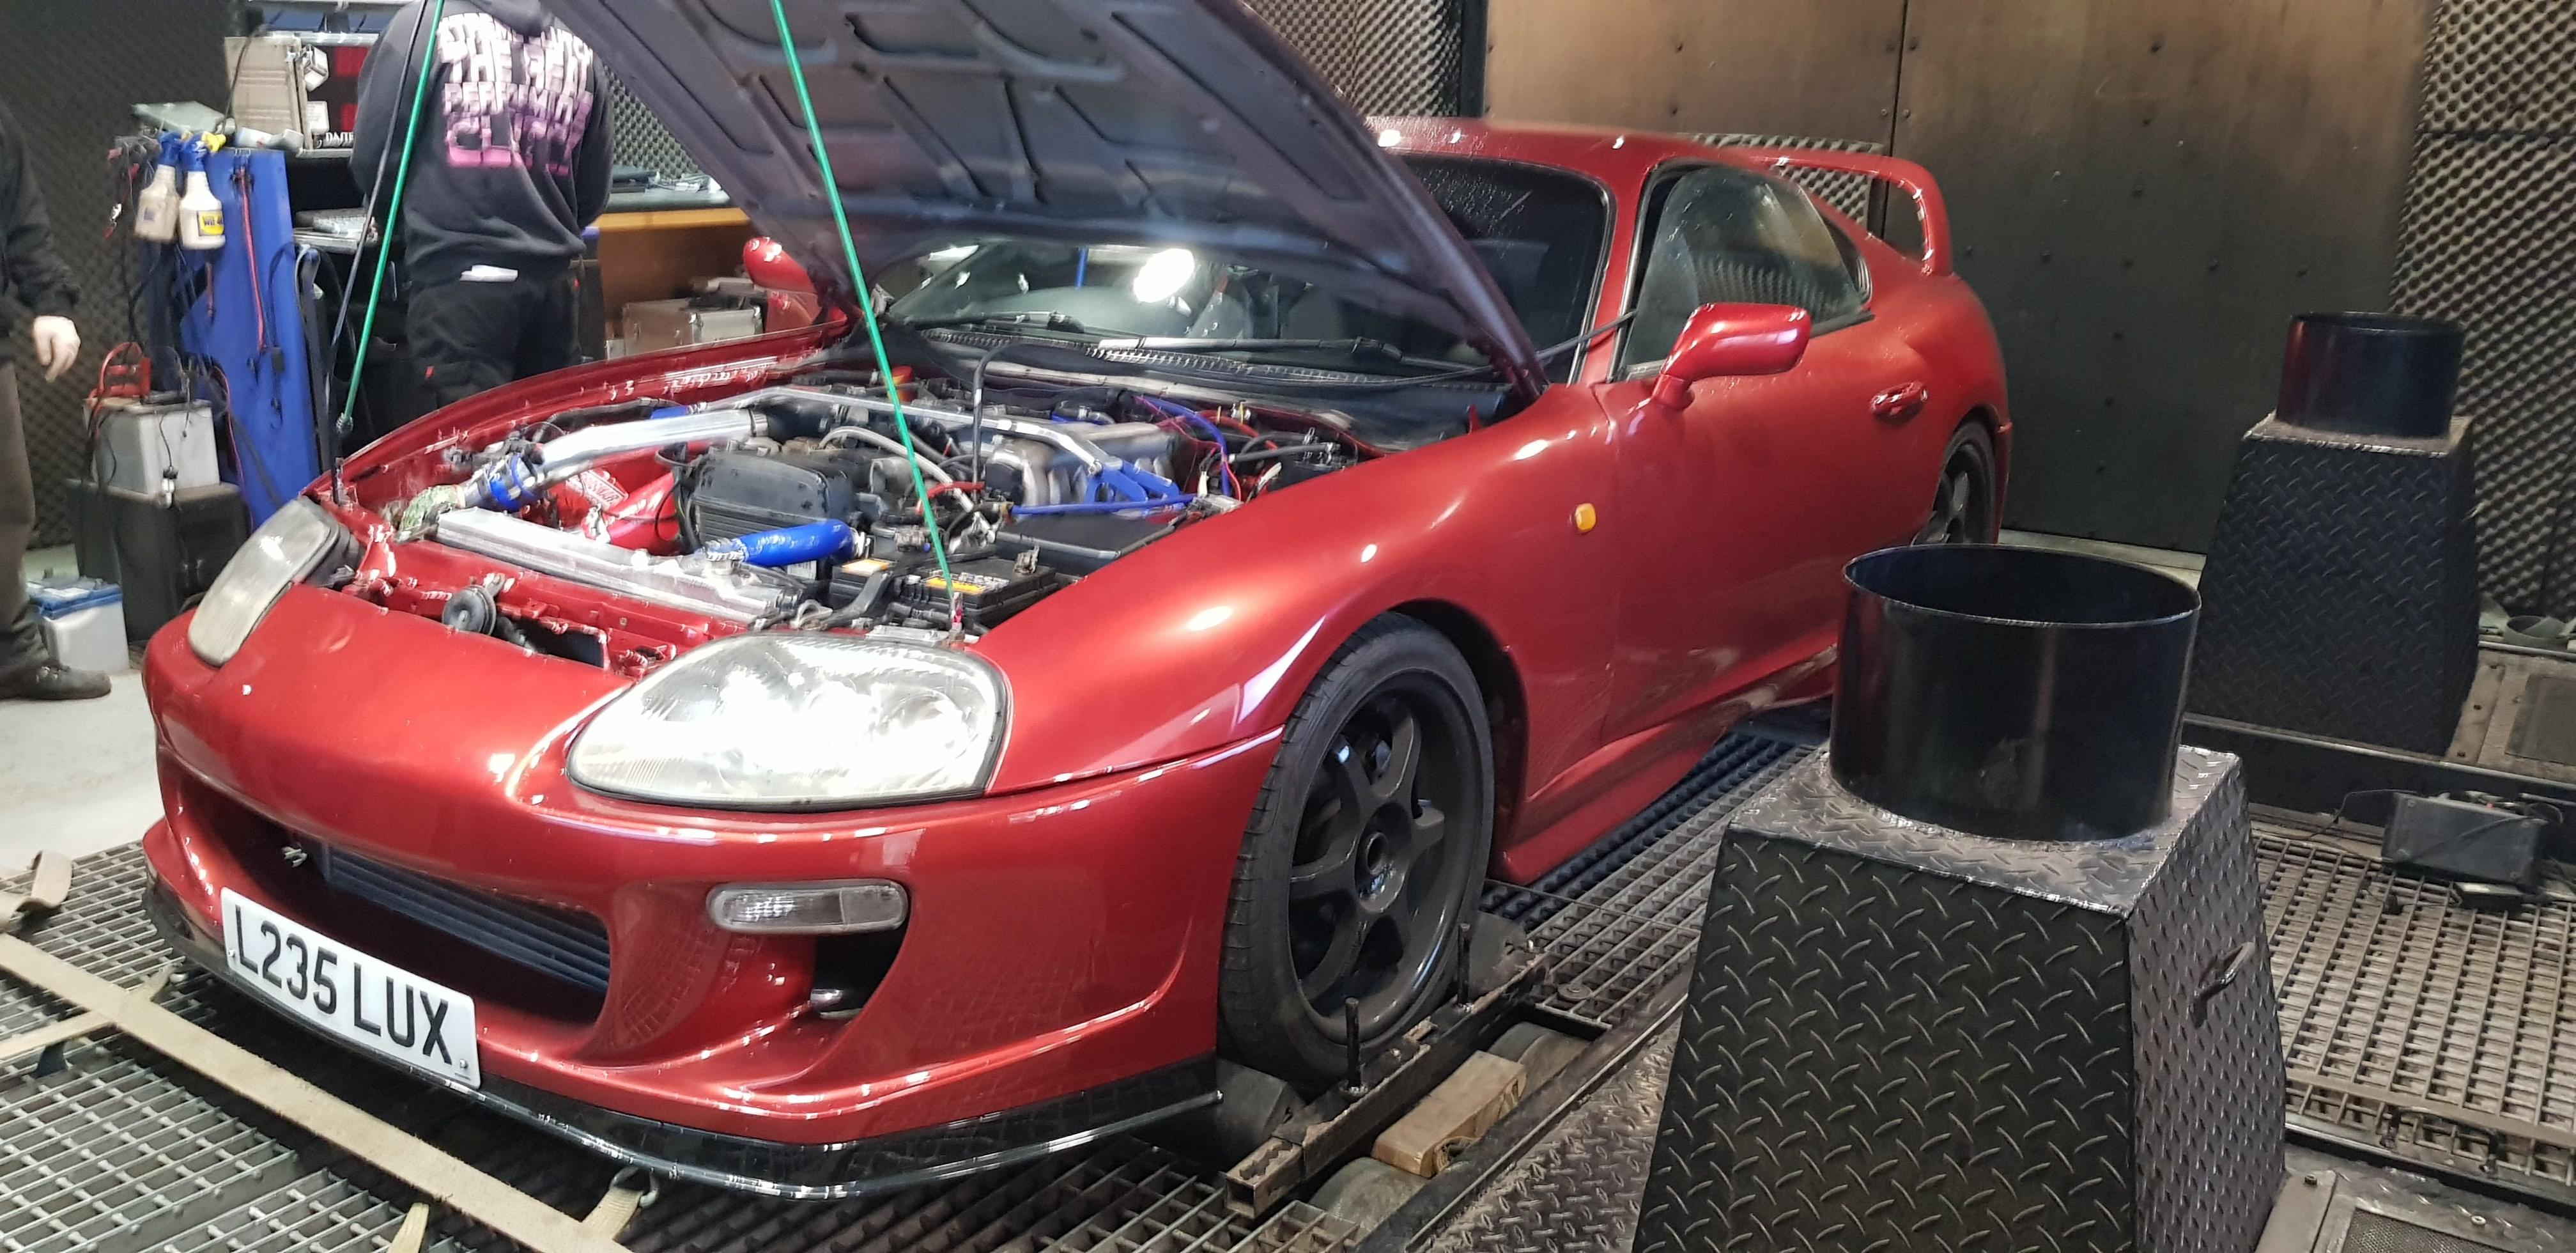
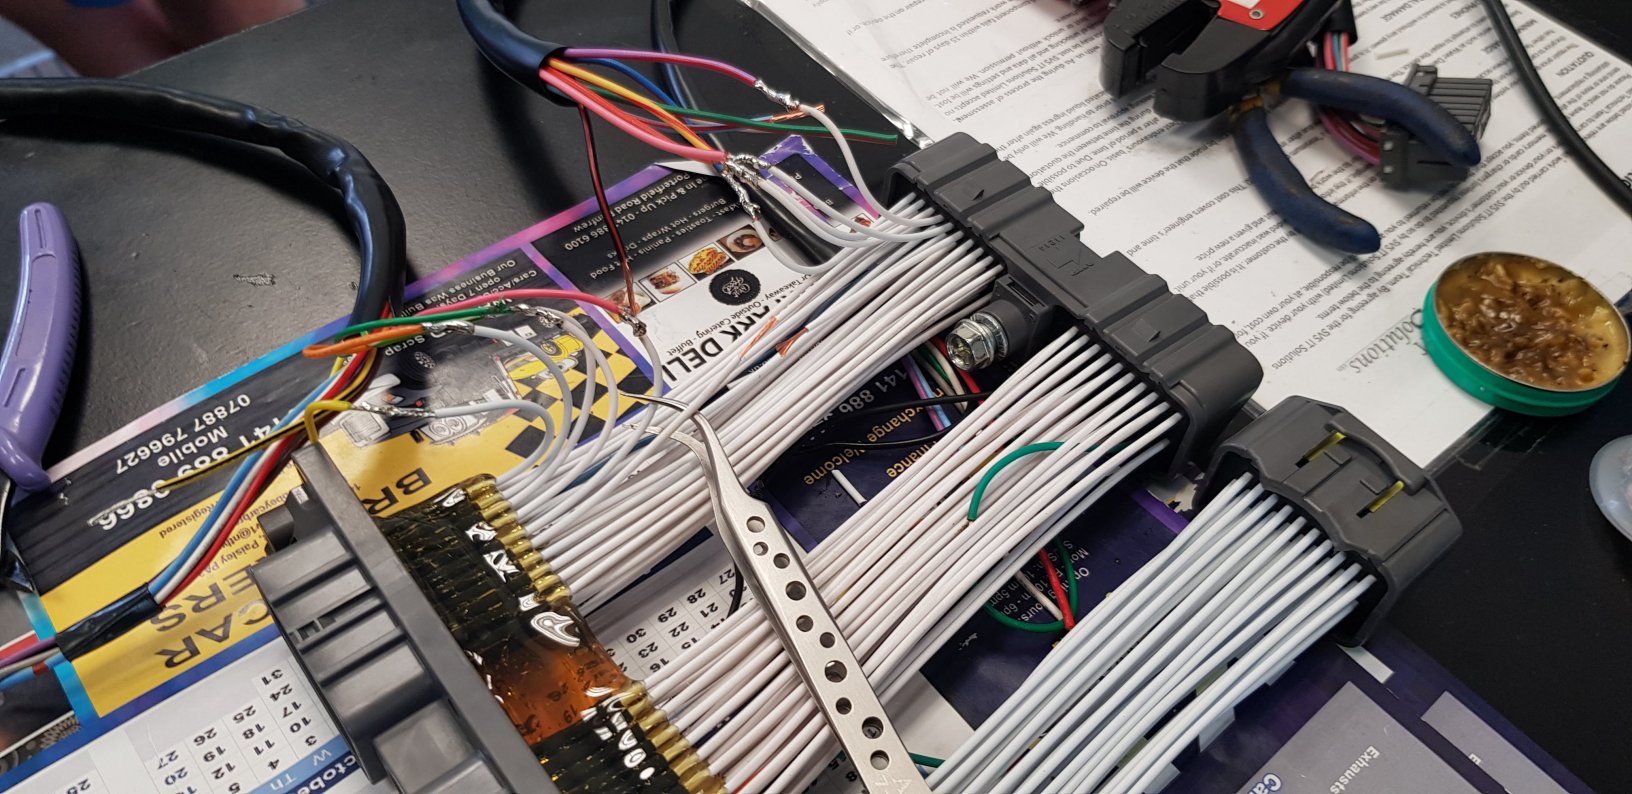
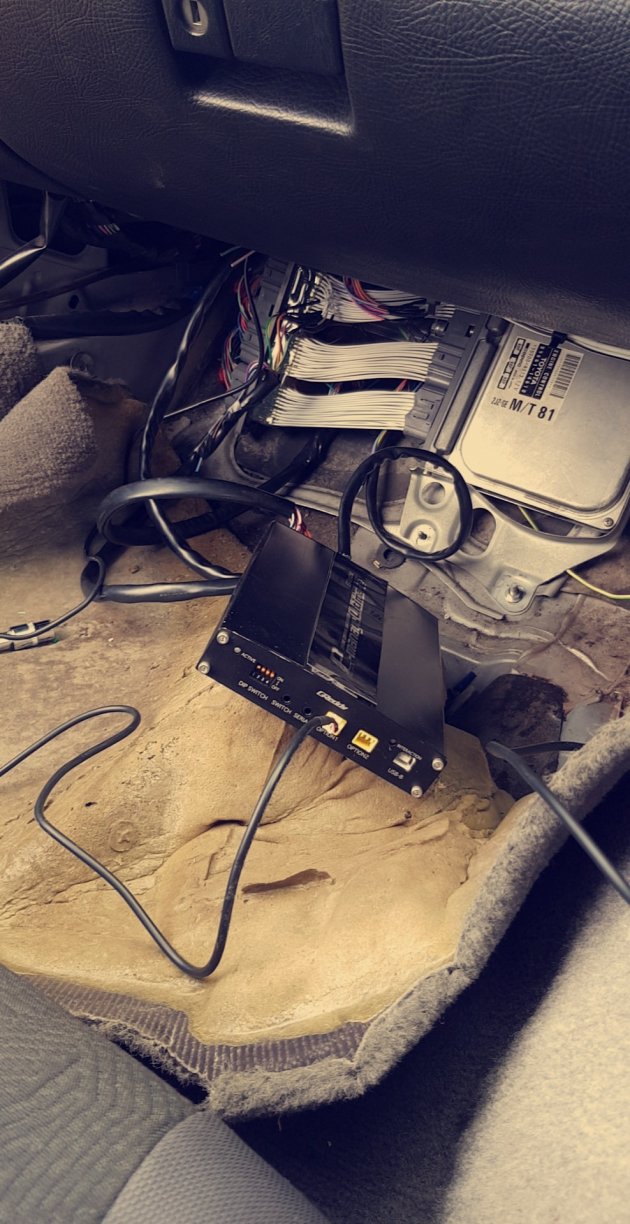
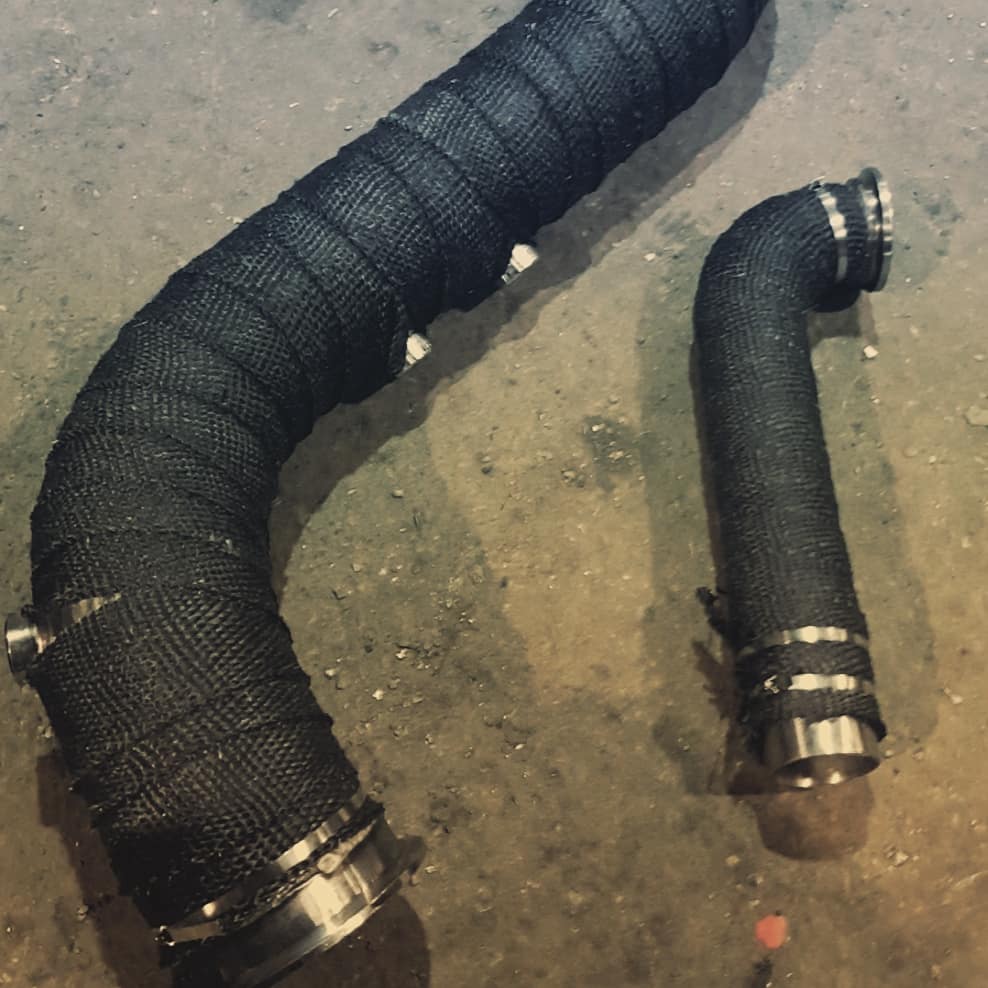
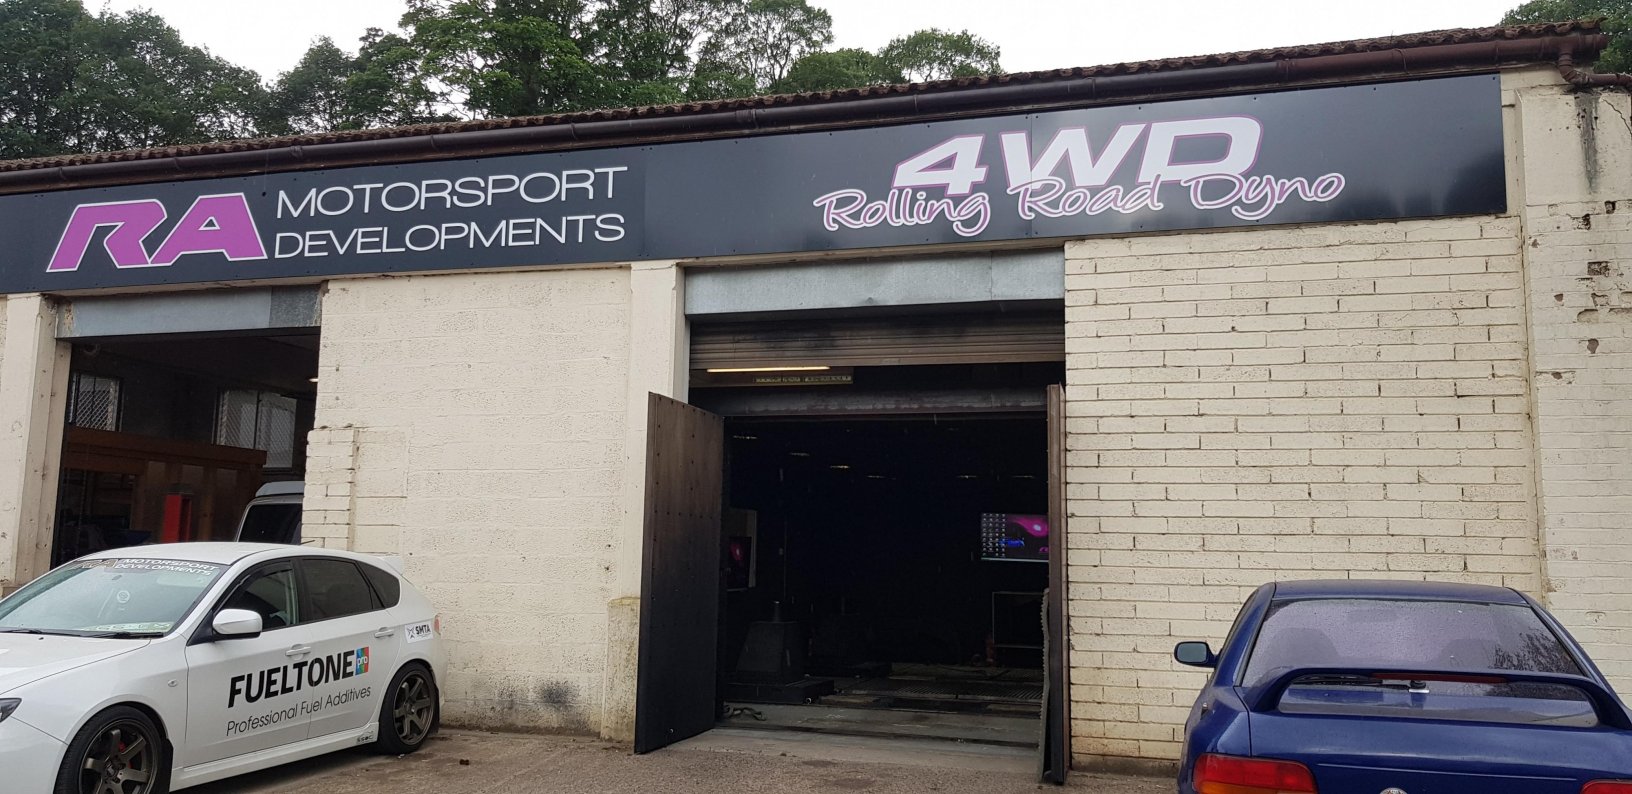
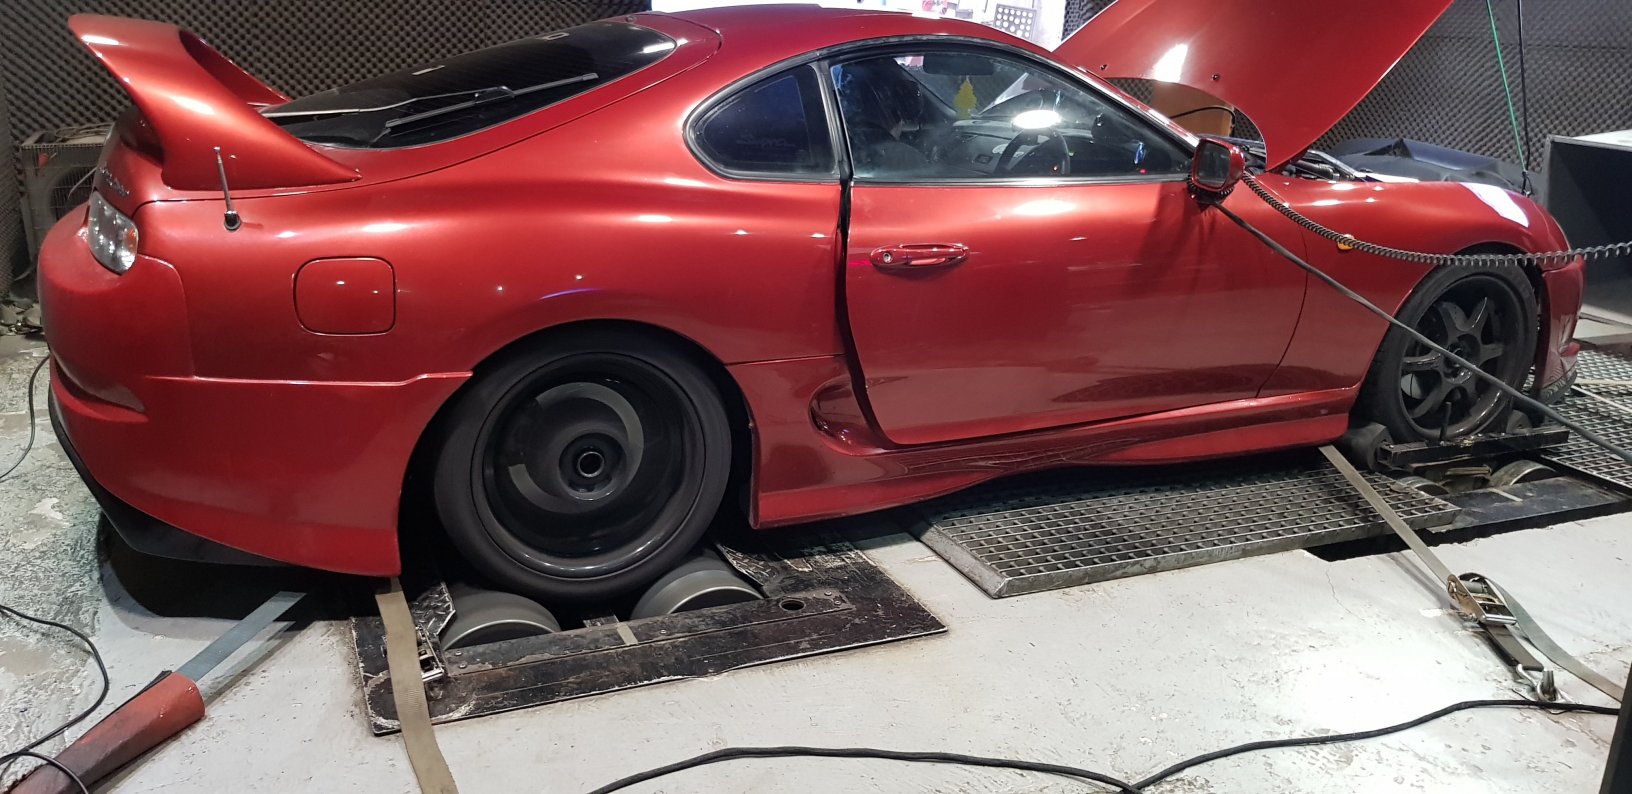
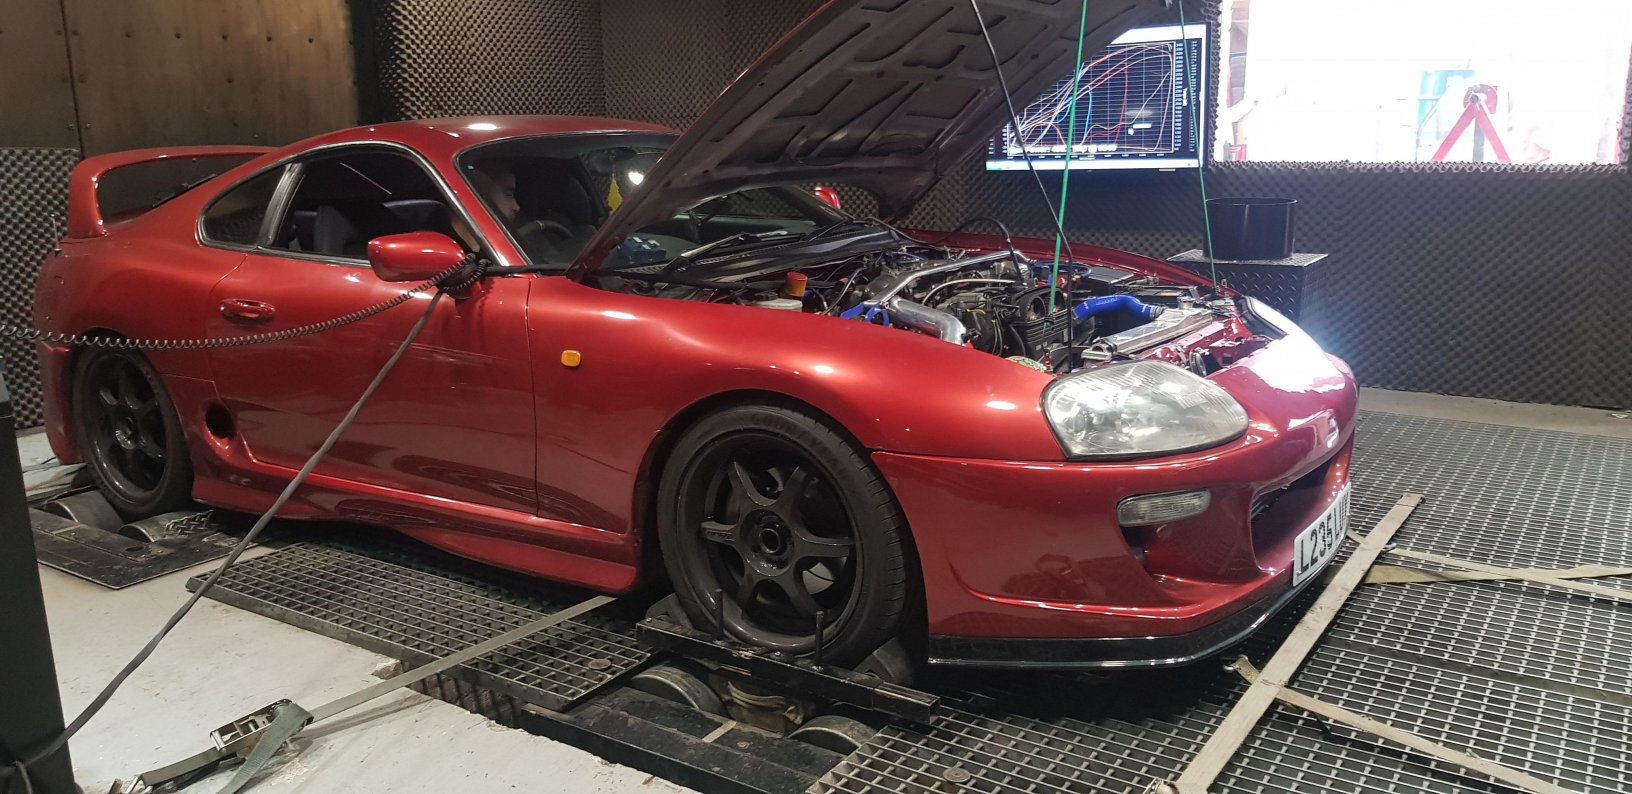
Ok so i have not updated this in a while. Quite a lot has been done since then. Finally managed to get the car started. Turns out there was issues in the ecu wiring which is all sorted now and properly wired in using a patch harness i got from a usa company called wiring specialties. Done properly this time by soldering which i got my dad to help with Then once the car was running, I had more issues to deal with. - Overheating like mad due to air being in the cooling system. Literally had to bleed it 4-5 times. - The tial Wastegate was also overboosting like mad so ended up getting a genuine turbosmart 45mm hypergate from whifbitz again and no more overboosting. However, I still get a small boost creep upto 8.4 psi with a 7psi spring. I think this may be due to the xs power manifold design. - heat wrapped the downpipe and screamer pipe too Also fitted a oil cooler due to the oil temp getting a bit high at times which resolved those issues. Anyway, last friday, finally got the car mapped at RA Motorsport up in Perth and couldnt be more happy with the job Russ did with it. Problem i got on the dyno day was stock 330s got maxed out after 6k so had to rev limit the car until i can get bigger injectors and do other supporting mods too. However, I now need to get on with fixing the Rear Main Seal which has been leaking for a while before i can properly drive the car about. I know i really should have done that when the engine was out but that was my mistake. Anyway, will update this post as i go along. Car runs and pulls very well now though. Will also update with a youtube link to the dyno run soon. Follow me on insta @sunny2jz if you like as I post most of the stuff there usually first.


-
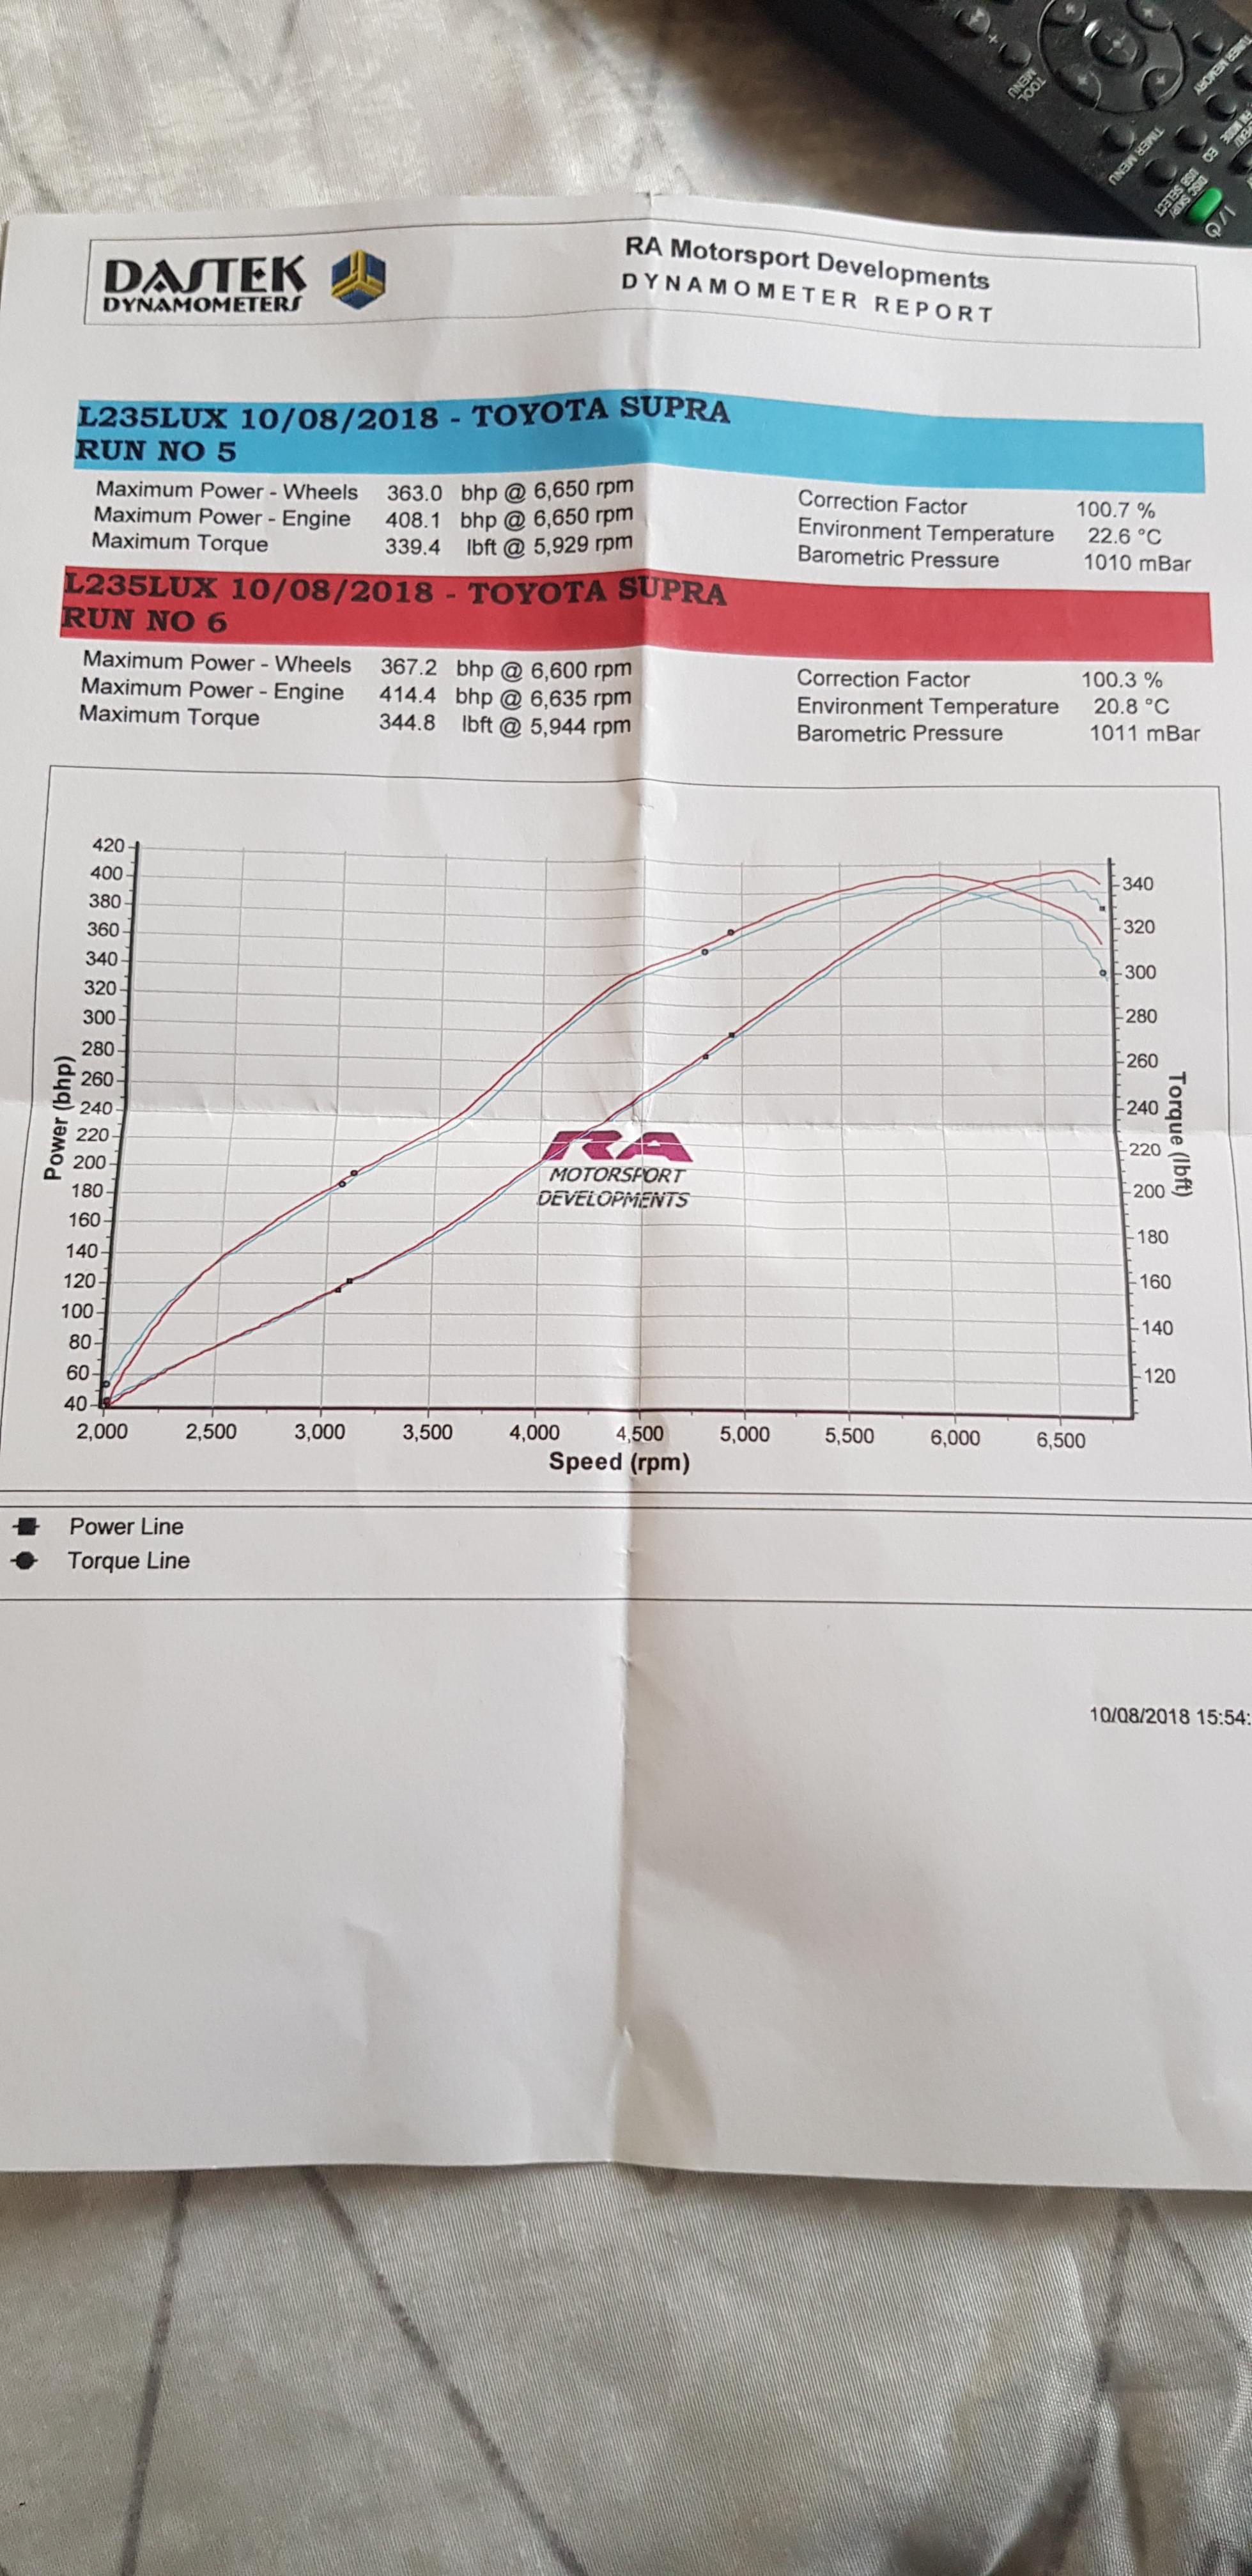
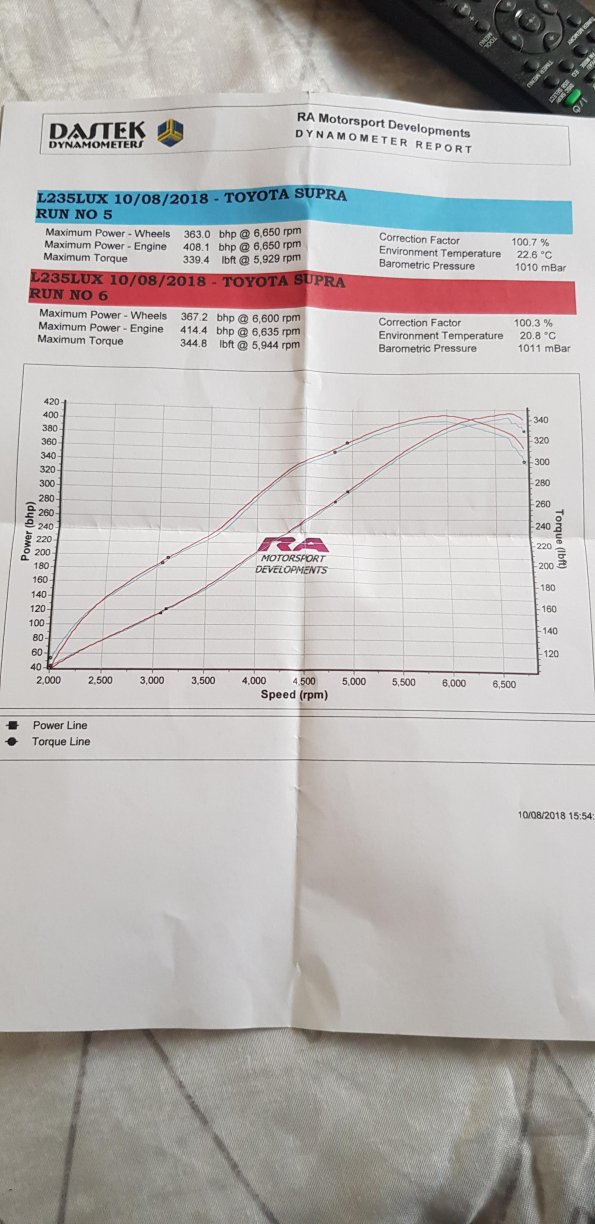
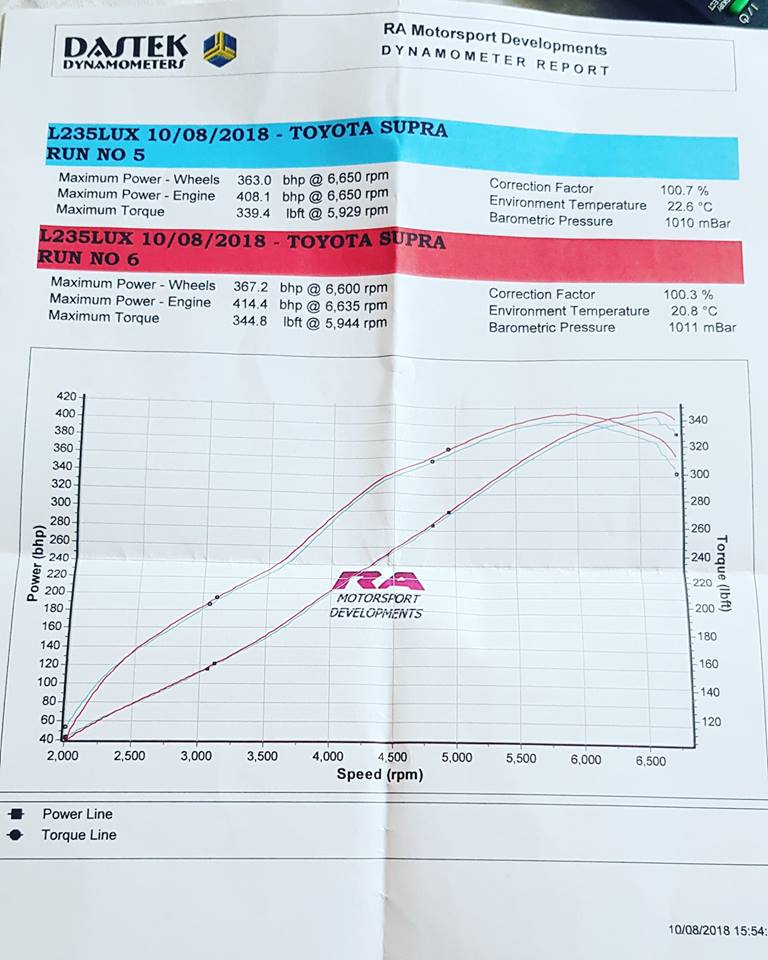
Made 367whp and 344 lb/ft. But maxed out injectors after 6k so had to rev limit it till i get bigger injectors. Its running stock 330s currently. Attached my dyno sheet below Out of the two runs from the dyno sheet, the car is using the map from run 5 which made 363 whp and 339 lb/ft
-
yea, i just had the car mapped by Russ at RA last friday. Very knowledgeable and friendly guy and made decent numbers too for a NA-T.
-
From (hub pcd) and to (wheel pcd) should be the same (5x114.3) unless you're trying to put wheels with a different pcd on. - Centre bore is 60.1mm - stud or bolts option should be studs as the supra hub takes studs rather than bolts. - threadpitch is correct what u have M12 x 1.5 as far as i am aware pretty much the same for the wheels side of things too.
-
defos need to make it happen this summer, weather seems to be good for it too plus would be nice to meet other owners as i dont know any in glasgow :/
-
seems like this is dead. Just wanting to see if members is Glasgow still get together now and then??
-
not really sure, i read somewhere that apparently you have to cut and splice a couple wires if using the auto loom. Correct me if i am wrong but I think the neutral safety switch wire is one of them?
-
You need the manual ecu aswell as far as i know. No.81
-
Does this apply to scotland aswell? I've been told different from various garages around here in Glasgow.
-
Hi guys, I am looking for a Emanage Ultimate plug and play harness for my '94 JDM 2jz-ge manual ecu to complete my na-t build. If anyone has one or knows of somewhere I can get it from, please let me know. Thanks
-
Little update. Turns out my starter relay really was gone. So i jumped the relay terminals and car started to crank but wouldnt turn on as if there was no fuel going to it or something. Couldnt hear fuel pump coming on either. Jumped the +b and fp terminals on the diagnosis box too and still no fuel pump. Is that pretty much telling me the fuel pump is gone? Need some advice, help, anything at this point... Attached is a video of me cranking it by jumping the starter relay terminals.http://cloud.tapatalk.com/s/5a8b3c1625c58/Snapchat-1086435160.mp4
-
So this weekend has been a total failure. Managed to get everything connected and wired ready to turn key but whenever i go to start the car, it wont even crank...nothing. so spent whole weekend trying ti find out what the issue is and came to the conclusion of some sort that the 12V connector going to the startee is not getting an any signal whatsoever. The starter itself is fine as i tested it by putting a wire in the 12V connector of the starter itself and connecting to the battery and suddenly it started cranking. Checked all the grounds, fuses, relays etc and all checked out ok. All the interior lights, guages etc work fine and the emanage also powers up fine on ignition but nothing happens on START. I cant for the life of me figure out why that little 12V connector going to the starter is not getting any signal when i go to start the car. Anyone have any ideas? Also the ecu ignition wire that i had to cut to put the emanage wires in is not getting any power either, on ignition or on START position. Does the car have to be on for that wire to get signal coming through?
-
Ok, thanks will do that then
-
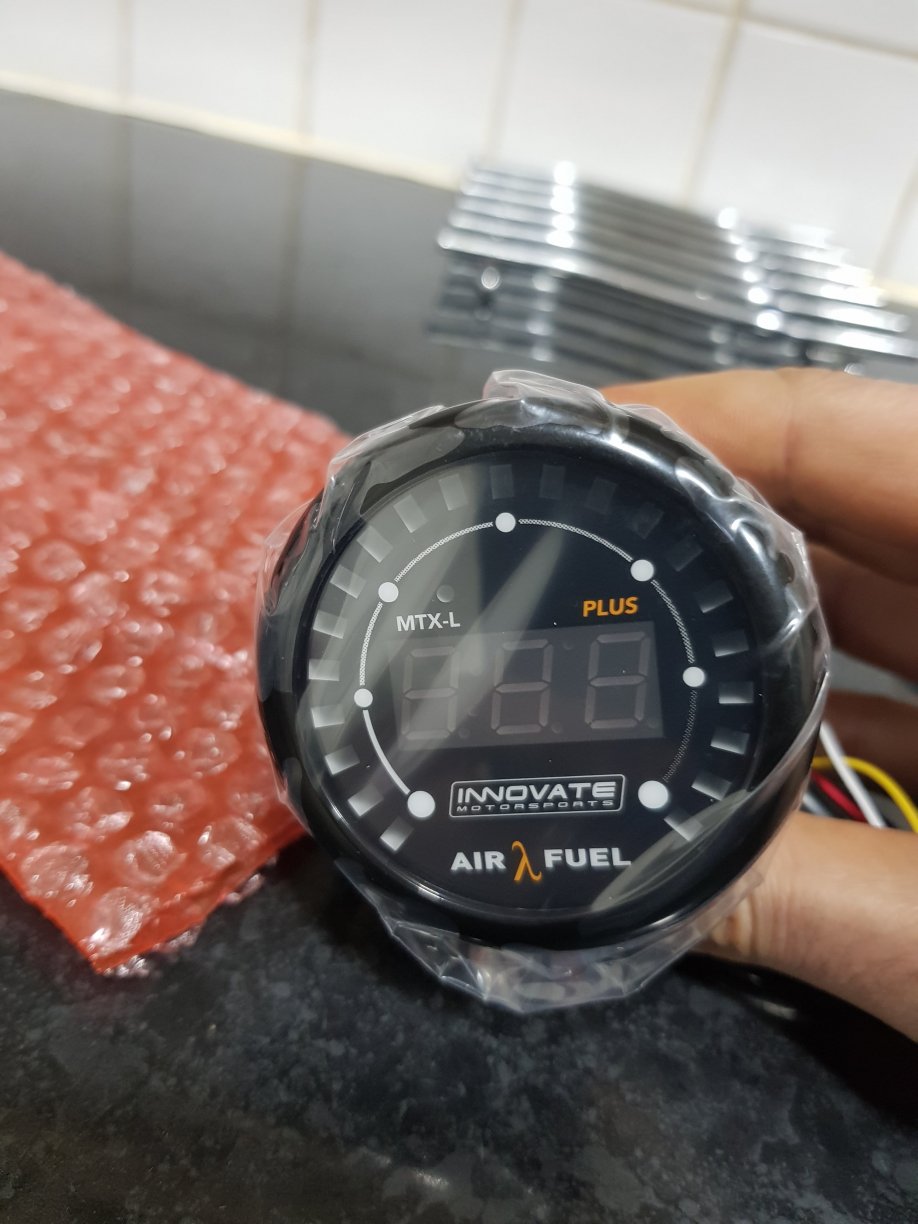
Hi, yea I have an A/F port harness that I am going to connect the innvoate to the emanage but there are two output wires on the guage that are programmable to provide output from 0-5v, so according to the manual it says that one can be used to provide input for stock o2 (stock ecu) and one can be used to provide input for the wideband (emanage). But i think maybe i might just get a universal single wire o2 sensor and splice it into the stock o2 leads rather then going this way i guess as it seems easier :/
-
Ok so got quite a bit done this weekend but didnt take any pictures. Will take some later when i get a chance. Things done - - finished intercooler mounting and piping, - downpipe, screamer and wastegate mounted, - 3 bar map sensor mounted and T'ed in - boost, oil press, oil temp, afr lines ran into cabin - Wired ECU Now, I really need help in getting a definite answer to this part if someone can help. So i have an Innovate MTX-L sensor and guage. The guage has an analog signal cable that can provide by stock ecu with analog signal so i can get rid of the stock O2 sensors. My stock O2 sensors are single wire ones if that helps. Anyway, I located the pins on the stock ECU - E9-48 and E9-47 - these feed to the stock O2 sensors. Now the bit I need help with is this - Do i cut both wires on stock ecu side and join them both to the analog cable of the Innovate Guage? Or do only need to cut one of the two? If i need to only cut one, can someone please please tell me or even guide me in the right direction as to which one to cut? Help would be very much appreciated as I did search on this forum and other and there are mixed answers - some say cut both, some say cut only one etc etc. Thanks in advance for any help.
-
Thanks . They definetly look the part especially on a supra
-
Not much done this week other than the intercooler mounted and the piping done. Afr guage and sendor arrived today. Planning on running single wideband with the analog output from the innovate guage for the stock o2 sensor. Anyone done this before? If so what ecu pins do you splice the analog into? I cant find the 2 o2 sensor pins on the repair manuals table.
-
Ah ok. Thank you. Will just point it down towards the ground then and leave it. Thanks again for that.
-
Anybody able to tell me where the hose highlighted connects to please? I dont remember disconnecting anything there and its the only one left now in the engine bay. Its coming from the firewall so not sure exactly where it goes. Is it something to do with the ac lines? as i have deleted those now. Thanks

-
Ah ok great. Will put the wastegate on soon aswell now then
-
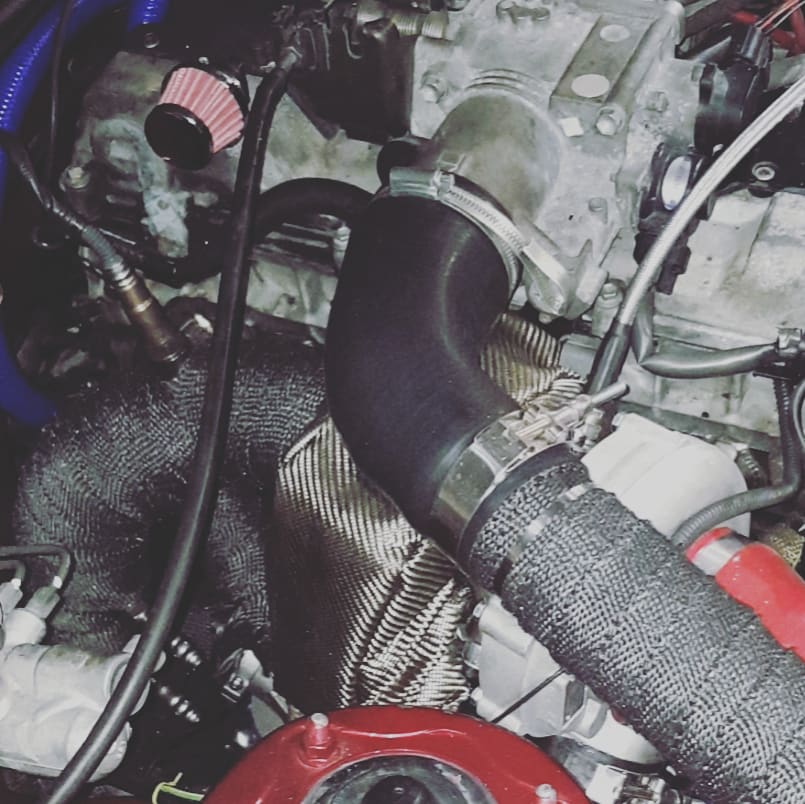
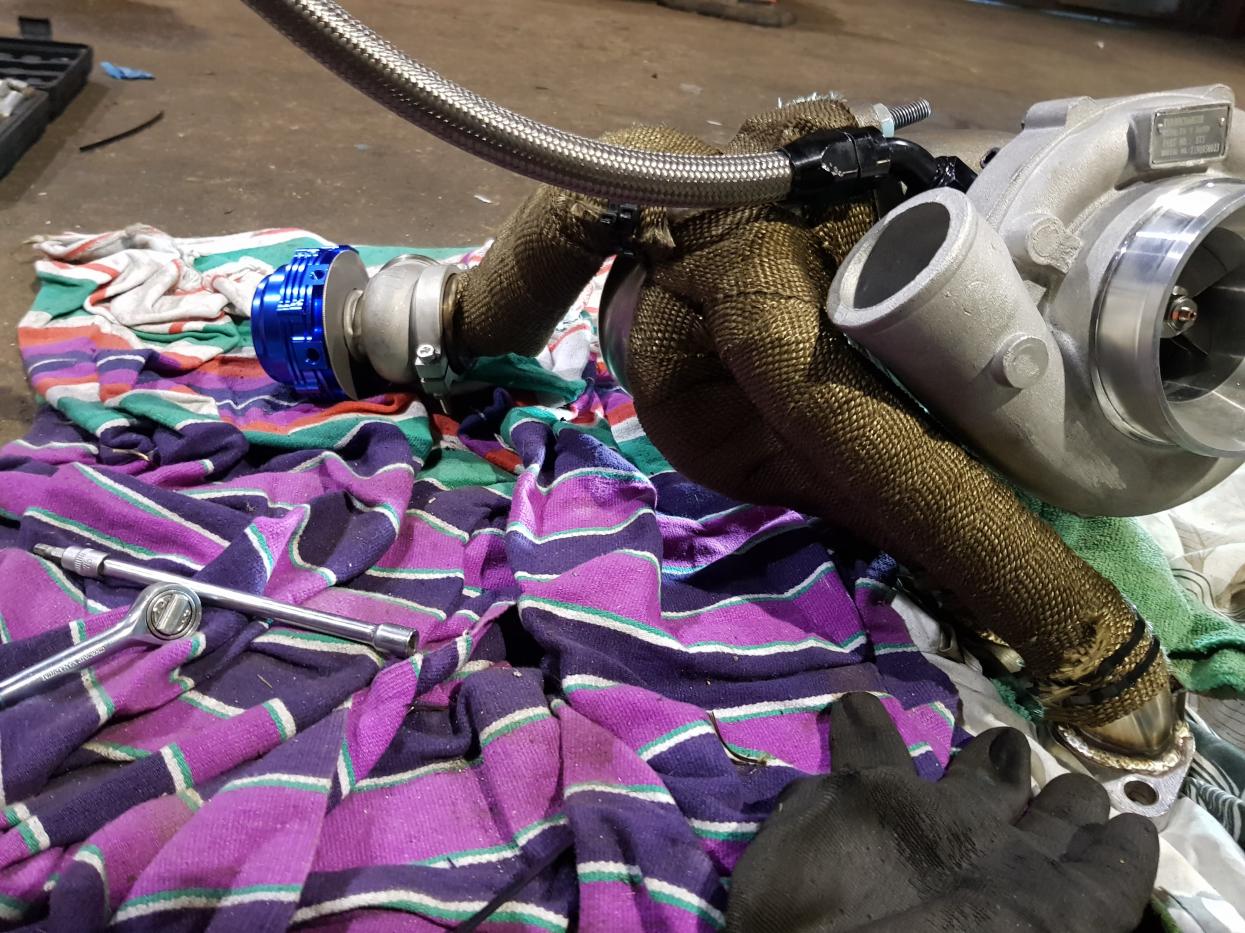
So got quite a lot done during the weekend. Got the manifold heatwrapped and turbo, manifold and oil drain final mounted to the engine, changed the wastegate spring to 7psi. and started to make mounts for the intercooler to go on. Finally looking like a car again Had one question tho if anyone can help. The watercooled lines on the wastegate, I wont be using them so can I just leave them open like that or do they need to be plugged?
-
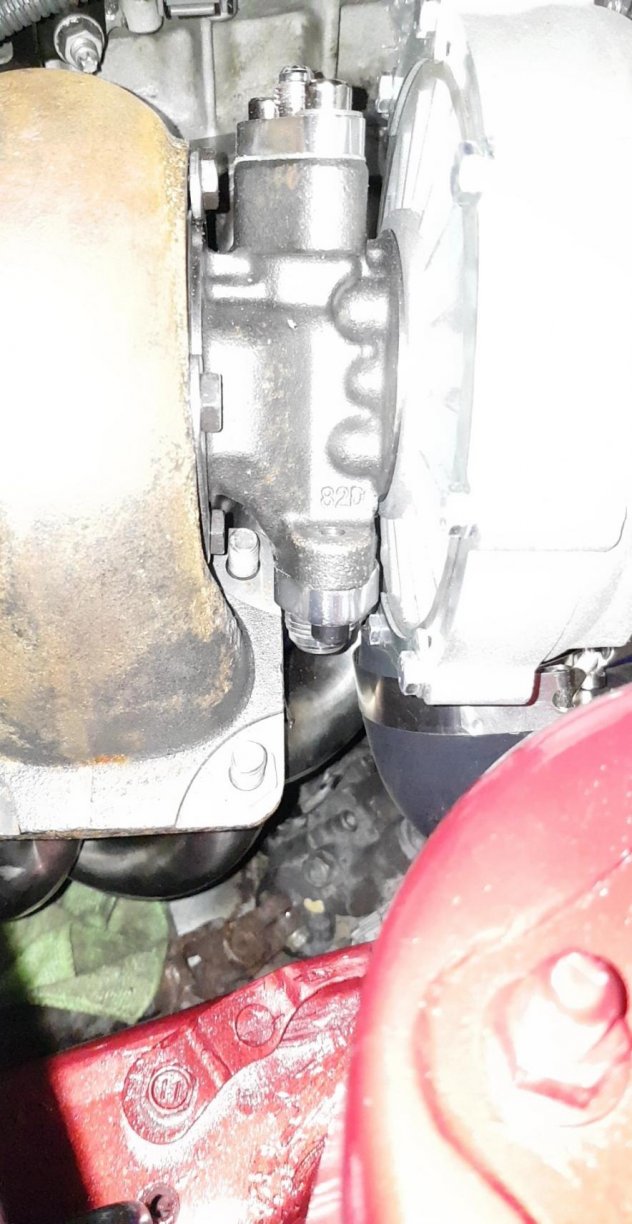
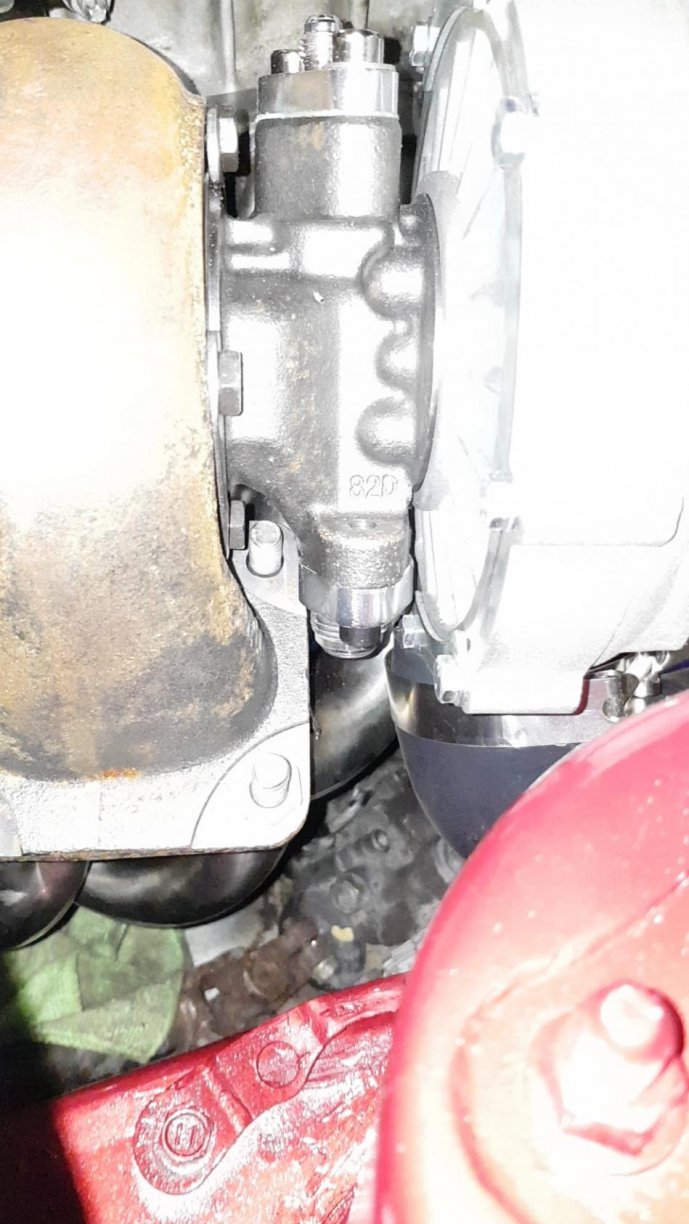
So need some advice. If you look at the attached pics, my oil drain flange on the turbo is very close to the turbo hotside flange connected to the manifold but it clears, however, when i put the an fitting onto the flange, the fitting touches the t4 flange of the hotside of turbo. Has anyone else had this problem? If so, how did you manage to ger around it? I saw garage whifbitz have a drain flange that is extended but before i buy that, wanted to know if there is an alternative to fix it without the extended flange. Help would be greatly appreciated )
-
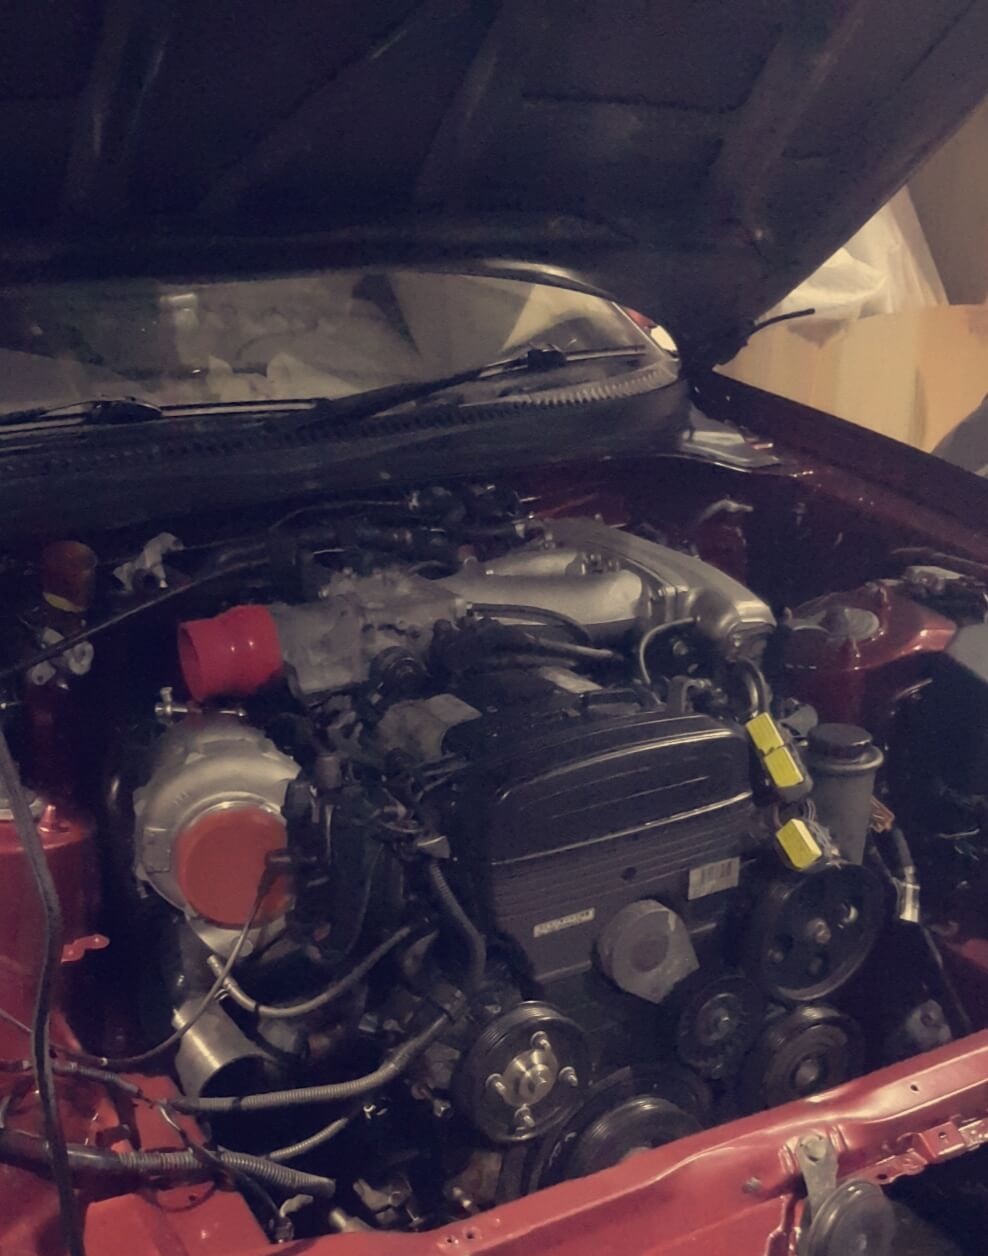
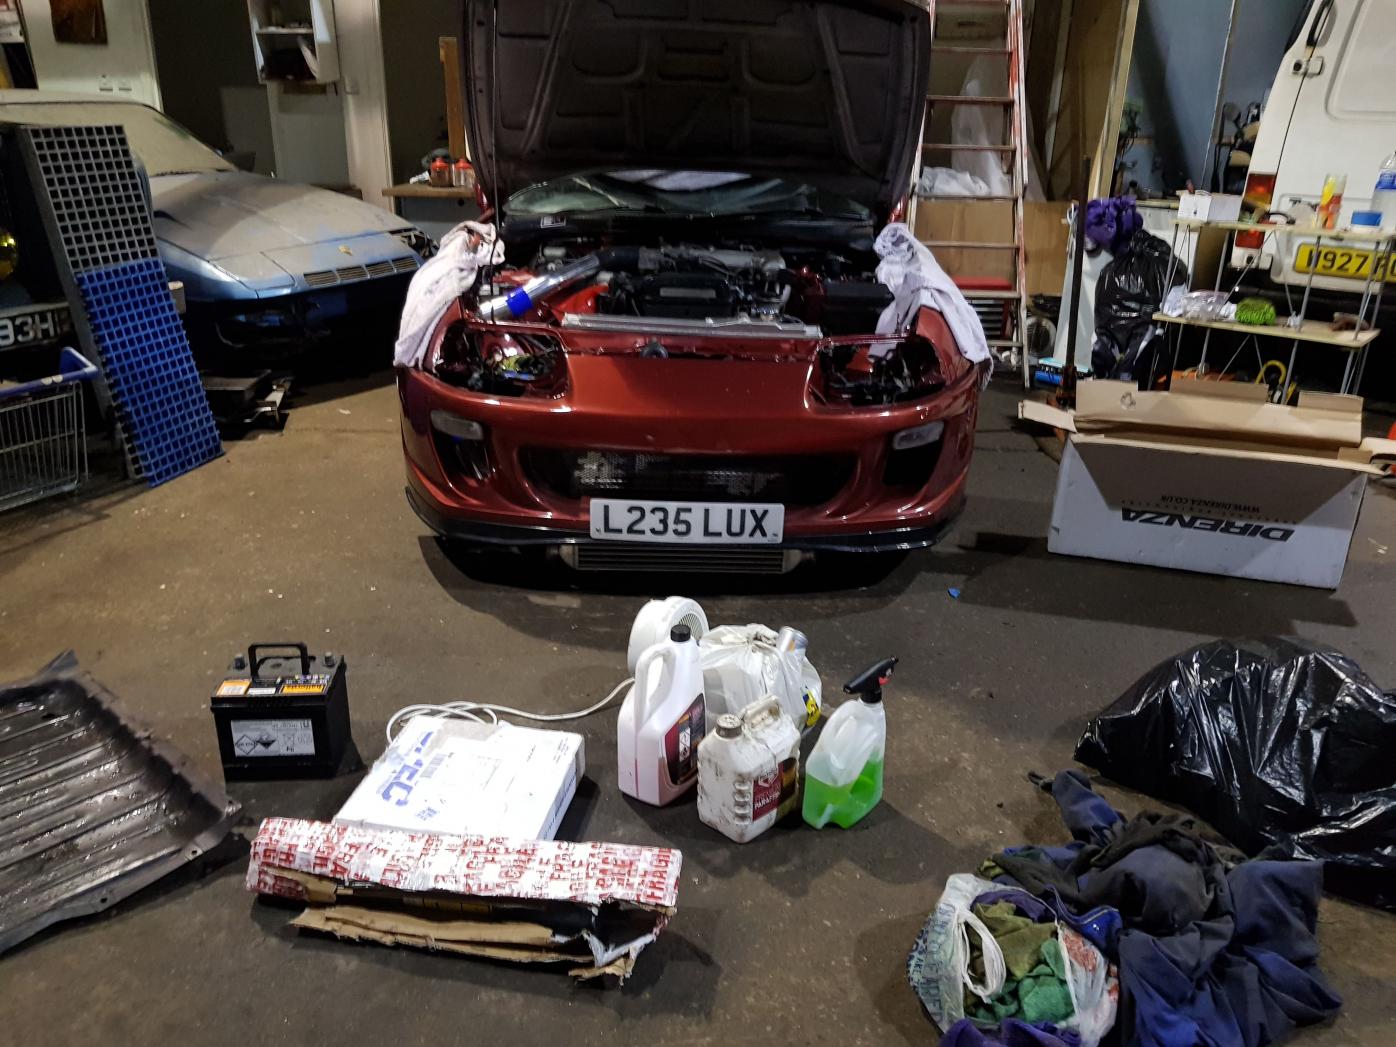
- Got the engine in after what seems like a century as the passenger engine mount just refused to go in the right spot but thankfully got the engine in without a scratch on the fresh paint - Test fitting some of the stuff and found the oil drain flange i had has a gap in between the sump and the flange itself so had to buy a different one. Dont have pictures but most of the wire and connectors are now connected, driveshaft is back on, also deleted ac comp and lines, power steering lines are back on, pretty much just the turbo stuff left to do now and the ecu wiring. The xspower downpipe actually clear the rack and bulkhead pretty well also as i read that people have clearance issues. The turbo however is not clearing the dizzy that well so will need to look at that at some point. Now just waiting on some other parts arriving before starting up work again. - what the engine bay looks like right now Planning to do intercooler piping this weekend so probably will post more updates/pics then