
mharvey
-
Posts
358 -
Joined
-
Days Won
8
Content Type
Profiles
Forums
Store
Blogs
Events
Downloads
Supra Articles
Gallery
Everything posted by mharvey
-
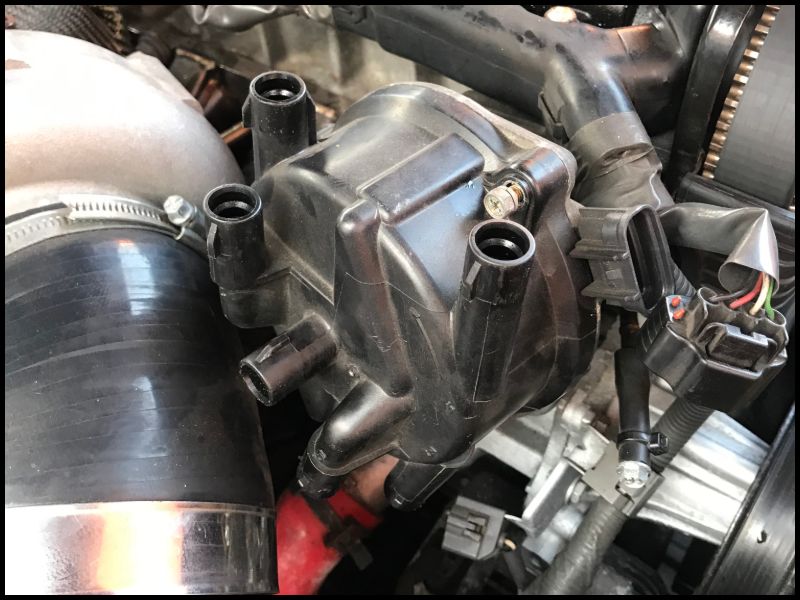
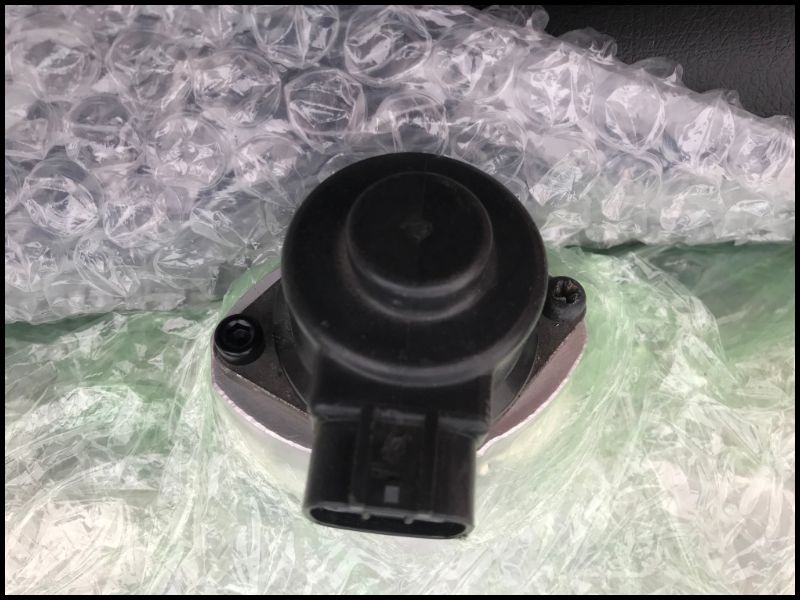
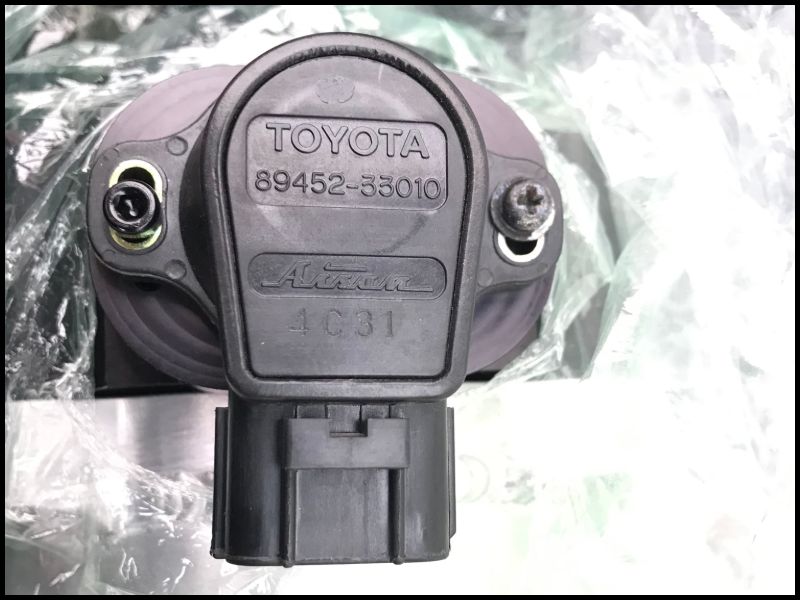
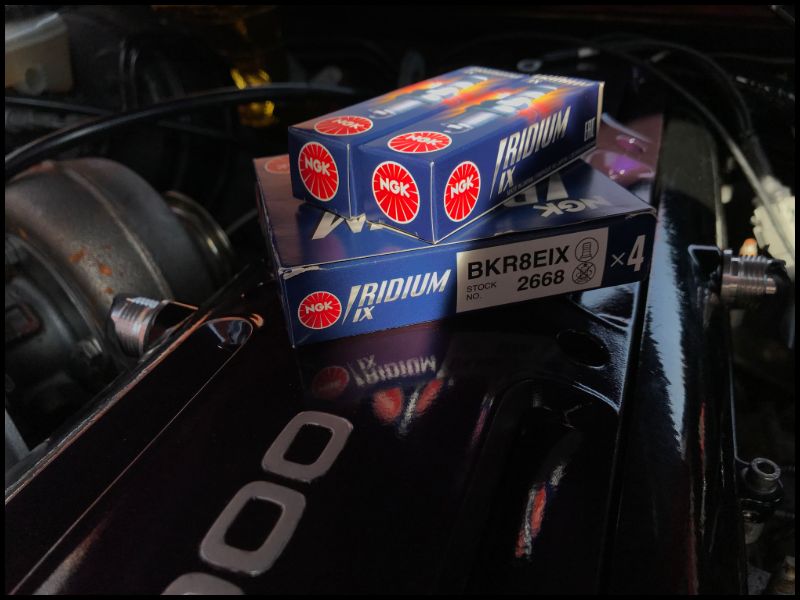
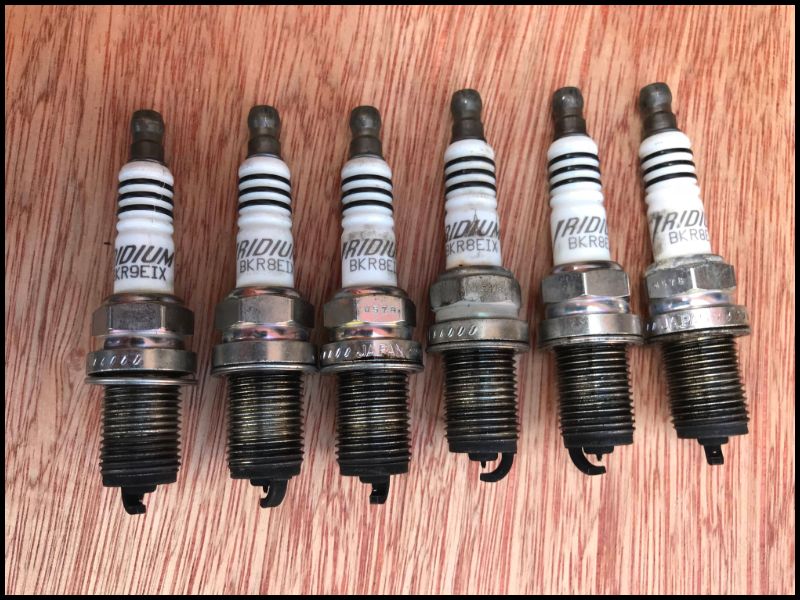
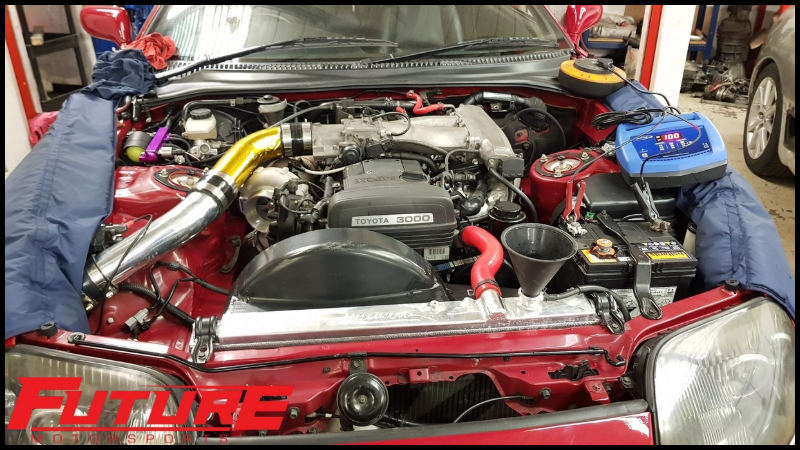
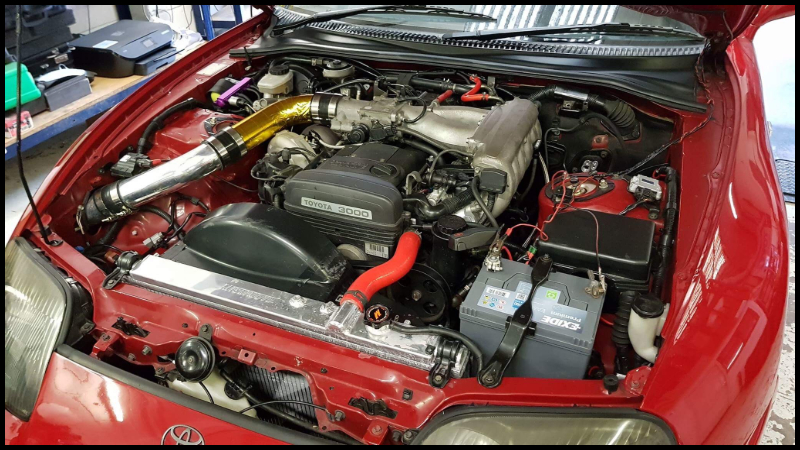
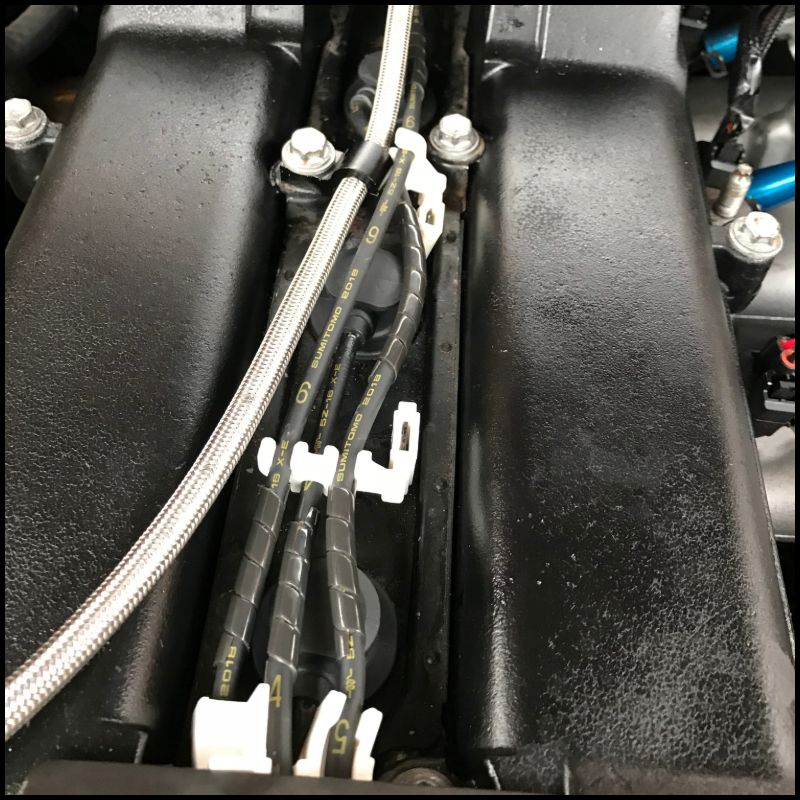
Part 26 - Take it back apart again The next thing is to take it all apart again, below is the last photo of it all working in its current state. Hopefully not only will it work considerably better but it should look a bit better too. Can't wait to get rid of this, the distributor is just as cumbersome as it looks and is definitely a limiting factor. So with new coils going in I may as well drop some new plugs in for the sake of a few quid. I went with BKR8EIX's as the iridium ones seemed to serve me well previously. With the old inlet removed I was able to fit the new Denso coils along with their mounting plate Following this I test fitted the inlet to see what needed moving, changing etc. It was apparent that at the least the PS res needed moving as expected and I'd need to do a lot of work on the wiring loom. (Old turbo etc still fitted) The GE inlet had a coolant feed which would be surplus to requirements with the new inlet and throttle. This meant I could delete this from the water neck on the inlet side and the heater tube on the exhaust side. I stupidly considered (albeit briefly) sticking a bolt in the end with some sealant haha. Luckily I saw sense and got them both welded up, not the prettiest job but functional and will be well hidden I'm trying to make sure that I improve anything that comes up during this strip down. As a result, when taking the IACV and TPS off of my original inlet I noticed that the screw heads were somewhat rounded. I replaced these with some much better bolts acquired from pro-bolt. They look nicer and I shouldn't have to worry about rounding them
.jpg.082aa236c258f87deb478eb84919788c.jpg)
-
Not an update - Just some reflection So the other day I received an email from a fellow forum member who helped me hugely in my search for a suitable car way back in 2014. He forwarded on an email from the seller which contained a load of photo's that I haven't seen since. It was quite motivating to see to see how far it had come since then. It was also somewhat depressing to think that this was before sinking a huge amount of money in to the car and...it just worked haha This was the car when I turned up. Part of the deal struck meant that the wheels you see on it here were removed and the ones featured on pg1 were fitted (I paid less for the car and I much preferred the other option) With this little trip down memory lane I was keen to see what more I could uncover. I looked through old paperwork yesterday and managed to locate the first UK owner after import. I knew he was from Northern Ireland and took a chance and looked on old facebook. I found a few people with matching names but when one had pictures of a Mitsubishi Evo based race car it was a safe bet this was the guy. (Turns out he races them competitively, cool guy. Anyway, I dropped him a message and to my surprise he made contact almost immediately We had a lengthy phone chat and he was really keen to share his tale of ownership and loved hearing about its current state. I'm properly chuffed as it's a period of the car's life I knew nothing about and being only 6 years old when he imported it, found it rather fascinating.
-
Thanks mate Majority of it is sold I'm afraid mate. After anything specific? Appreciate the kind words. Couple updates at once but I'm trying to catch up. Had a lot of issues to fix too Oh it's nice stuff, very pleased with the package...may have some more bits for the next update soon
-
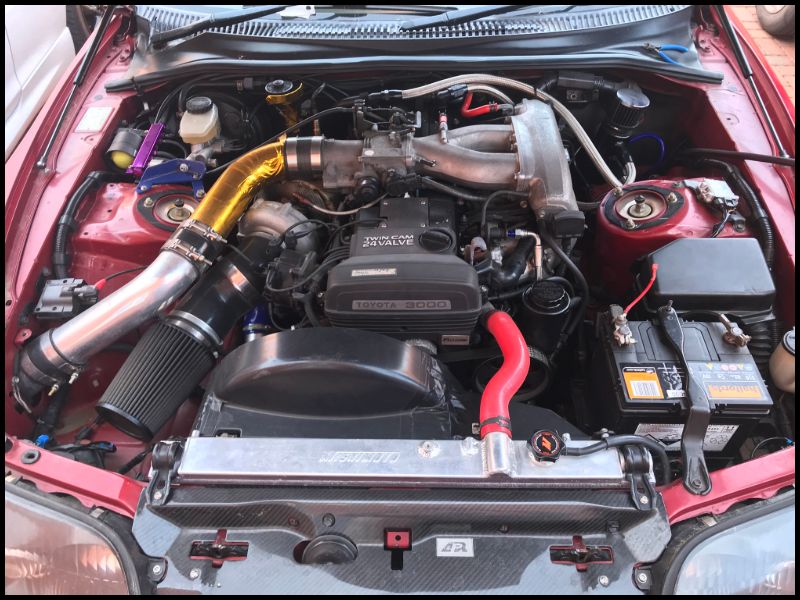
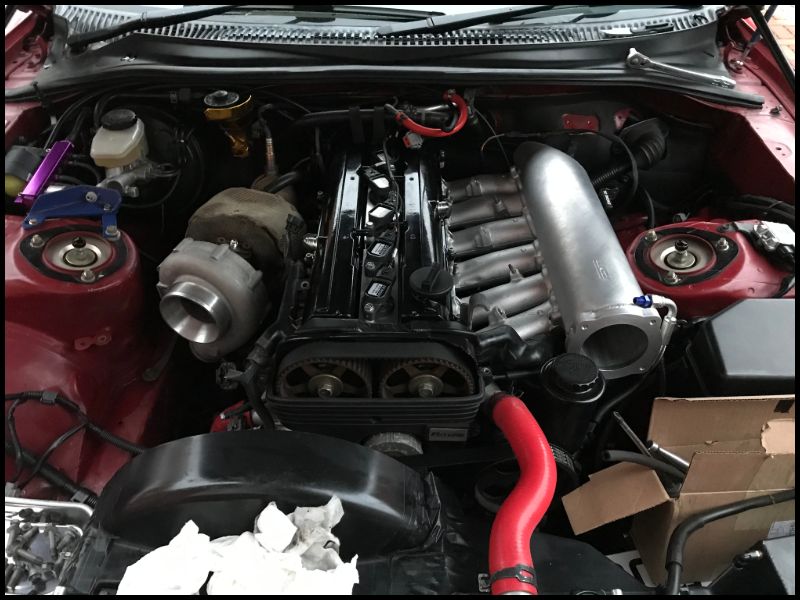
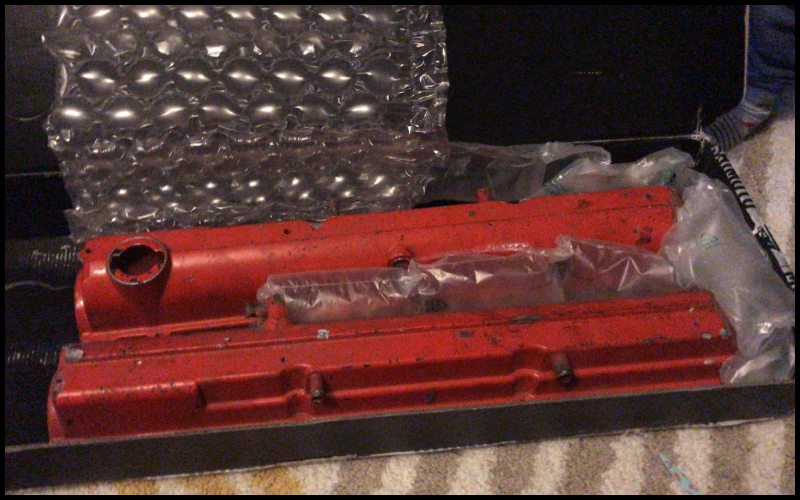
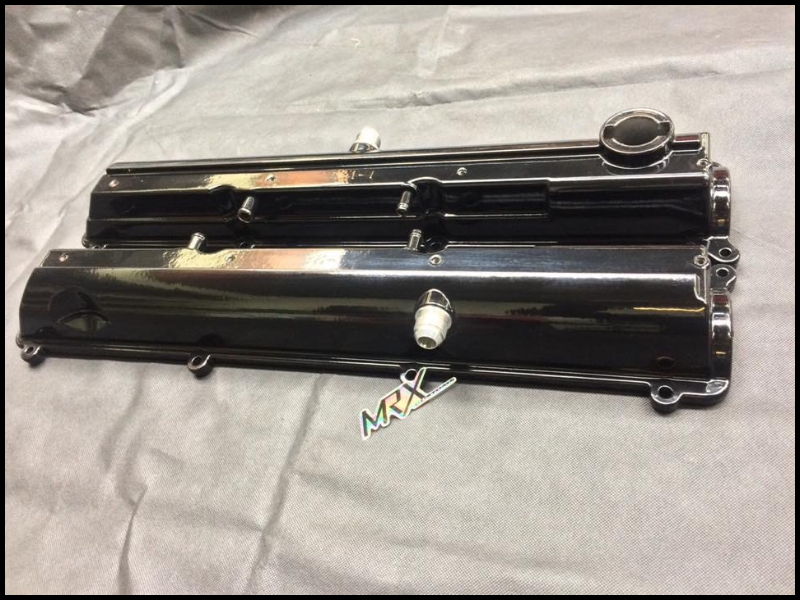
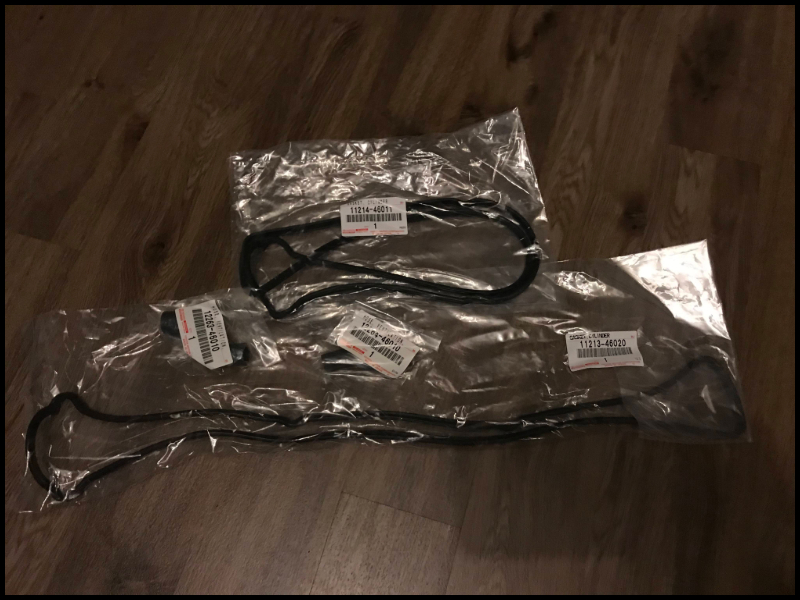
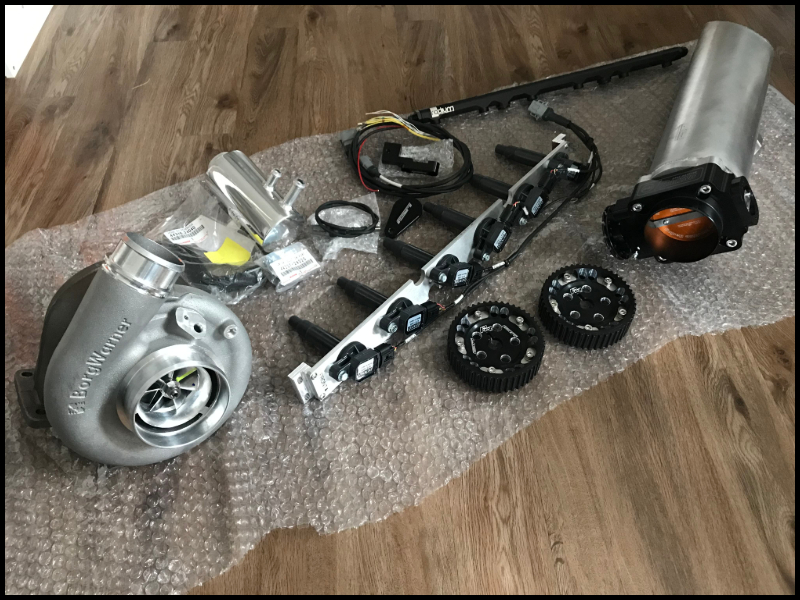
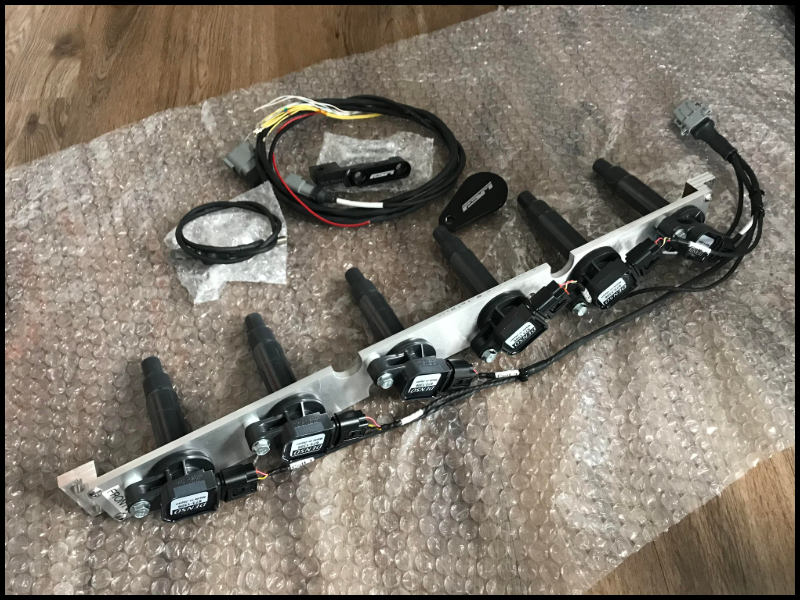
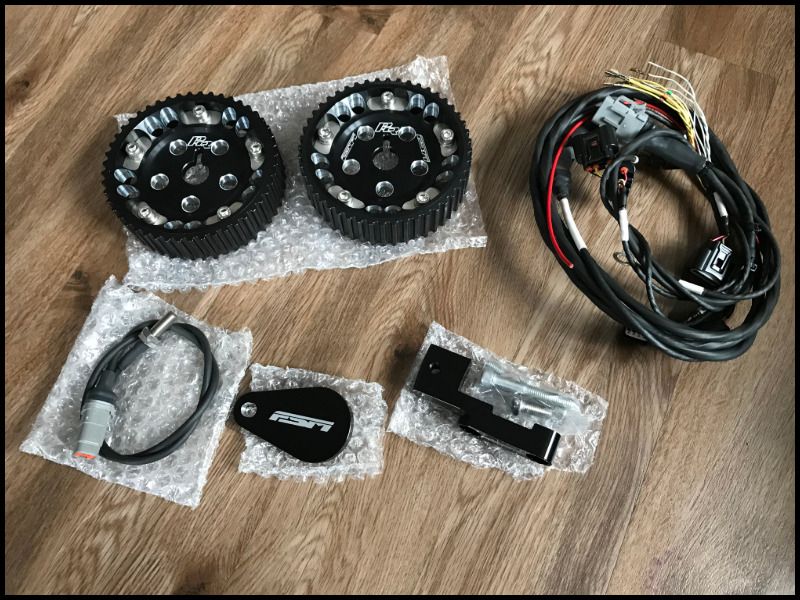
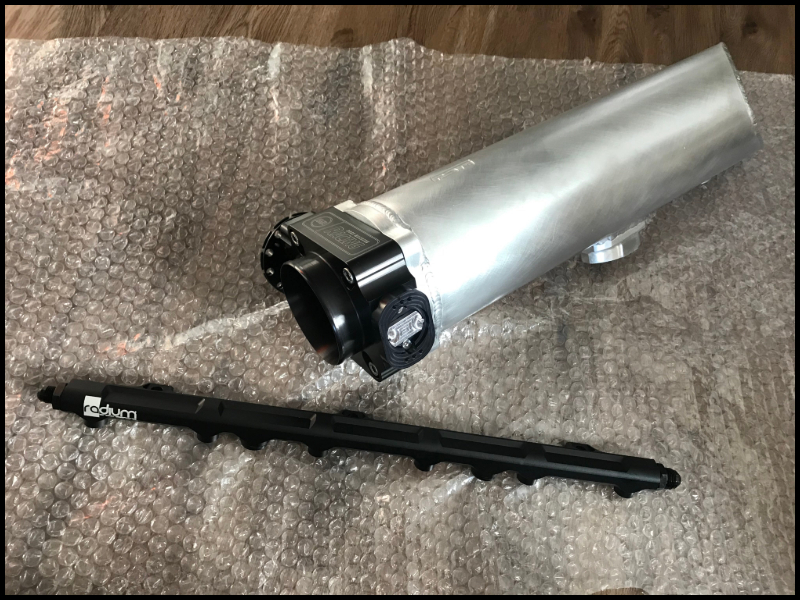
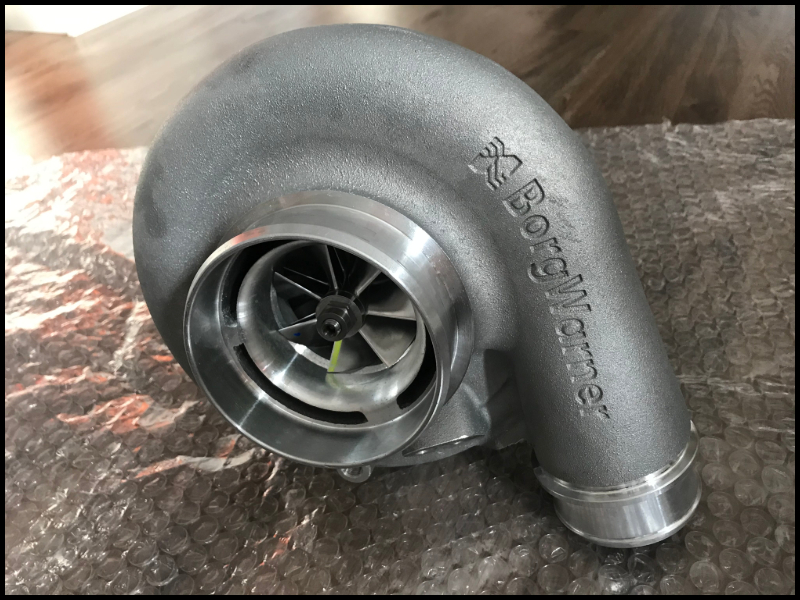
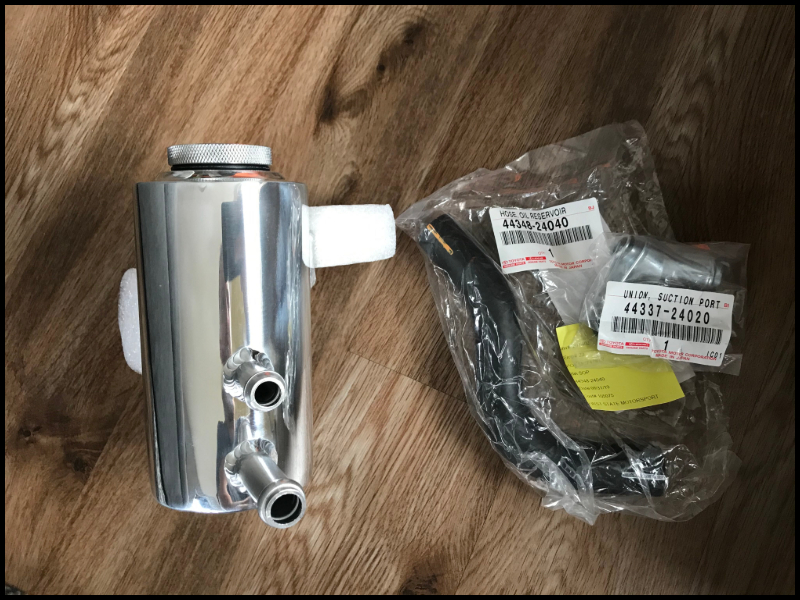
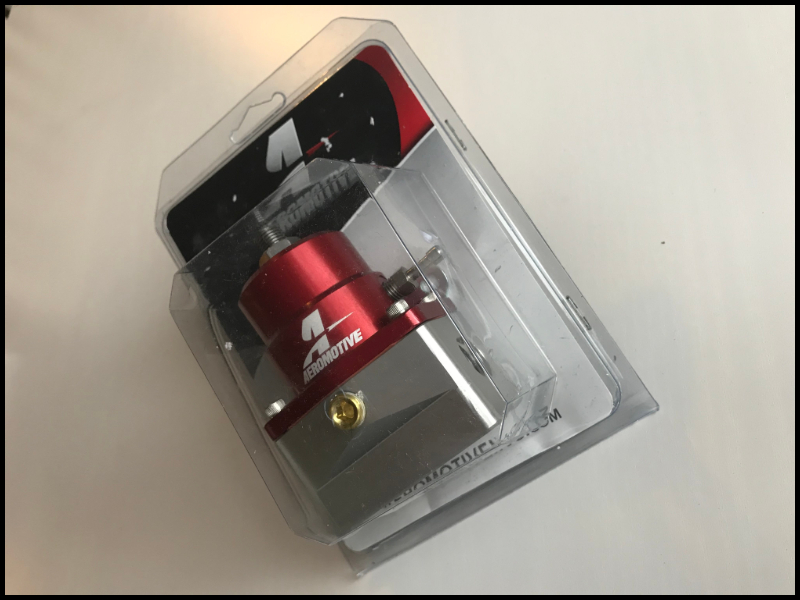
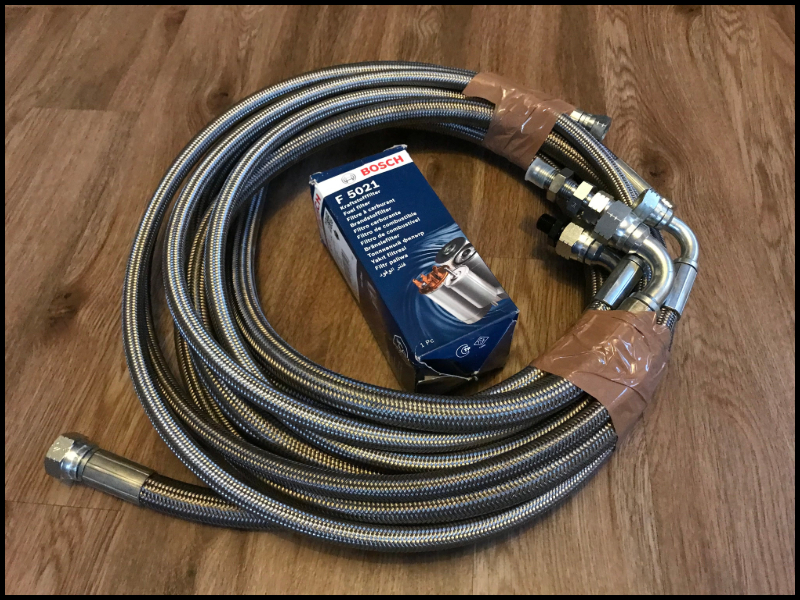
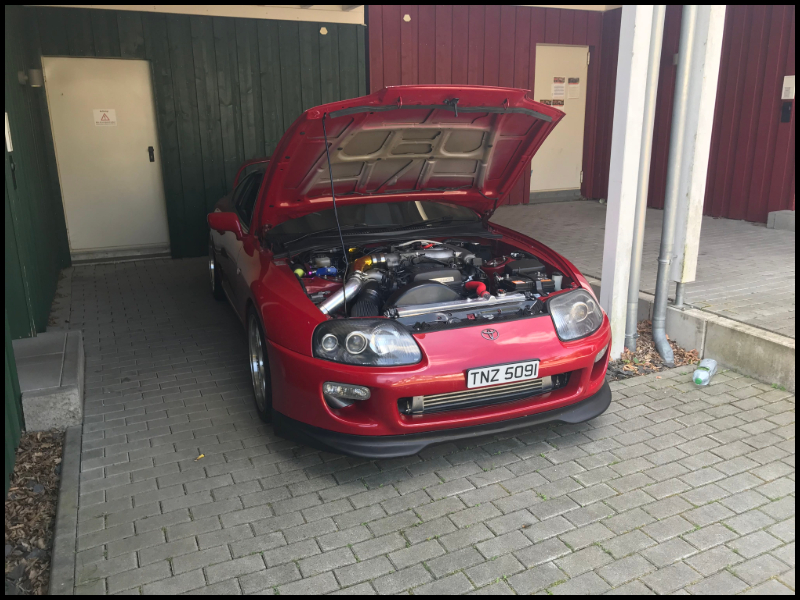
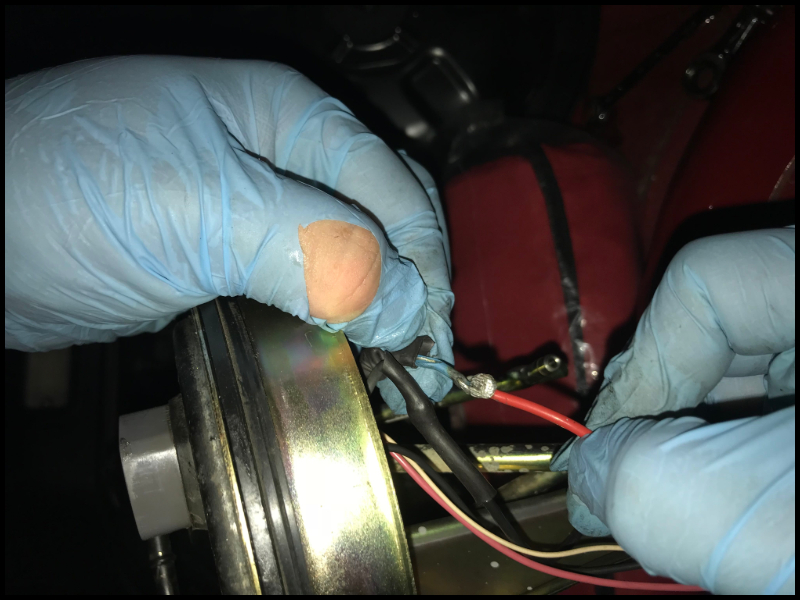
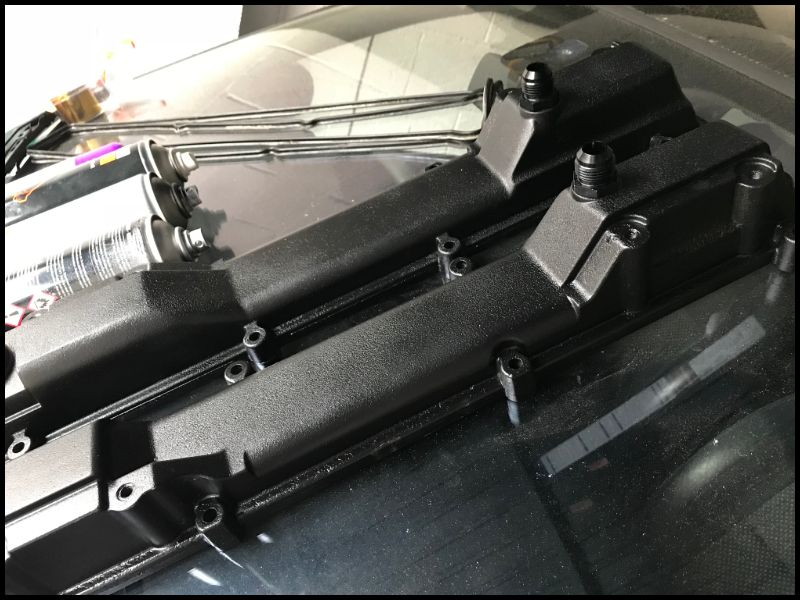
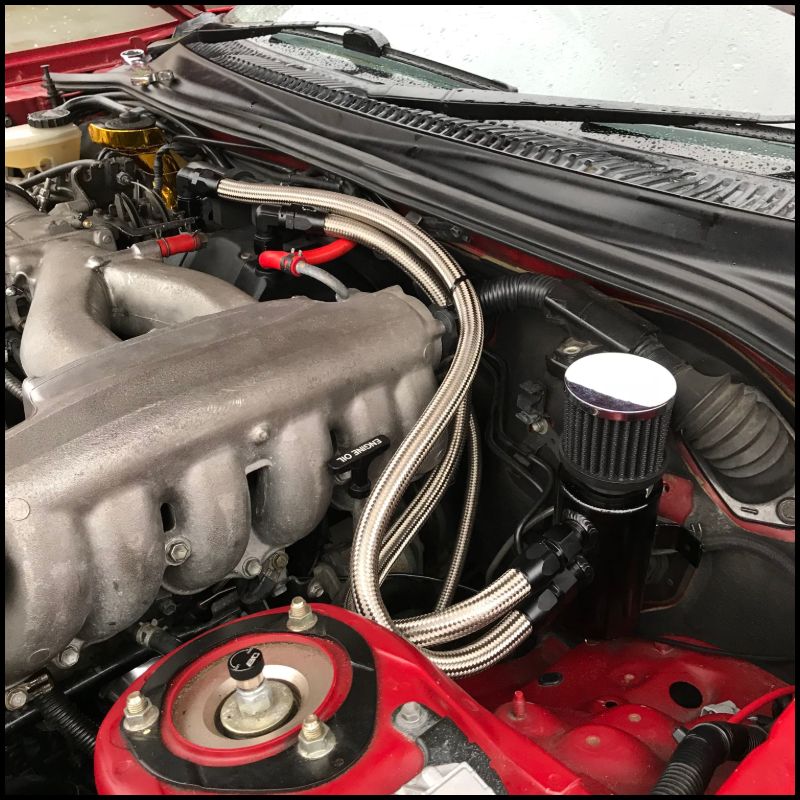
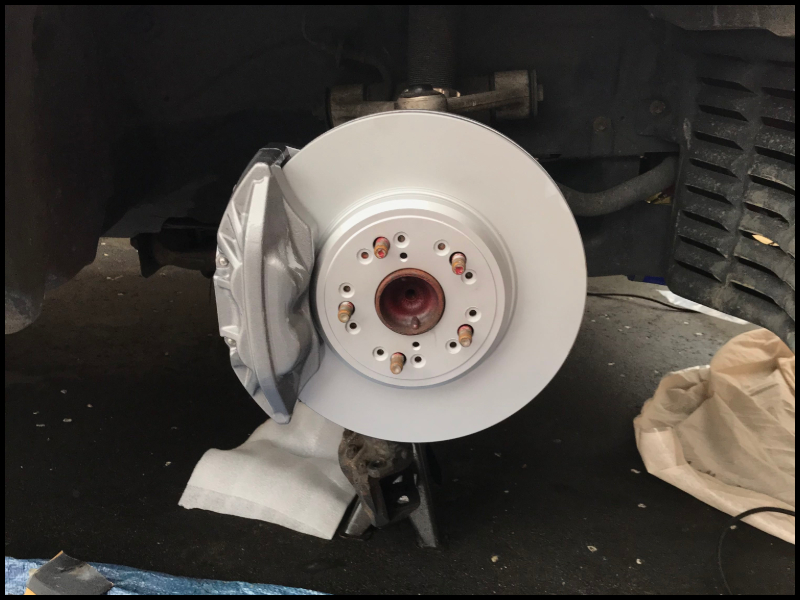
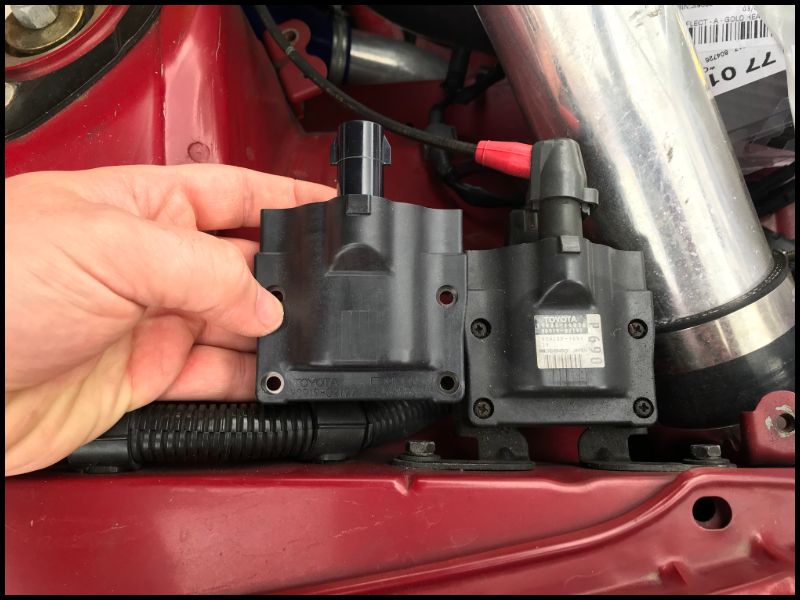
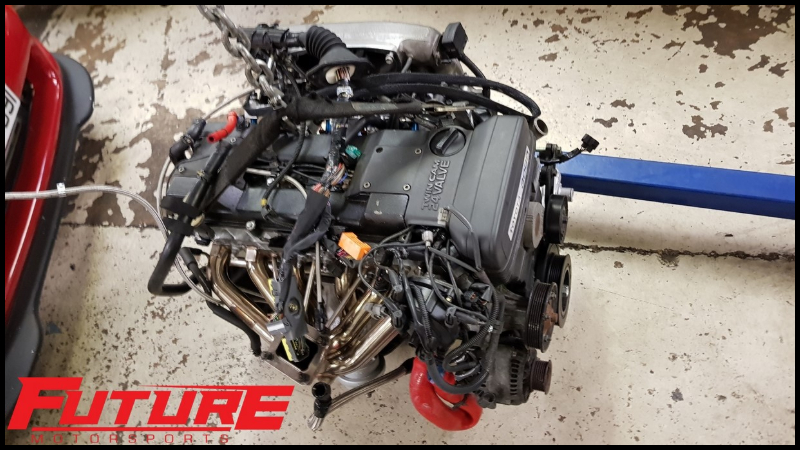
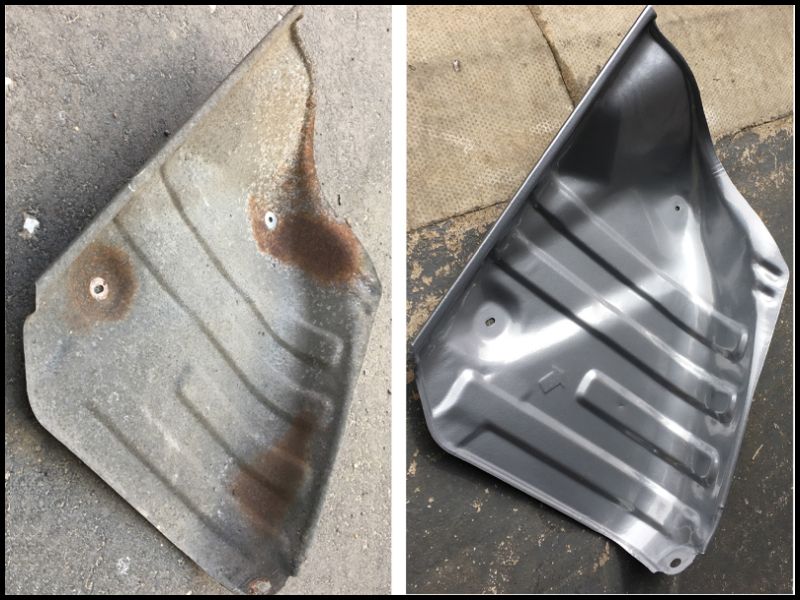
Part 25 - Time to level up Most of the last posts are well over a year old now and in the past year or so I have worked my ass off paying off debts, working up to 90hrs a week and now that I'm on top of things, well I decided it's time to treat myself. This of course, meant treating the Supra. I've made a few decisions of late which ultimately should take my car to another level and really move this NA-T thing on. So with a forged engine, fresh R154 gearbox and a few other supporting mods it was time for some upgrades. The first involved contacting Lee@SRD Tuning. I want stuff done properly now and it seems he's the guy to go to. Having spoken about my goals (thanks Lee), i was decided that my AEM v2 was no longer suitable and Lee recommeneded I go for a Link G4+ instead. He's supplied the ecu along with a few other bits linke a cover, map sensors etc. Before it goes to him though I decided to change some of the spec to try and get a bit more out of it...I got SERIOUSLY carried away It started with some TT cam covers They were, as you can see, dog rough. I sent them to a guy called MRX customs who I have to say, was fantastic. I got loads of photo's as they progressed but ultimately he blasted them, fitted AN10 fittings and then tapped them for the baffles to be bolted in. Oh and powder coated them to look awesome Obviously grabbed new gaskets and a few bits and bobs too No I hear you crying out, but Matt, you can't possibly fit those under your inlet manifold. So I purchased a new one, it was one of the SSI type pieces. It wasn't a bad piece of kit and seemed fairly well made but there were a few stories about problematic throttle bodies and poor fitment to the head so I decided to sell it on and go a different route. This is where it all went wrong/right. I contacted a guy called Dan at FSM (first state motorsport) and...well, the pictures will tell the rest. My haul from Dan consisted of this lot There was obviously the new inlet manifold which came with an RMR (Ross Machine Racing) throttle body and a Radium Engineering fuel rail Then I took advantage of his full dizzy delete kit which means I can run 6 x 'smart' coils with no need for ignitors or the sort Obviously this also means that the whole distributor goes, it's not even used as a pcikup. Instead, the kit comes with these fancy PHR cam gears and a hall sensor which picks it up instead. I could hardly fit that lot and run my old XS Power T61 turbo as well as it had served me so I went for a Borg Warner S366 SXE. This has the newer billet wheel etc and in T4 0.91 version it should suit my future plans well The stock NA power steering resevoir won't fit so Dan also supplied a polished resevoir and the relevant pipe and fitting Finally I grabbed an FPR, an Aeromotive one which again should suit future plans We're still not quite up to date but we're almost there, now it's fitting time....wish me luck
.jpeg.4d78254622388f9c395394633c76c69f.jpeg)
-
Thanks mate, I'll try and bring it right up to date over the next week or two. Thanks for taking the time to read.
-
Cheers mate. I blocked them so haven't seen that. Funny that they mention the same 'Nurburgring trip' I have (for different reason). Also the car made circa 450bhp as I remember....take from that what you will. 590bhp on that old spec would have been quite something haha
-
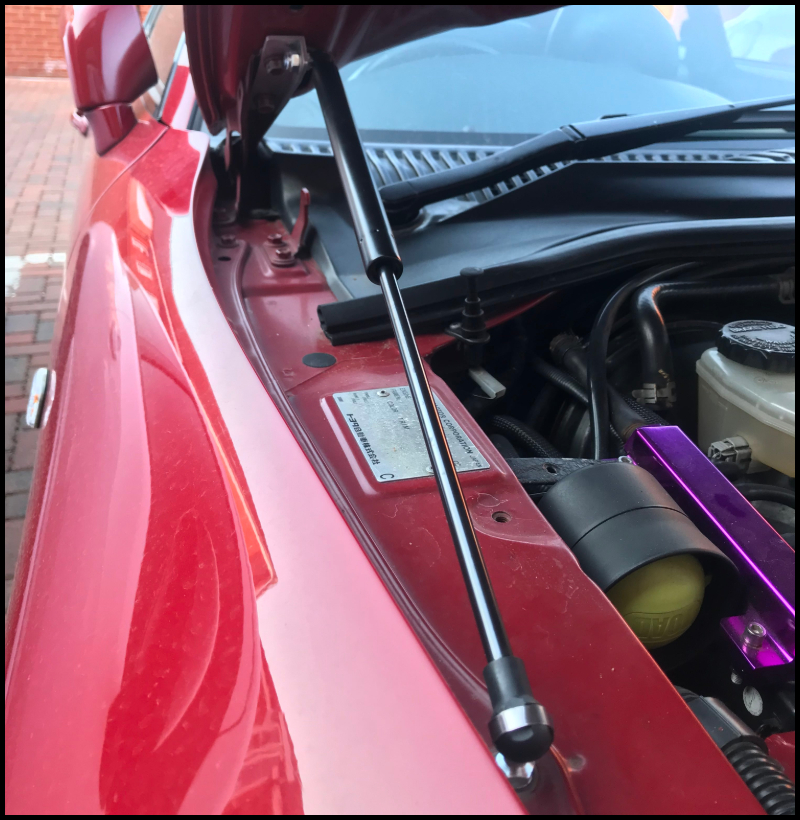
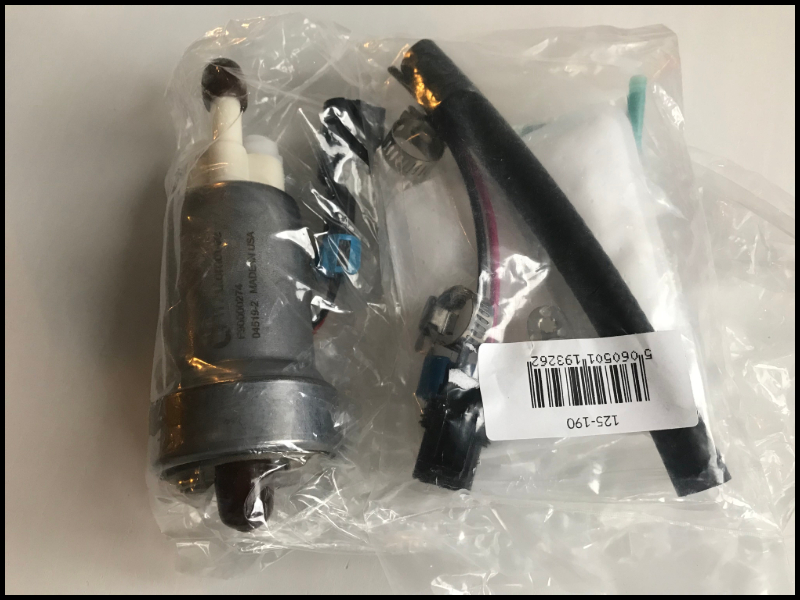
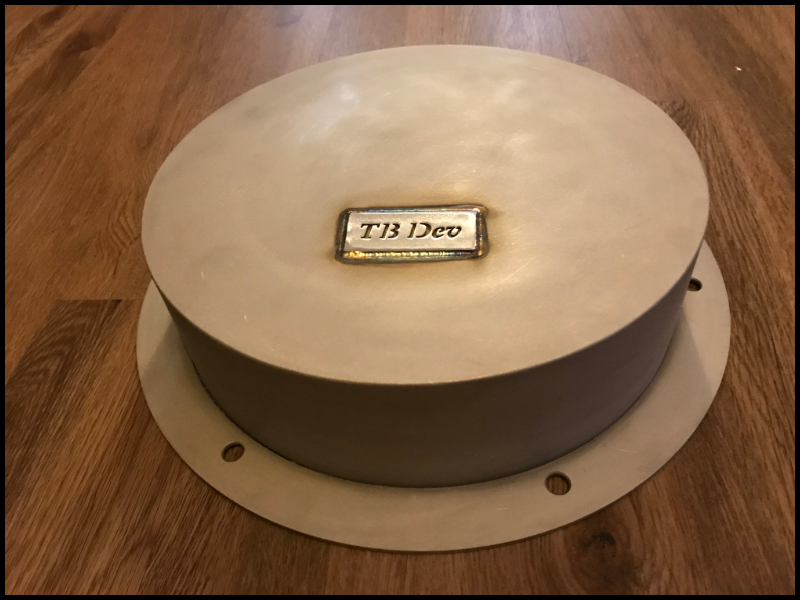
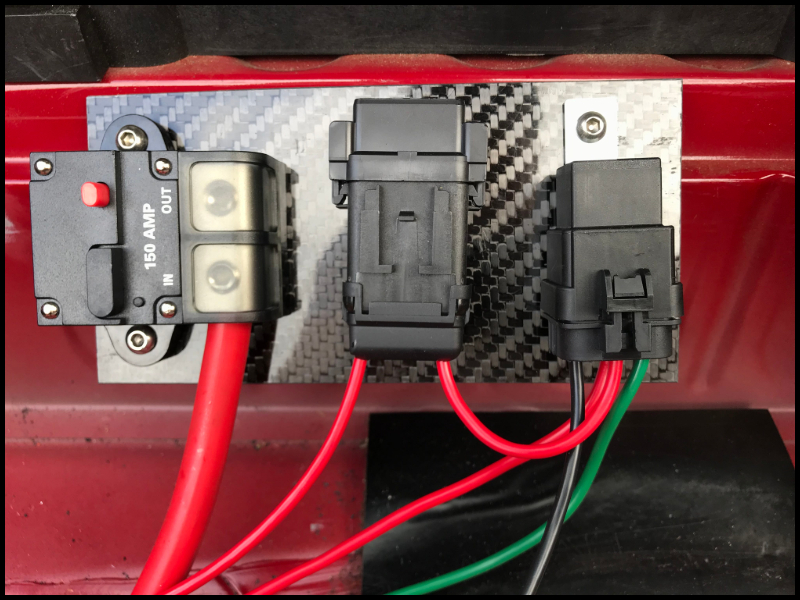
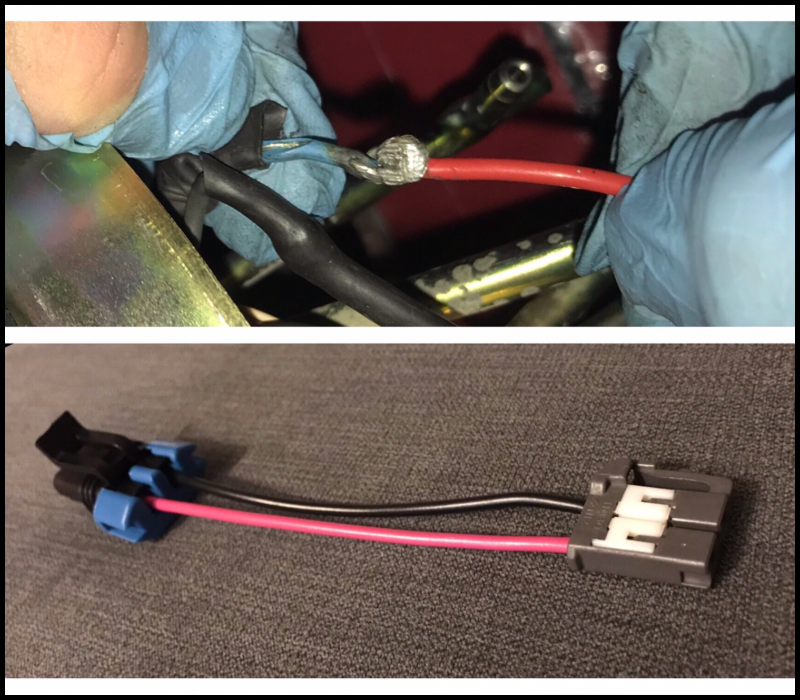
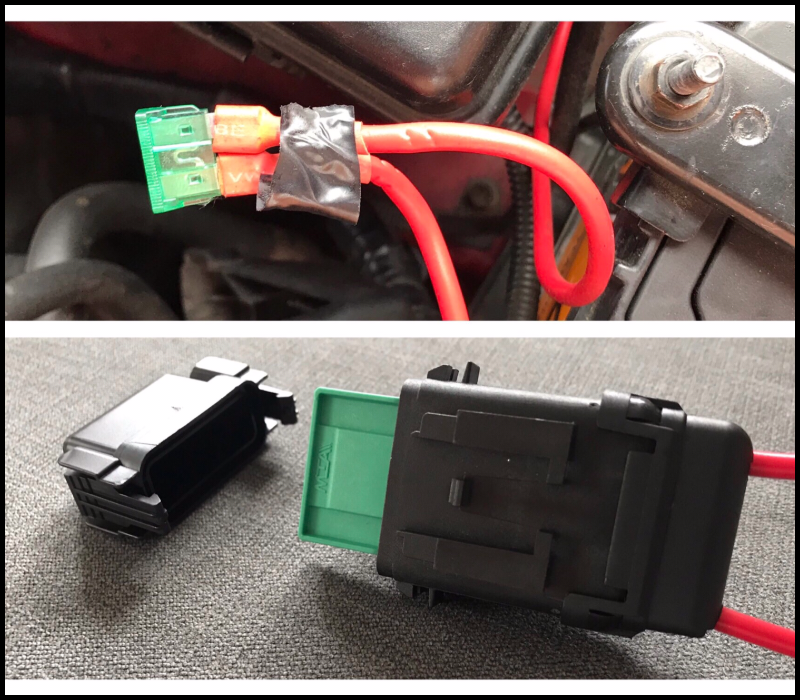
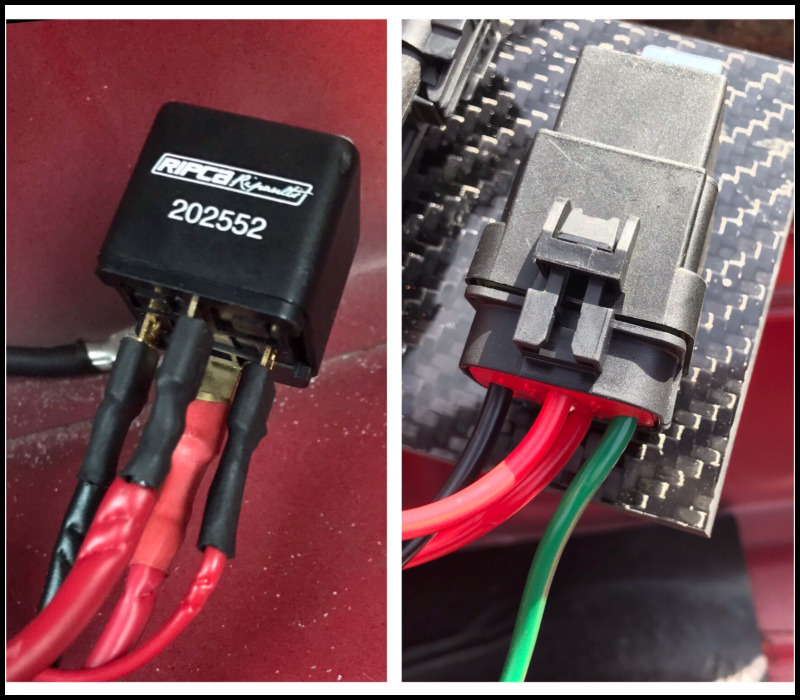
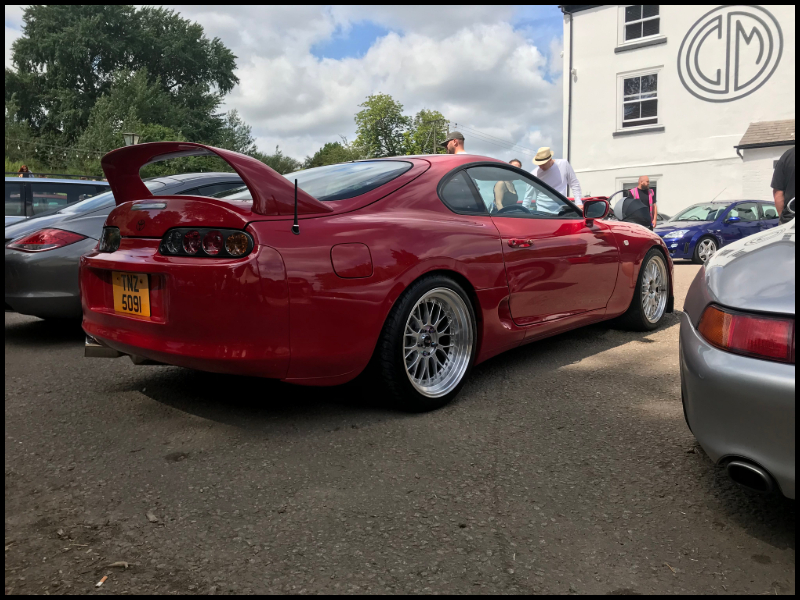
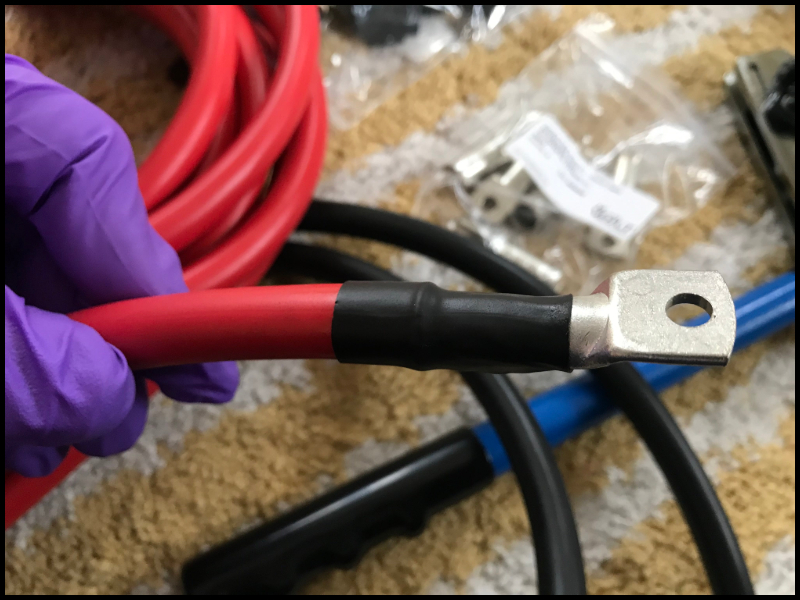
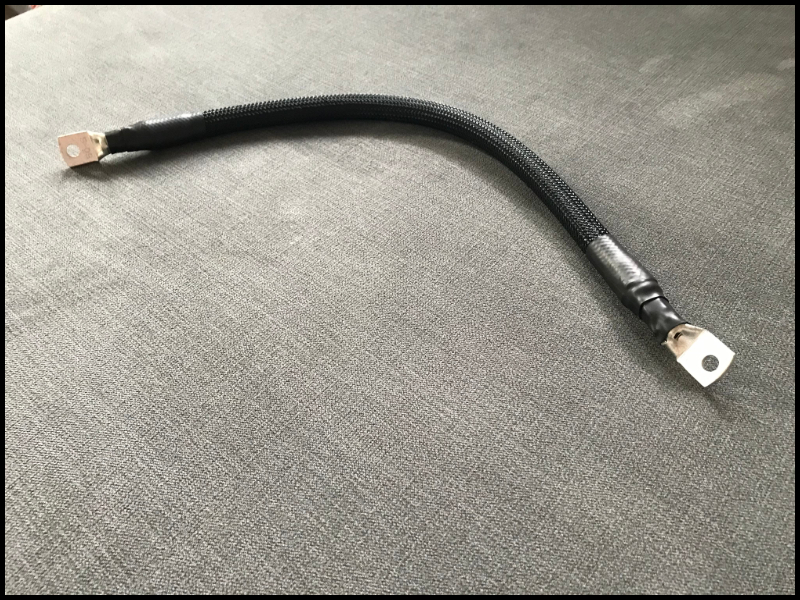
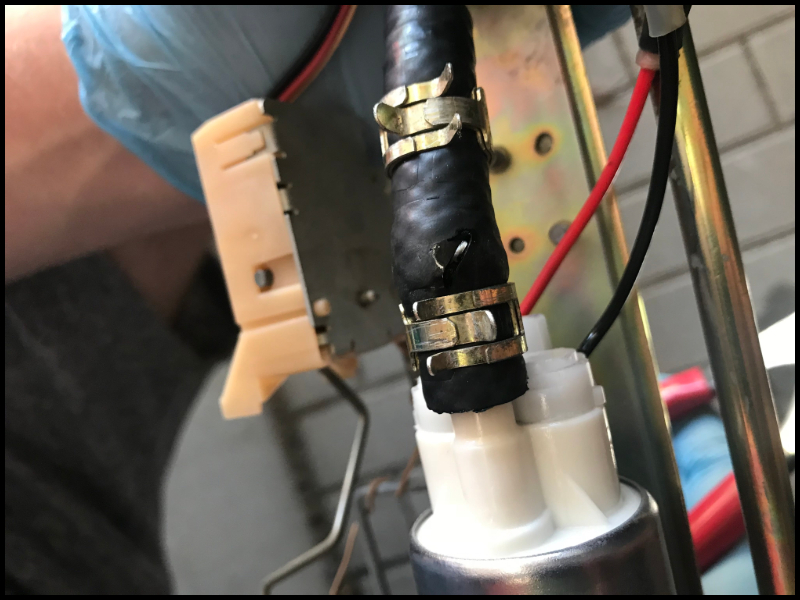
Part 24 - Do it again but better As per my last post, I'm not a fan of electrics and not very good with them but I've tied my best to tidy a few bits up and considering these were done by a 'tuner' who made many claims of greatness...I don't think I did too bad at all. Open to any advice if there's anything people look at and think 'that's not right' or 'that could be better'. The first thing I did was buy another Walbro 450lph pump. There was nothing wrong with the old one but as mentioned previously there were some bodges to the wiring that caused significant problems whilst at the ring. I decided I wanted to do away with soldered connections or anything of the sort and instead located the correct plug for inside the hanger and then crimped this directly on to the pigtail provided with pump. Next up was the supply to the pump, this previously ran from the battery at the front of the car and with it now in the rear I had to change things anyway. Despite that, having a bladed fuse plugged directly in to two spade connectors and taped so it didn't fall out...well that didn't cut it. Especially considering I spent a considerable amount of money for a '12v mod' prior to mapping. I picked up a fuse holder that I could grimp on to a new wire and tried to do it properly. Another part I think I made significantly better was the relay for this 12v mod. There wasn't anything particularly 'wrong' with this, it worked. But again, spade terminals just loosely pushed on to the relay was just asking for trouble in my opinion. With much searching I found a sealed relay where I could crimp each connection. With that all done I also added an inline fuse after my (boot based) battery, prior to the cable running up front, and then I decided to mount it all on a sheet of Carbon Fibre with some rivnuts. Yep...it's under the boot floor. Nope...it won't be seen...So what, I just wanted to haha. To compliment my new wiring and new pump I managed to get hold of a lovely set of braided lines (AN8 feed and AN6 return) to futureproof for future plans. Hodge supplied these. The lines necessitated a new fuel pump cover as they sit significantly higher. I got a lovely piece from TB developments. I've fitted it as-is for now, but will probably powdercoat this eventually too. I decided to fit some bonnet lifters with brackets bought from a group-buy on here. Struts were from SGS I think. These look the part but also means I don't have to carry my bonnet stay in the boot as it didn't fit with my APR Carbon fibre panel anyway. With these upgrades done, and a lot more planned which would involve the car coming off the road, it would be rude not to take her out. So a trip to Caffeine&Machine took place. (This was some time ago now and obviously pre-lockdown haha) Oh and I did treat her to a new inlet although you'll see from the next round of updates that I chose not to use it and went a different route...pretty to look at though haha
.jpg.8f68cb19e38484d82e664821b826d16b.jpg)
-
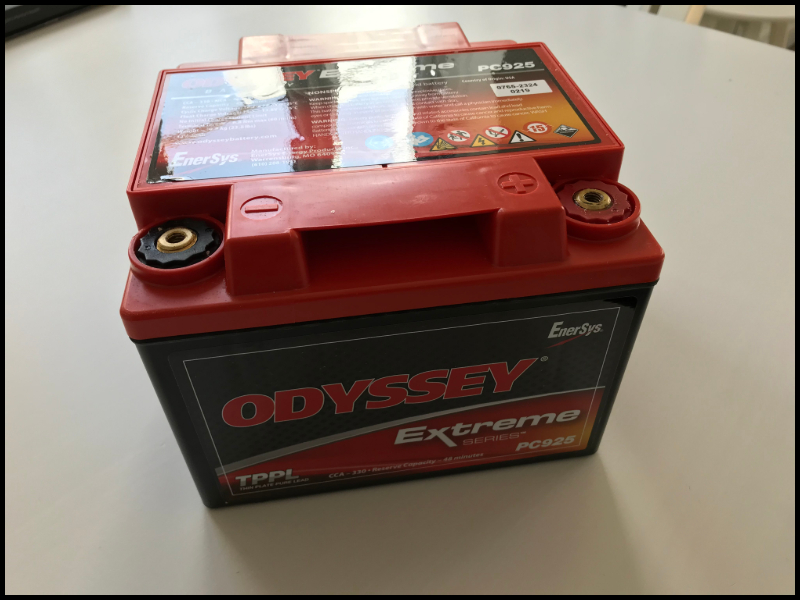
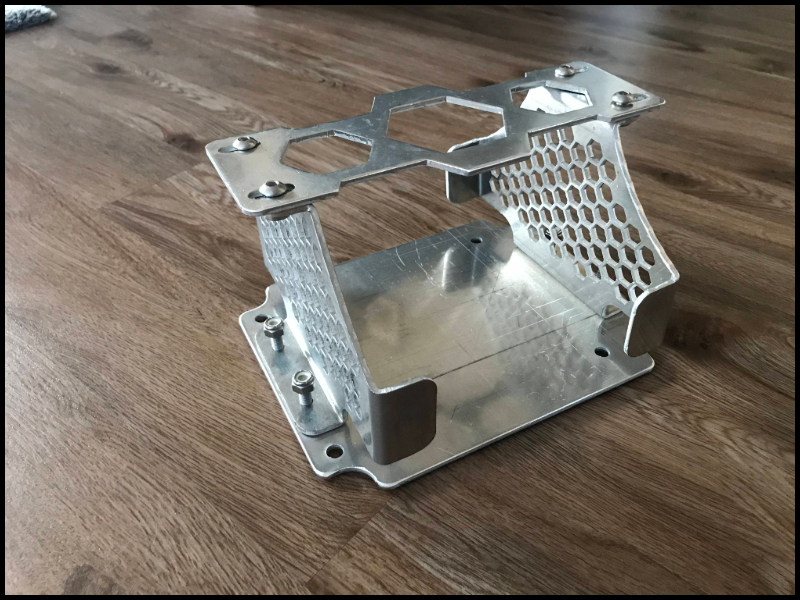
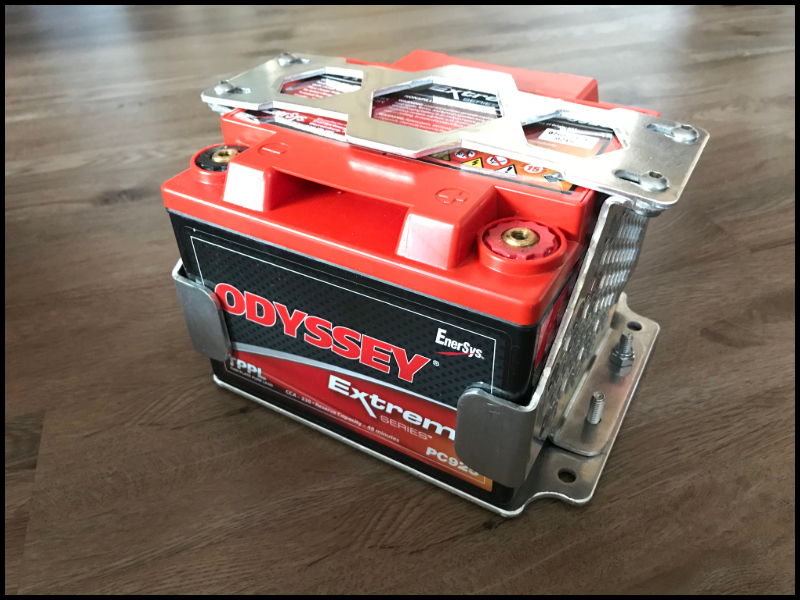
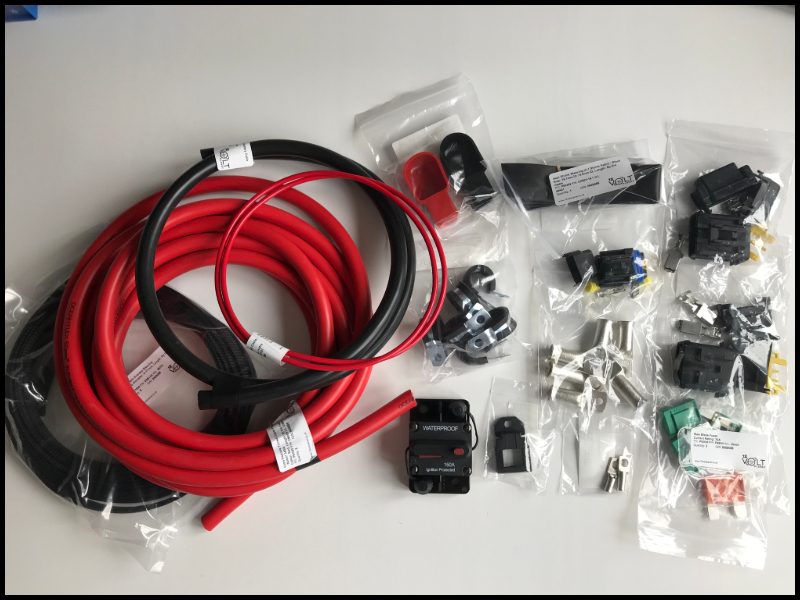
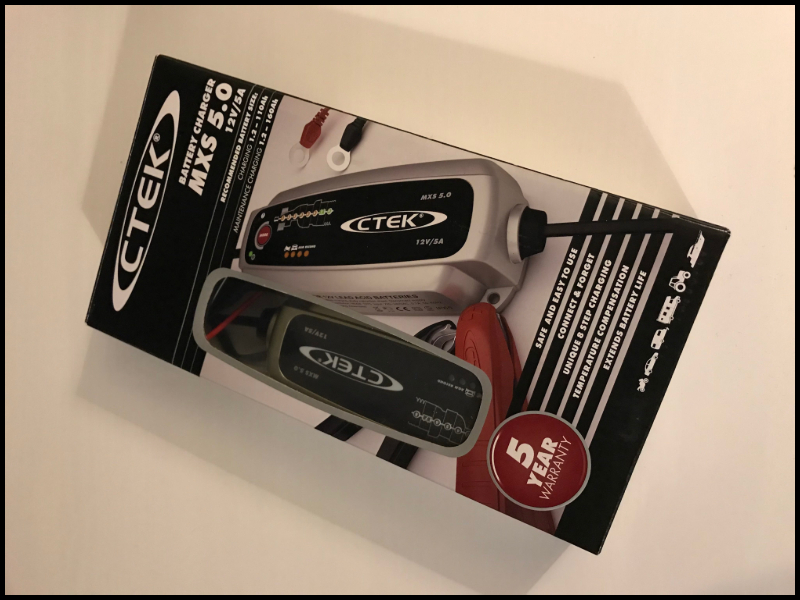
Part 23 - POWER...not BHP...the other kind Following the last round of updates, I have a few more. In all honesty, these aren't quite up to date still but I'm getting there. Upon returning from the ring a few things changed including moving house so the supra went on the backburner (again) for a little while. This left me with a lot of time to compile lists of stuff I wanted to fix and following the problems at the ring, I decided that sorting some wiring was my upmost priority and whilst I was at it I may as well upgrade a few things at the same time. I purchased a lightweight battery, opting for Odyssey PC925. The main reason for this was wanting to move it to the boot (for future plans which will become apparent soon) which meant it had to be drycell. I purchased a lovely little billet aluminium cage, imported it from the states. It's also extremely light and looks pretty. I've left it as it is for now but contemplating powder-coating it? They go together quite nicely Obviously installing the battery in the boot meant a significant amount of re-wiring. I purchased suitable cable to take power back to the front of the car, earth it in the boot, supply the fuel pump via a 12v mod etc I wanted to do this as neatly as possible, there were a few shortcuts made on the build previously and I'm conscious to not make the same mistakes and try and up the quality as best as I can. I therefore purchased the correct crimp tools etc for all the wiring and made sure I either braided or used heatshrink where needed. I'm sure there's much better out there but considering I've always avoided electrics, I'm fairly happy with the outcome. Positive cable all crimped up etc Ground for the boot all crimped up, braided and heatshrink, happy with this one On this note I also picked up a C-Tek charger so that I could charge the battery if needed, being drycell this seemed the best option. I'll probably leave it plugged in when I soon get a garage again.
-

wanted Steel water pipe under exhaust manifold from none turbo
mharvey replied to jumpbike's topic in Parts Wanted
I've got one mate, don't have any pics to hand but I presume you mean the long stainless pipe that runs from the back of the water pump to the heater matrix hoses at the rear of the engine? -
for sale Tial MV-R 44m wastegate / 2JZ GE (NA-T) manifold
mharvey replied to mharvey's topic in Parts for Sale
Cheers Noz, appreciate it mate. - All sold -
for sale Tial MV-R 44m wastegate / 2JZ GE (NA-T) manifold
mharvey replied to mharvey's topic in Parts for Sale
Wastegate sold. supra_aero, your inbox is full, if you want manifold can you PM me or I'll give Chasz86 second refusal Manifold is T4 flange -
for sale Tial MV-R 44m wastegate / 2JZ GE (NA-T) manifold
mharvey replied to mharvey's topic in Parts for Sale
All works spot on, only removing for a series of upgrades. Ran circa 450bhp on mine with scope for more. Indeed wastegate fits the manifold nicely - - - Updated - - - See above really, series of upgrades. Fitted nicely, as expected really -
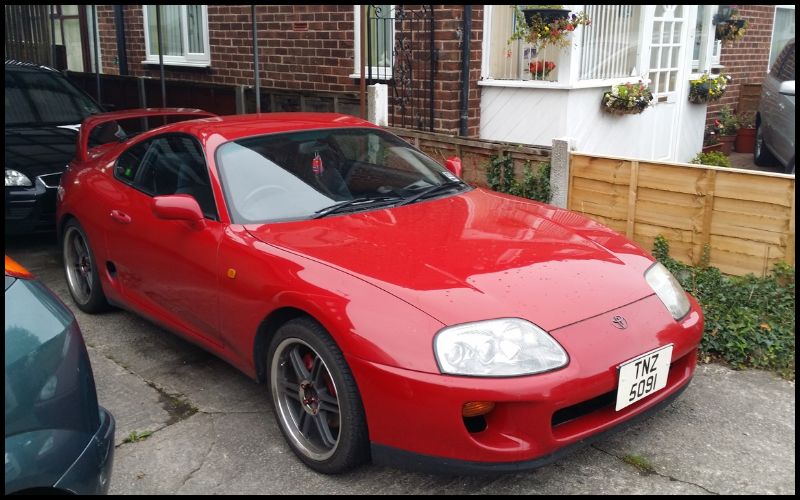
As per the title really, I have the following for sale; Tial MV-R 44mm wastegate (cost me nearly £400 new) - Purple in colour and comes with several springs £300 o.n.o 2JZ GE - XS Power Manifold (flange decked and v-band wastegate flange welded on) £125 o.n.o Collection from Aylesbury or postage at a cost.
-
Same here, feed is fine but the return is ridiculously long. I'm probably going to have to get it modified at some point
-
Love this build. It's a real credit to you, doing it all yourself and addressing little things that most would miss. I keep looking forward to the next updates. Oh and I REALLY want your garage, what a great space!!
-
Thanks mate, appreciate you taking the time to read it all too. Oh really, well for your sake I'm glad you dodged that bullet haha. There's a lot more to it and there'll be some pictures in the next updates of stuff I have had to go round fixing Cheers Noz. I want some wide OEM metal arches now, just like yours haha. One can wish. Yeah Whifbitz would no doubt have been a much better idea, yours did very well from what I've seen. I've been in touch with Lee @ SRD for the next round so hopefully it'll be on track soon. I love the place mate, can't recommend it enough. Already booked a trip for this year. Thank you. Haha I'm not sure I'm anywhere near 'there', I have a LOT to do and some rather huge updates under way but it's definitely heading right.
-
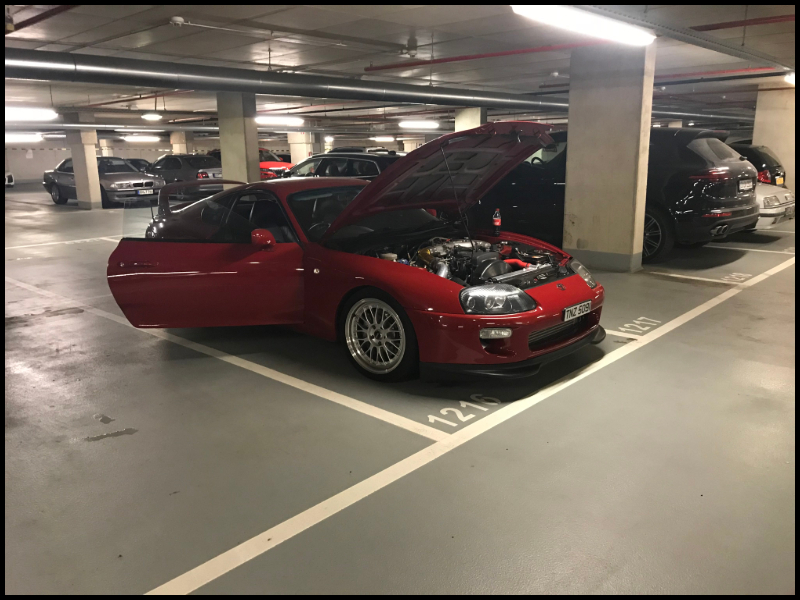
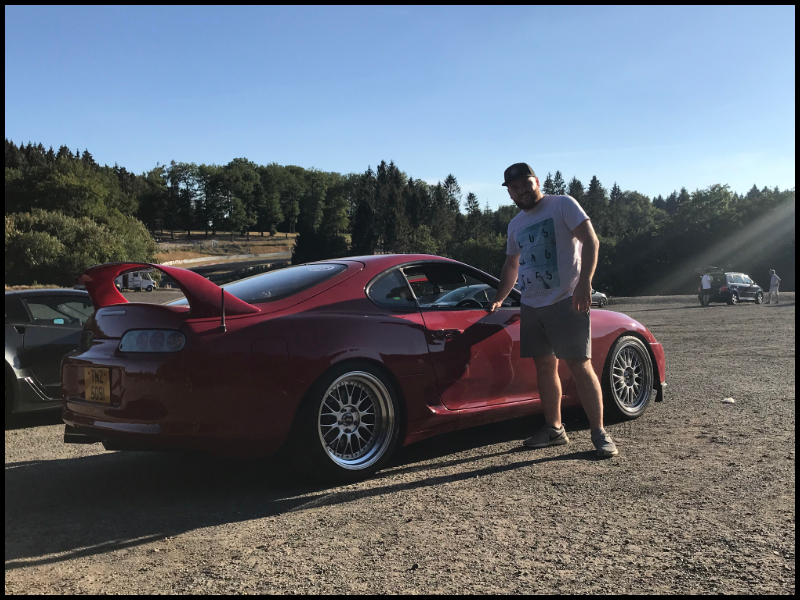
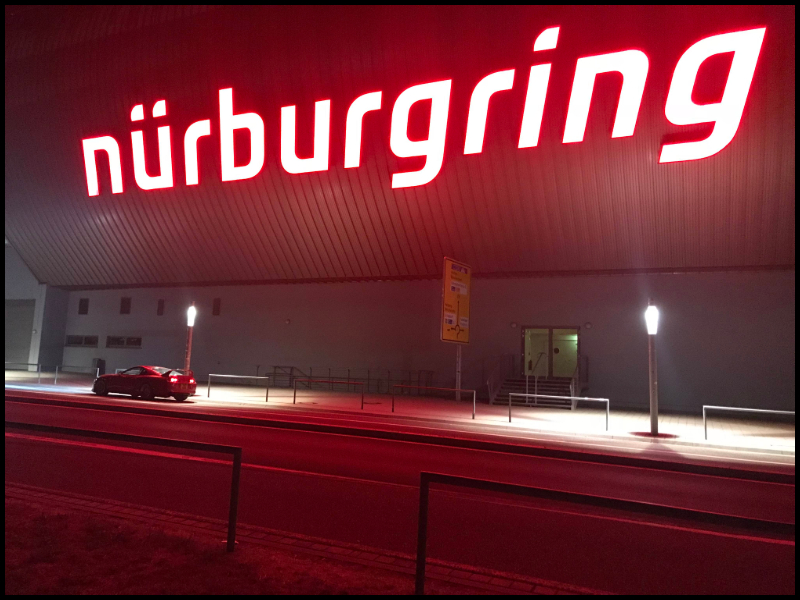
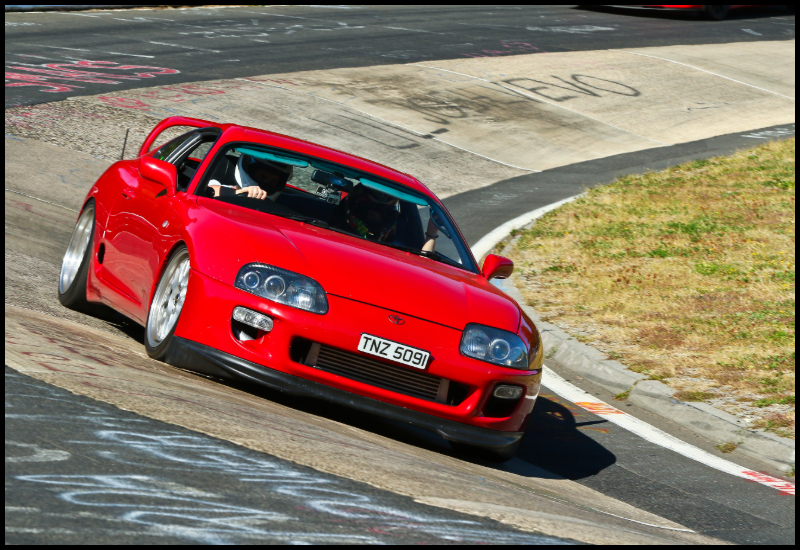
Part 22 - It actually made it. Bucket list…tick I love the ring, I love my Supra. To finally get the two together really was a very important milestone I was aiming for. I don’t have a lot of pictures from the journey over there because…again disaster struck. I was circa 1hr away from the ring when the car ran unbelievably lean. I’d managed to get the password protecting my ecu so a bit of data logging was done and visual checks on the mechanical side but nothing immediately jumped out. Recovery home was contemplated and I was distraught at this time. After sometime waiting at the roadside, she cooled down, I started her up and all seemed much better. I decided to take a very gentle drive the res of the way, keeping an eye on the AFR’s and all was fine. Finally I made it! I was on cloud 9 but was still somewhat concerned about the random lean issue. Day 1 happened and we popped to the ring complex…where I got stranded. There was a lot of fiddling in the car park and on a Sunday I was struggling for assistance but luckily a tuner, ‘Atomic’ over there came to the rescue and we eventually narrowed it down to the fuel pump. They did also mention that the map wasn’t far from a ‘base map’. They discussed it at length with me and ultimately came to the conclusion that it appeared relatively safe but was ultimately completely flat. As for the pump issue, with this narrowed down I then took the hanger and pump out…in the above car park…to the bemusement of many a passer-by. Here I found some questionable wiring from our UK tuner. Could have shorted out etc and I was rather pissed. Also found the supply pipe to be split. Luckily another garage ran by a chap called Dean came to the rescue. He supplied a new Walbro 450lph and turned up with a soldering iron and some heat shrink. We managed to fit it safely until I could get home and grab a new plug etc. The car was now running and seemed better than ever. I was on for a lap…it was going to happen. Nope!!!!….A few road miles to check everything out and a boost pipe popped off. Not usually an issue you might say, except it was the one on the bottom of the turbo. As a result it had then fallen against the manifold and melted. The same chap, Dean, came to the rescue. He called around every contact he had and sourced a 90 silicone elbow and we got her back up and running, he even brought round some new better clamps. I fitted it all up and wiith thanks to the locals who helped me out that day I FINALLY MADE IT. It was sublime, everything I expected and I whilst I only put a couple of laps in, every single minute was incredible. The brakes, the handling, they were all spot on. There were a few flat spots on the map but as mentioned previously, this wasn’t surprising. I actually posed next to the car, I think I bonded more with the car that day than I ever had beforehand. So home time came round far too quick. I vowed there and then that I would slowly go through the car with a fine tooth comb upon my return and that it WOULD be back better than ever. I formed a list in my head of everything that needed addressing and will slowly address those going forward. Watch this space.
-
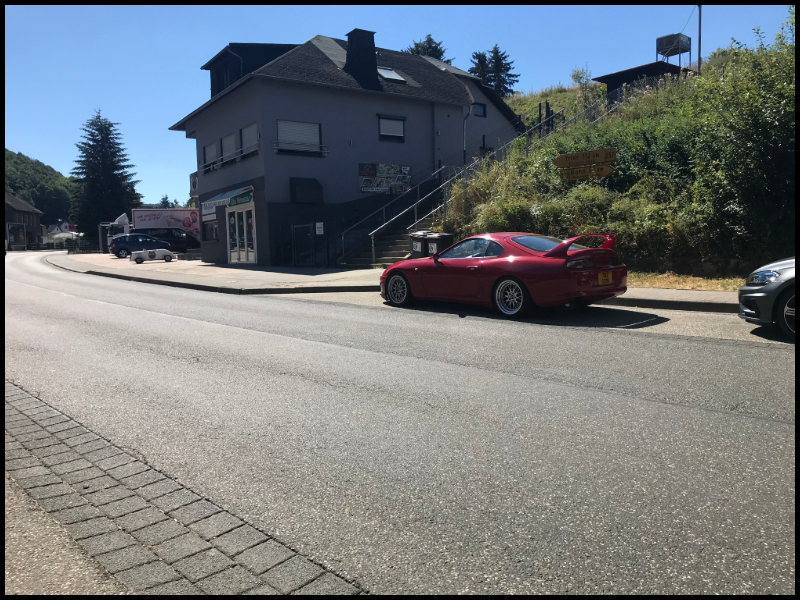
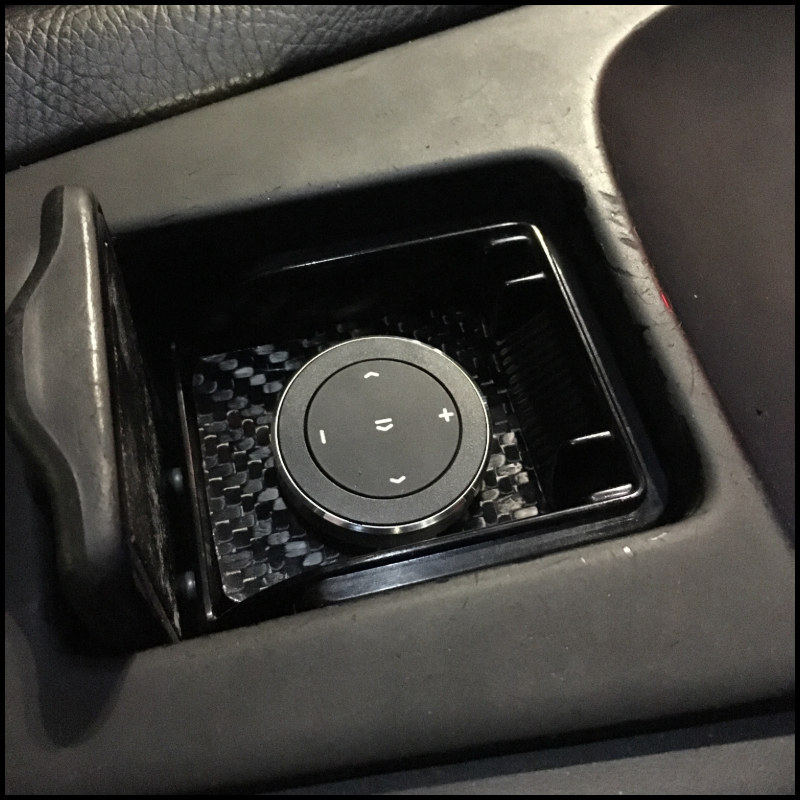
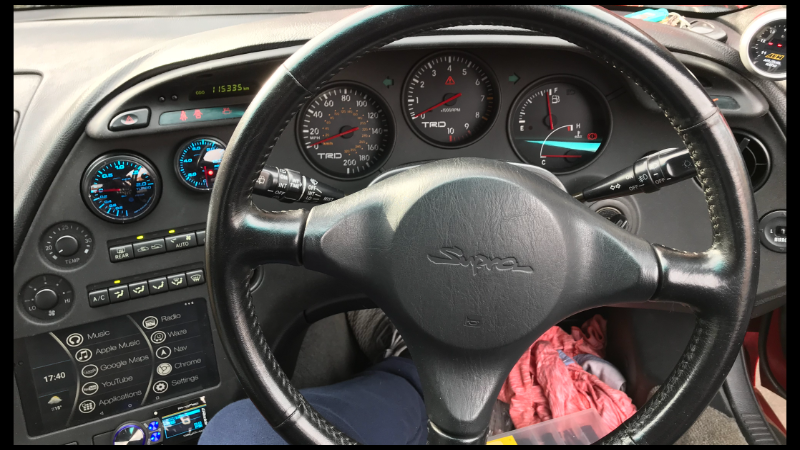
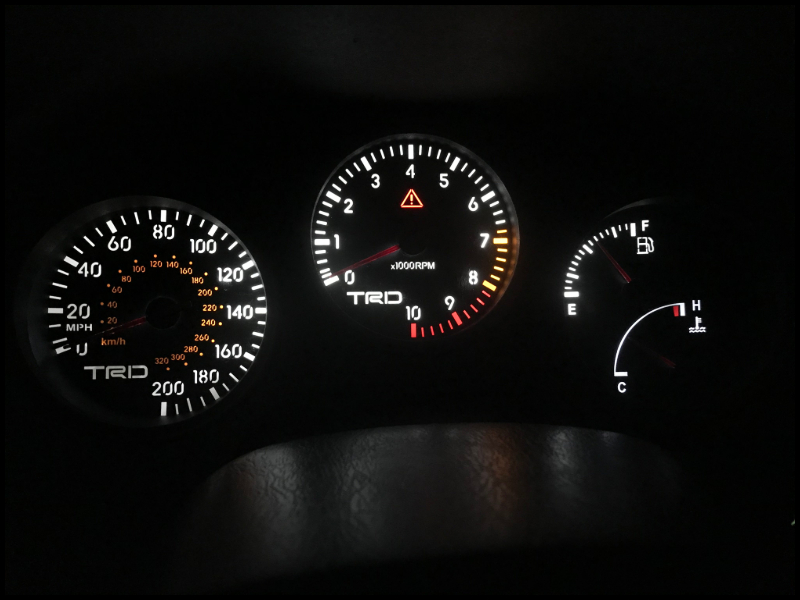
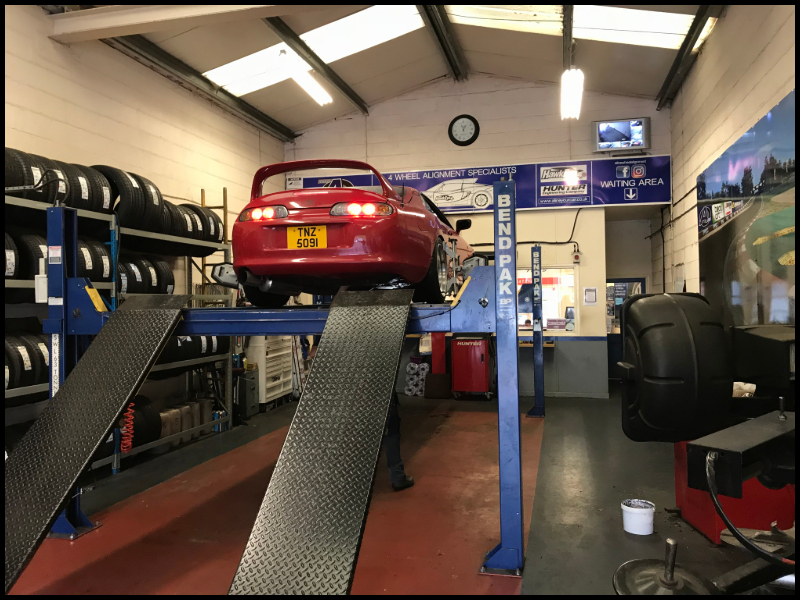
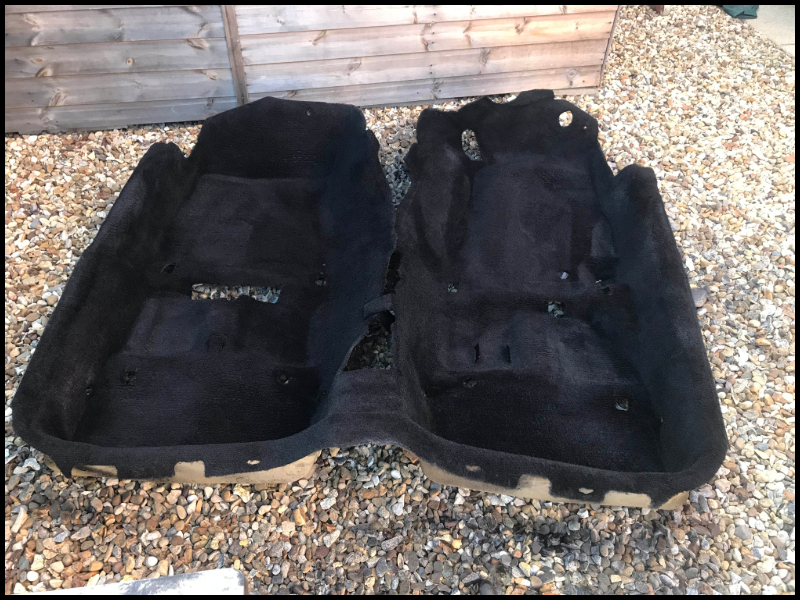
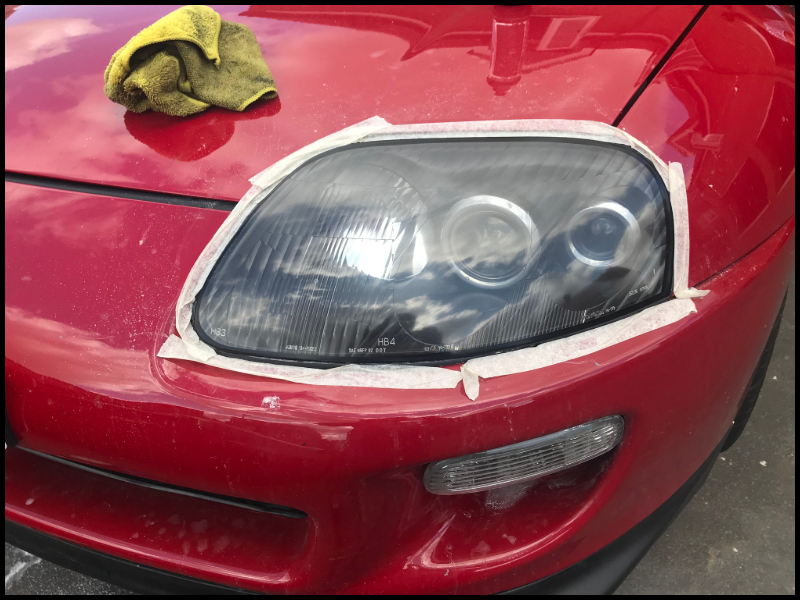
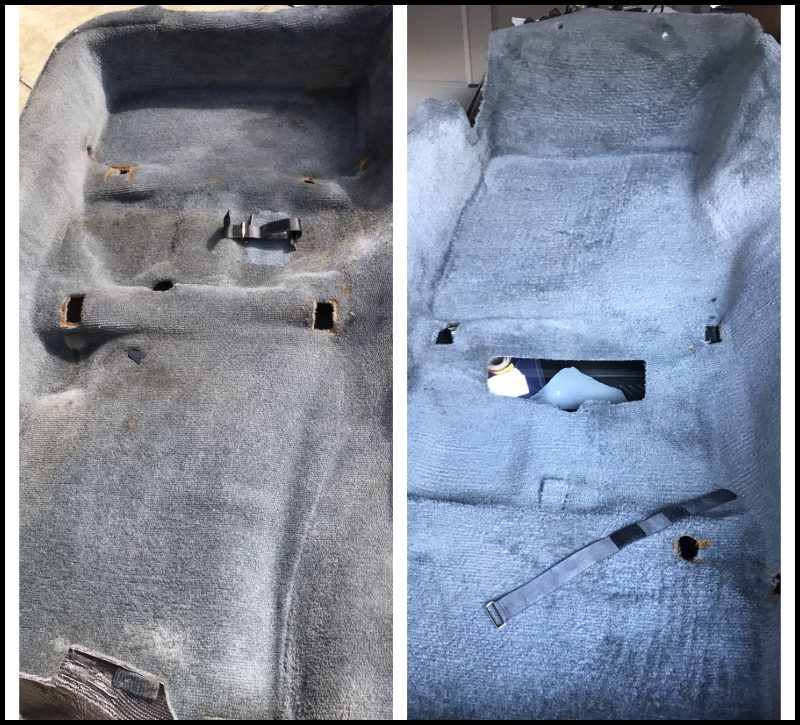
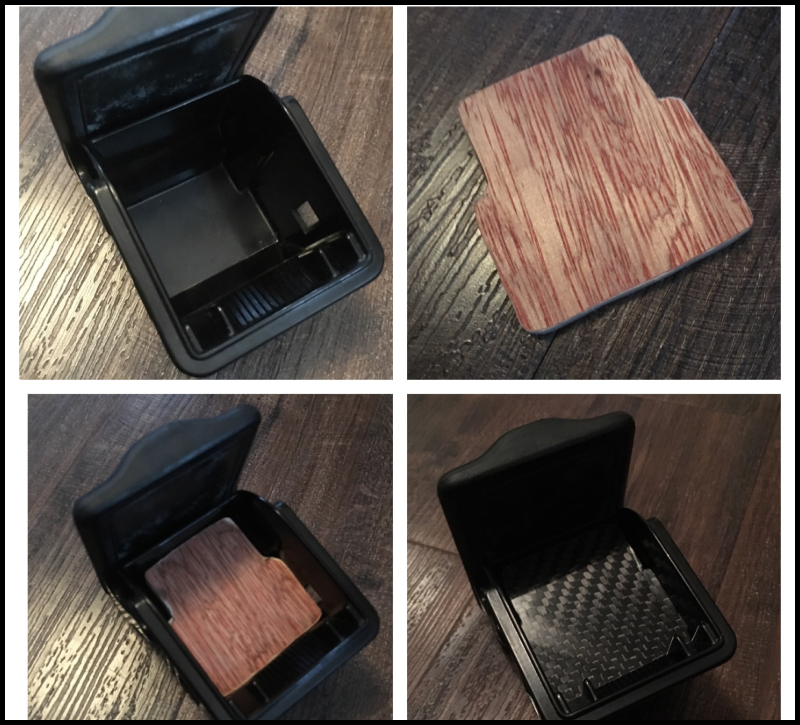
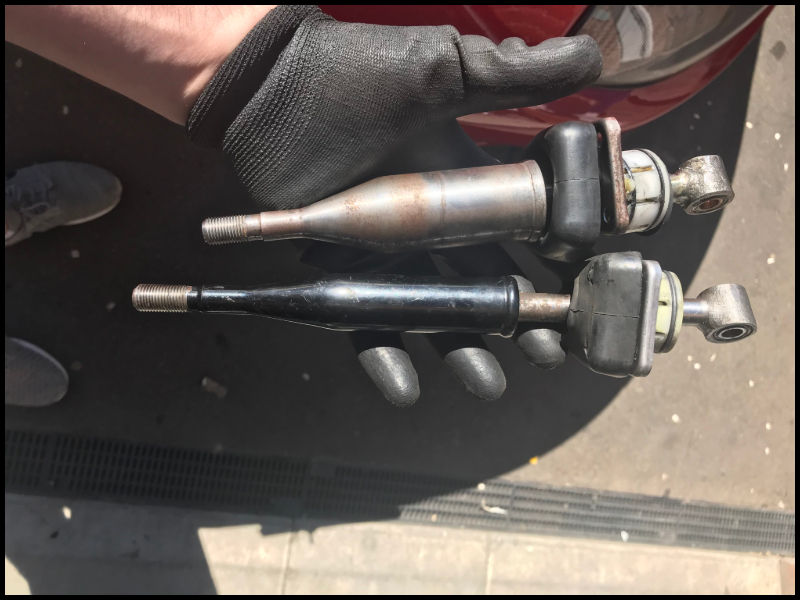
Part 21 - Ring prep (3rd time lucky???) So by this point you probably know how this goes. I prep for a trip to the Nurburgring and everything that can go wrong, does go wrong. So would this one be any different? Well I was certainly going to try my best!!! I had plenty of bits and pieces that I wanted to address before the trip, most were just aesthetic but I wanted to do it nonetheless. I decided to get my cam covers drilled and tapped for some AN10 lines to run a catch can. I also painted the cam covers in a wrinkle black effect whilst I was there. I mounted a catch can too and ran the lines to it. I intend to get something smarter and better fitting at some stage. I then decided to do some re-decorating on the interior of the car. I started with the grey carpets. These were washed thoroughly with multiple steps including carpet cleaners, snow foams, pressure washers, the lot. The before and after photos don’t do it justice. They were then dyed black. I used about 2l of the stuff and I think it had about 3 coats all told. In my opinion it certainly looks the part. Then it was time to do the dash panels. I wanted them to look as OEM as possible but first this meant HOURS of work removing the original coating which is stubborn to say the least. Following this I painted it with Matte black Plastidip. It definitely gave the desired look but I later realised it was not at all durable. I fitted the panels again and updated my Nexus tablet. I also fitted some Metal Monkey TRD style dials. I had them for some time and finally fitted them and I LOVE them. I fitted new bulbs whilst I was there however there are probably more even lighting solutions that I’ll look at in the future. I also decided to fabricate a little mount for a bluetooth remote. This is to control volume and skip tracks for my tablet/stereo. It can all be done from the tablet but reaching for physical buttons is a lot easier whilst on the move. I decided to pop it in the unused ashtray, built it up with a bit of ply and then a sheet of real carbon fibre. I reckon the finished article looks pretty good and obviously the ashtray closes as usual keeping it all hidden away nicely. I had a full geo/alignment prior to the trip and two new Federal 595 RS-R’s. I may live a considerable distance away now but still travel up to A-Line in Dudley for my Geo. They’ve always been very good to me. Then the final piece of the puzzle was a good wash (got to look it’s best to get covered in flies on the trip to Germany). Headlights were cut and polished I reckon they came out rather nice (no before/afters but they were very cloudy beforehand (also present is the APR carbon panel I fitted at some point along the way)
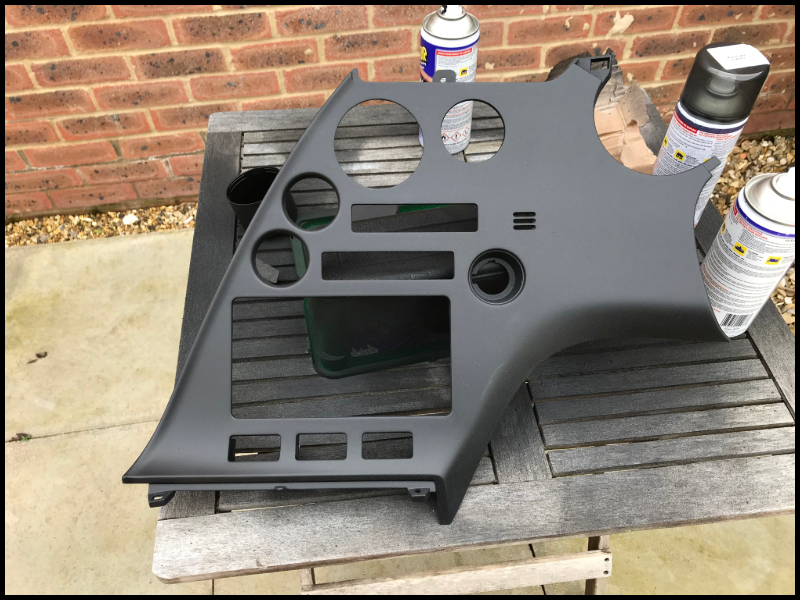
.jpg.08095f70401bd77c40354be9383dd7d2.jpg)
-
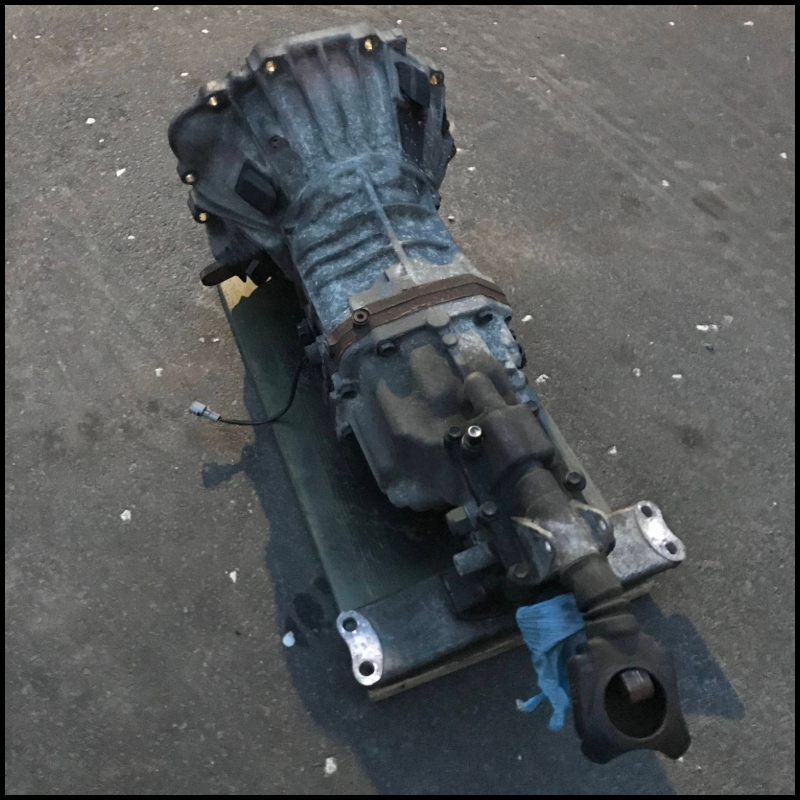
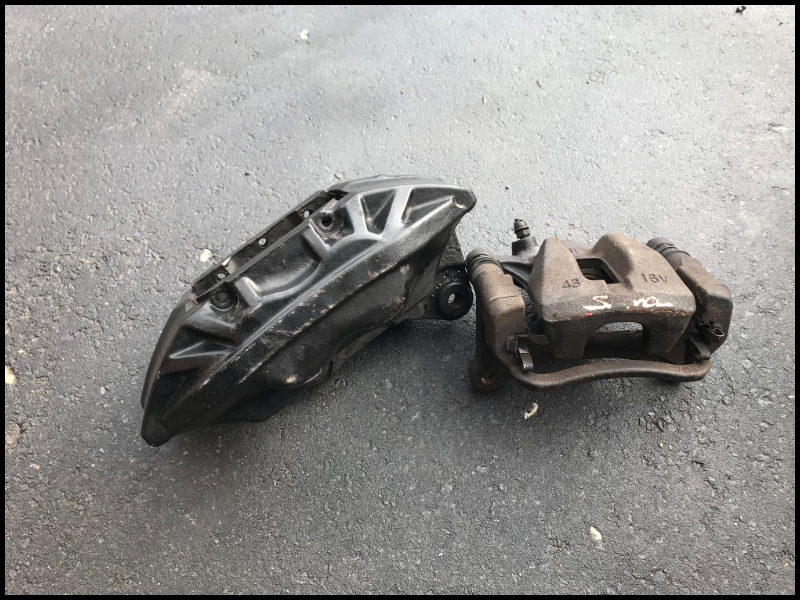
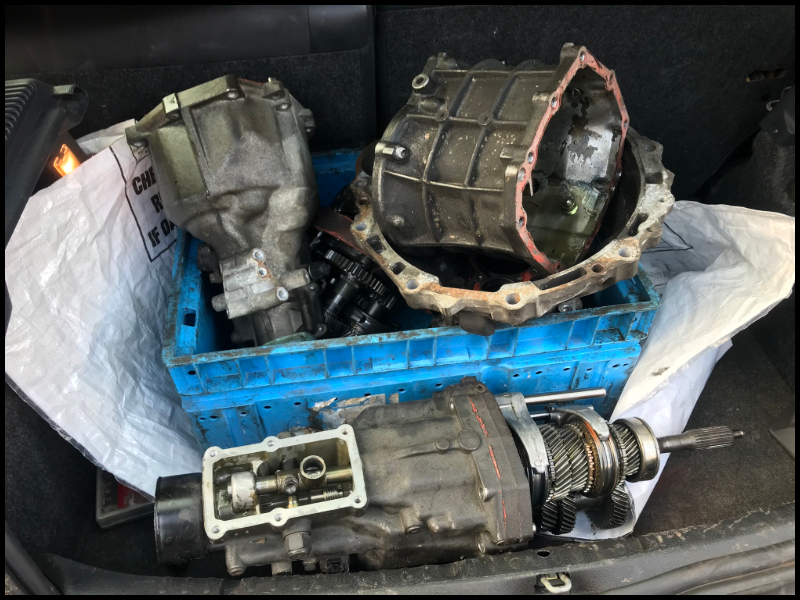
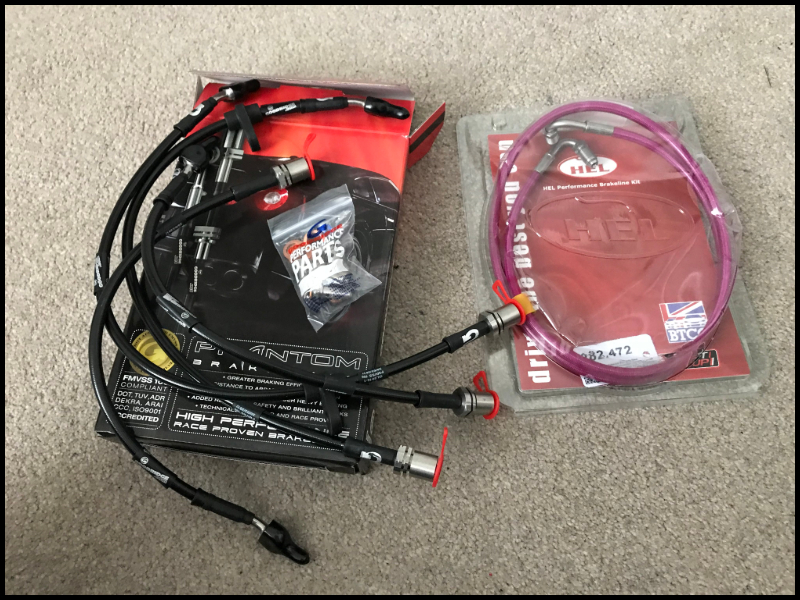
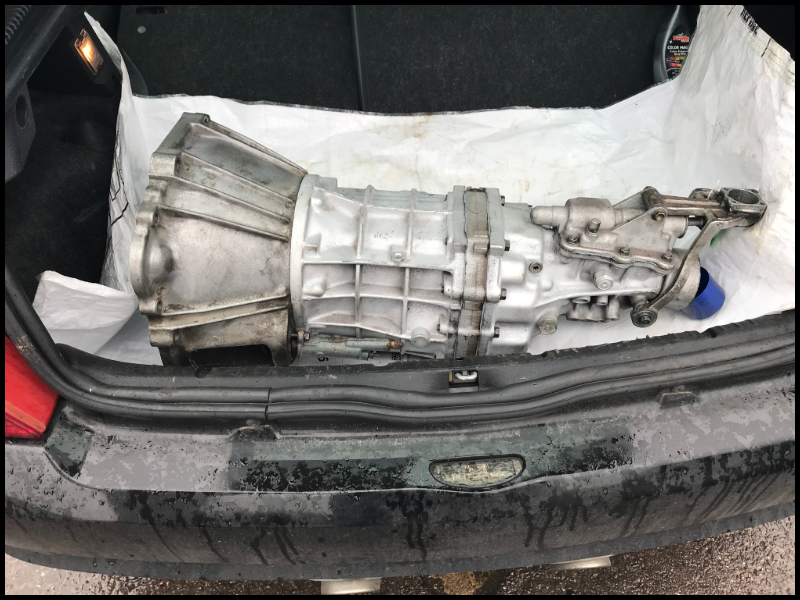
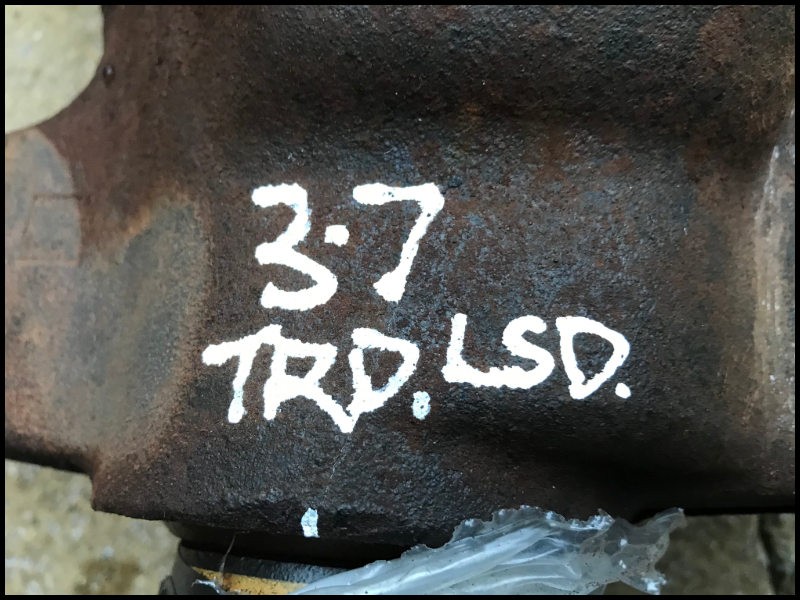
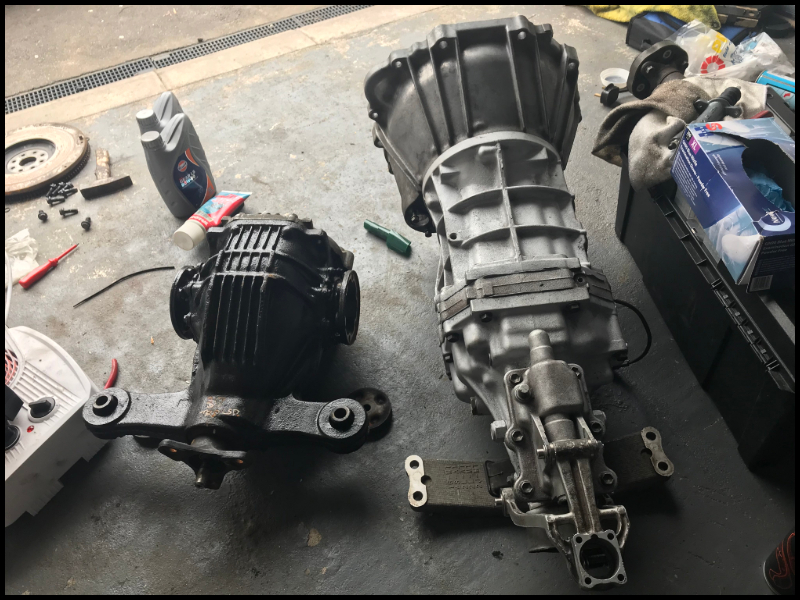
Part 20 - The solution to all my gearbox woes So the VERY broken W58 gearbox came out. I decided that I’d try and get it fixed. I was aware of other members who had broken their W58’s and had them rebuilt. I also had a lot of experience with a gearbox builder ‘Agency Transmissions’ who had done a few for other cars for me. I decided that I’d make the trip up there and to save a wasted trip I managed to get hold of another broken W58. The hope being that at least one good one could be made from the two. The gearbox’s went up to Agency. A box full of bits came back!!! There was absolutely no chance of rebuilding either, I think the phrase FUBAR or similar was used to describe them. So the gearbox hunt began. I considered V16*, R154 and T56 and spent a lot of time agonising over this decision. In the meantime I also purchased a set of LS400 calipers. I decided that with more power I’d probably benefit from some more stopping power. They were sent off along with the rears to BigRedd for a full refurbishment and came back looking excellent. I went with a dark silver for a relatively OEM look and was really pleased with the finish. I decided to compliment them with a set of Goodridge brake lines and whilst there I also grabbed a braided line for the clutch master - slave. This was a custom length one to suit the impending gearbox conversion. The new callipers looked so good I didn’t want to stick any pads in them so I treated the front and rear to a set of CW (Chris Wilson) fast road pads which I must say I am thoroughly impressed with. They were all fitted up. Unfortunately this was another area that caused headache after headache. It took the callipers being returned 3 times just to stop them from weeping at the bleed nipples. This was rather concerning and ultimately I believe they were drilled and tapped to accept larger nipples. So I finally decided on a gearbox, specifically an R154. This was supplied by Garage D along with all associated parts. The box itself was the correct (and rare) JZX100 version that fits perfectly. It had been refreshed by Garage D and was as good as new. I decided to compliment this with a new spec 3+ clutch as the one I had in my W58 (albeit briefly) seemed good. This was supplied by TB Developments. New Toyota flywheel, slave cylinder and the correct OEM prop etc too. A lot of research lead me to understand that the A01b lsd I had fitted was not ideal with the R154 ratios and that I’d be better off with an A02 diff. Unfortunately finding an A02b was nigh on impossible however I then struck gold and ended up with one of my favourite build components. A TRD differential, rare as rocking horse shit and the best balance of performance and drivability. I managed to pick up an A02a open diff and got garage D to install the TRD element for me. It all fitted up nicely and I was one very happy bunny. It lined up with he hole great, the only issue I had was the high shifter. It didn’t feel quite right and didn’t look right. I realised that the shifter worked the same as that from my W58 so I kept hold of that and later swapped the shifter unit out.


-
Part 19 - It ran…I broke it As mentioned previously, the plan was always to make it to this years ring trip but this didn’t happen. Fortunately my best mate offered me his Astra VXR for the trip and whilst it wasn’t the Supra it meant I still got to go, put some laps in and take my mind of the shit storm of a job on the Supra. Not many people would let you take their pride and joy abroad let alone around the most dangerous racetrack about. So, it was in fact a couple of months after the trip when the car was finally finished. Even when the engine build was done there were weeks and lots of £££ chasing a mysterious ‘misfire’. I could go in to great detail about the fuck ups here but I’m trying to put it behind me. Let's just say I later caught out a lot of the stuff I was told (and charged for). That all being said, the car WAS now running, it looked exactly the same haha, but is hopefully a damn sight stronger now. Mapping began and after all the misfires and replacement of many components it made circa 450bhp and 450lb/ft if I remember correctly. It still wasn’t perfect but this was a happy day for me, it made the right noises and finally felt like I was making steps in the right direction. I took the car home and over the next few days I went over a few bits related to the ‘mysterious misfire’. I replaced the igniter. I replaced the HT leads and king lead with all new Toyota parts. It was also discovered around this time that the plugs weren’t all the same which was worrying as they were fitted new, by the tuner, pre-mapping. With it running a little better I began to use the car to/from work simply to put some miles on it and get a feel for the car…that didn’t last long… I think I managed circa 350 miles before the W58 blew to pieces. It lost all drive and was shuddering and rattling like a bag of spanners. Now I knew the W58 was on borrowed time but I hoped I’d get a little longer out of it. The car sat up for a while from this point on whilst I pondered my options and also saved up all over again.

-
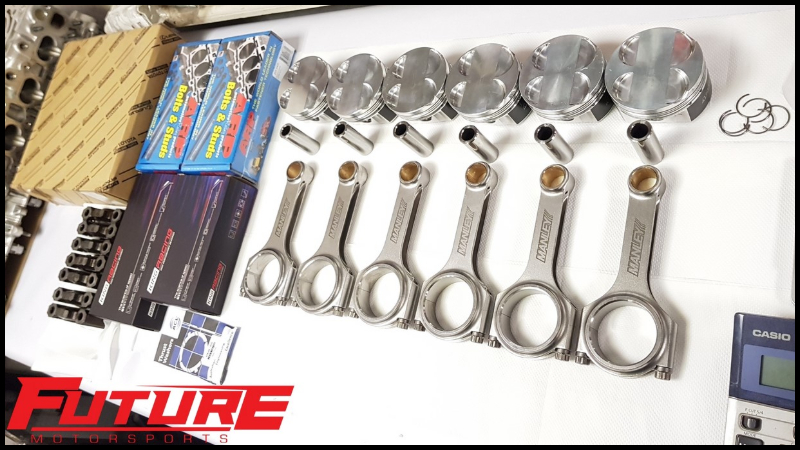
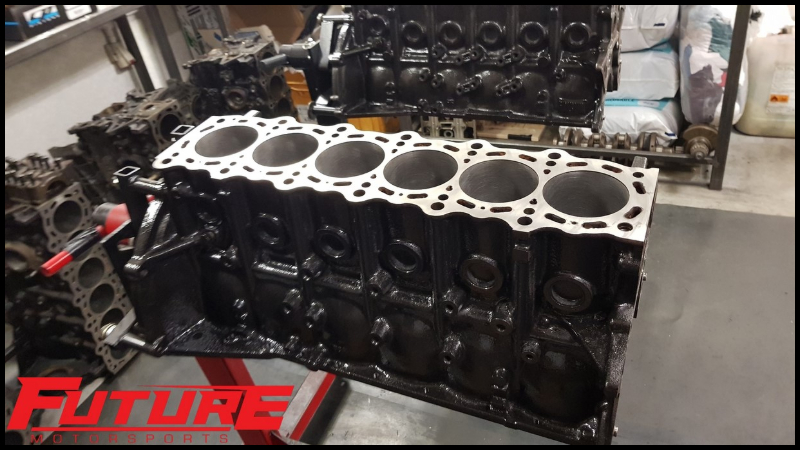
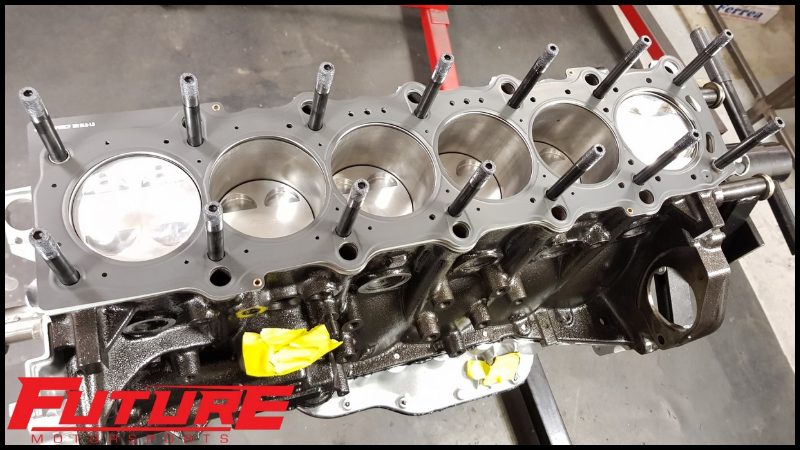
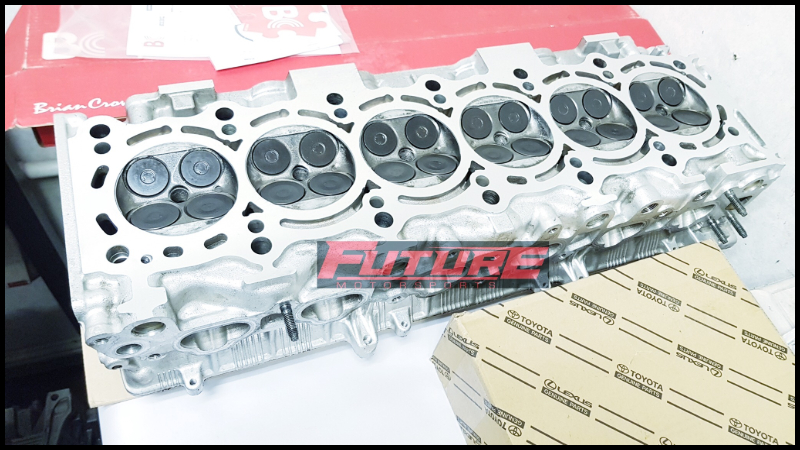
Part 18 - Mapping…goes wrong So following on from the last update she went for mapping and ultimately this was a joyous day. As the car was only finished the night before (and rather frantically with several issues arising) the morning was equally frantic refitting the bumper, fitting borrowed wheels etc and getting the car transported. It got there safe and sound and was tucked up with a variety of other Supra’s etc, all seemingly in good company and in safe hands…The tuner it was taken to can not be named on this forum so I’m sure most of you know who that is. So mapping began and DISASTER!!!! Now hindsight is a wonderful thing and there is now so much that has come to light and has shown me that I was well and truly screwed over BUT at the time I guess I fell hook line and sinker…maybe I wanted it done so bad!! So I was told that, prior to mapping, a compression test and leak down test were both carried out and the car failed catastrophically. This was somewhat strange due to the refresh and was put down to an error on my part with the refresh. To be honest we’d booked a trip to the Nurburgring again and with it closing in fast I was desperate not to miss out again. I gave a lot of thought to bringing it home, starting again but with time constraints I discussed the tuner pulling the head off and having a look but then somehow decided to ‘future’ proof and to forge the engine… So the engine was pulled The forging began, the spec list consisted of; Manley Rods CP Pistons Tomei HG ARP bolts throughout Full replacement of all seals and bearings Cylinder head rebuild The parts did look nice and shiny and I was rather excited at this stage. Now unfortunately this dragged on, the build took a LOT longer than promised and various reasons were given. Ultimately, despite being told it would be ready for my ring trip…it soon became clear that the Supra wasn’t going to make it…again!

-
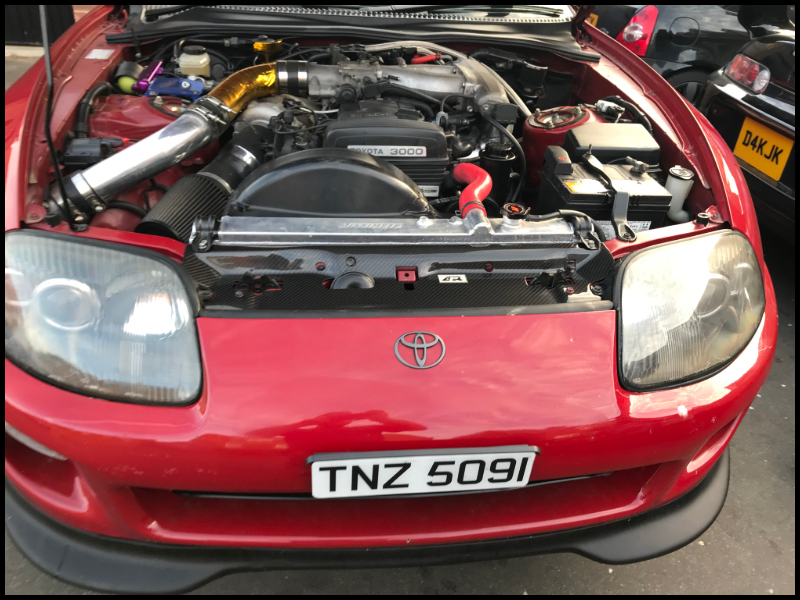
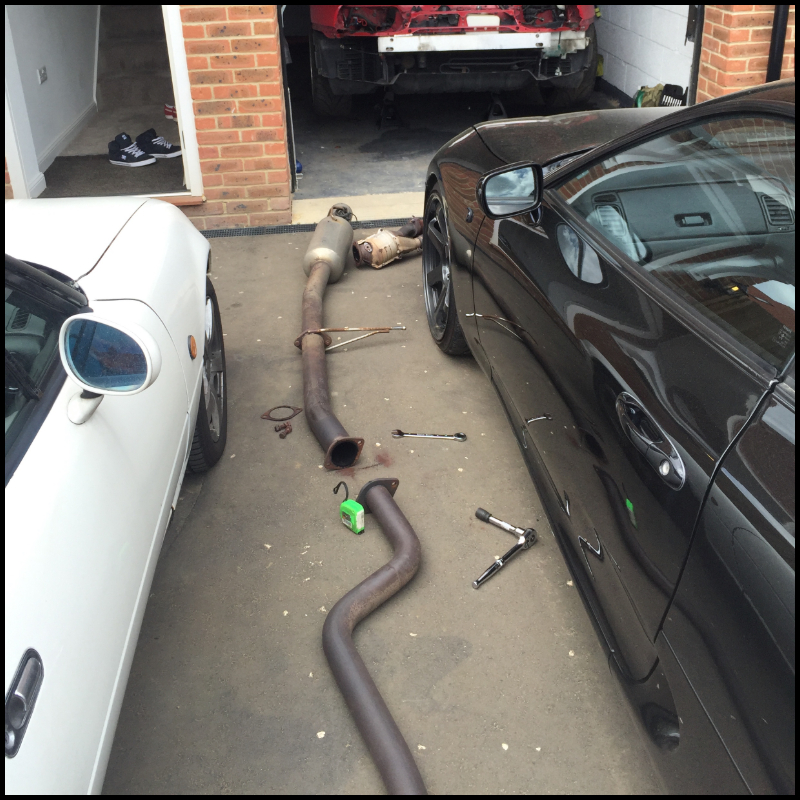
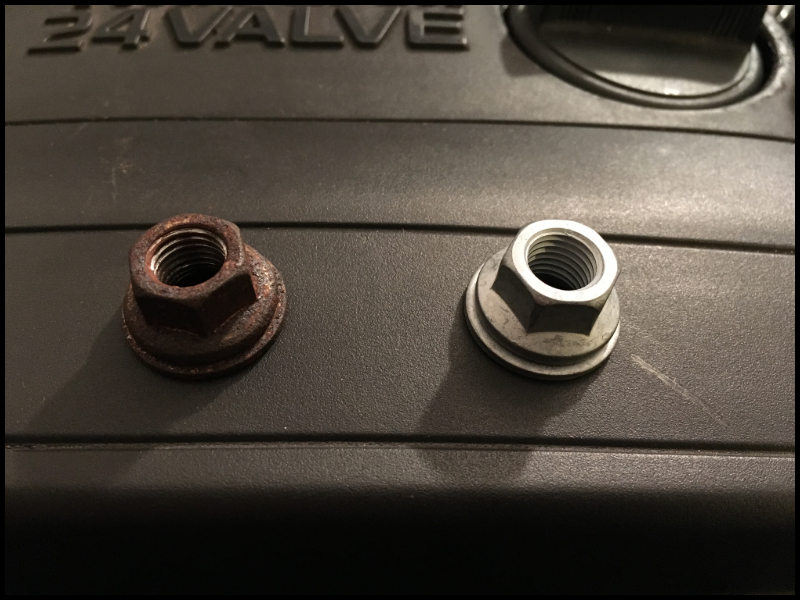
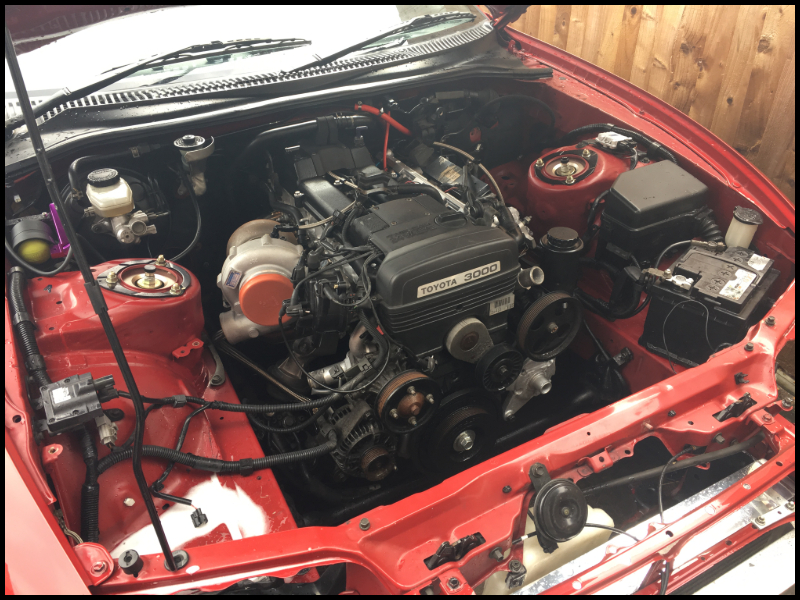
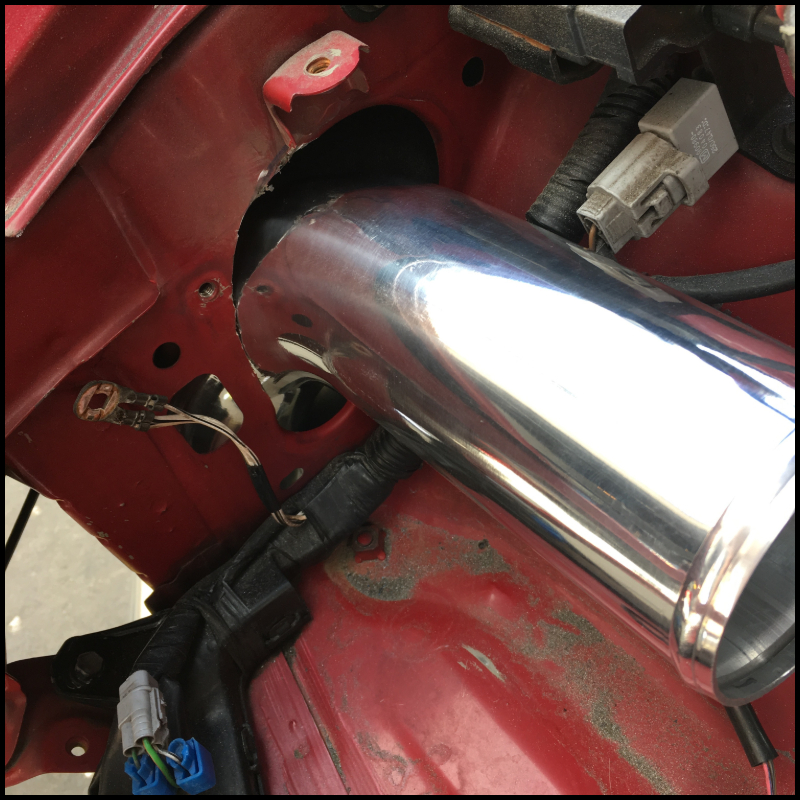
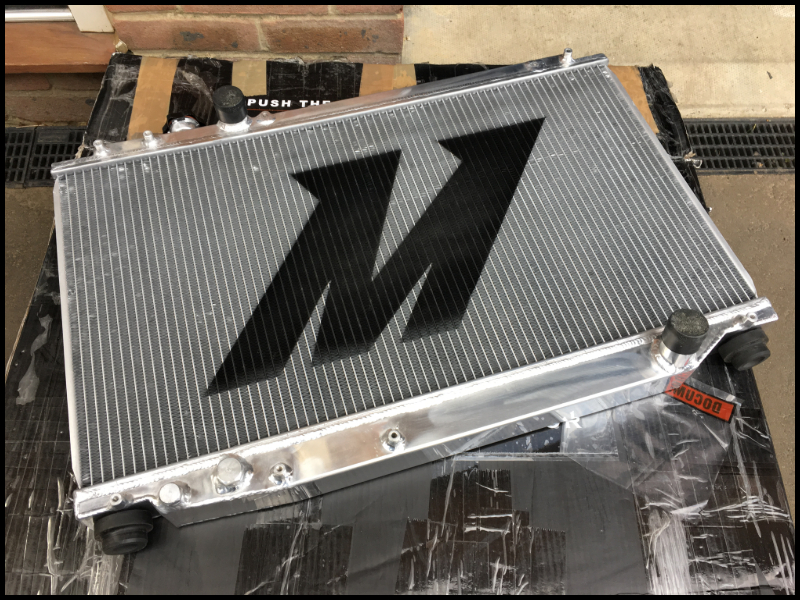
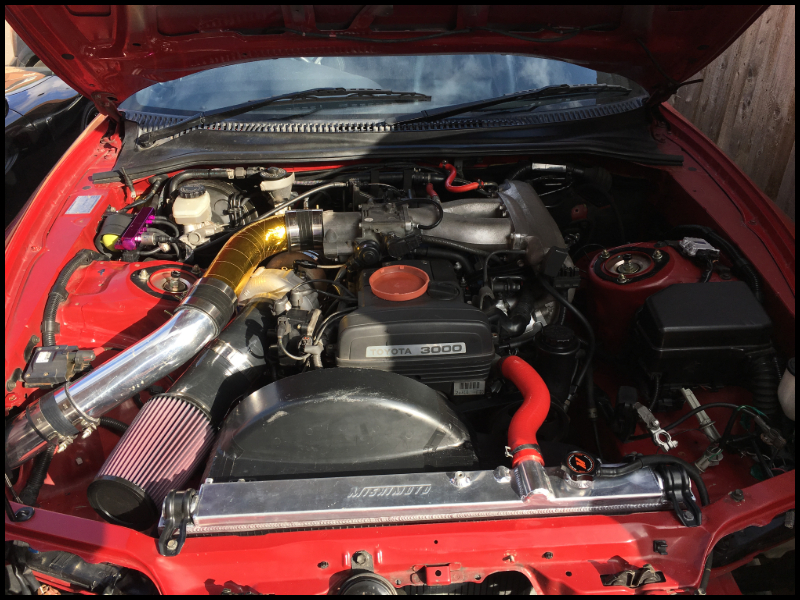
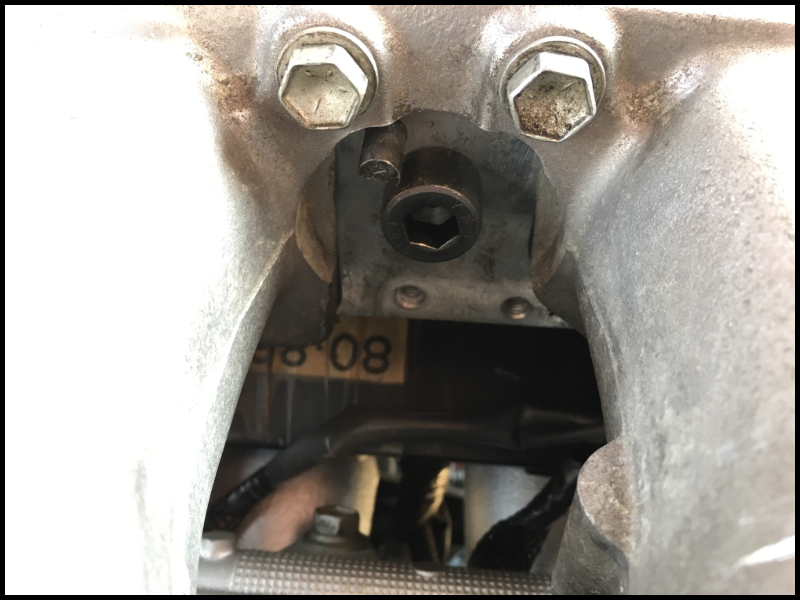
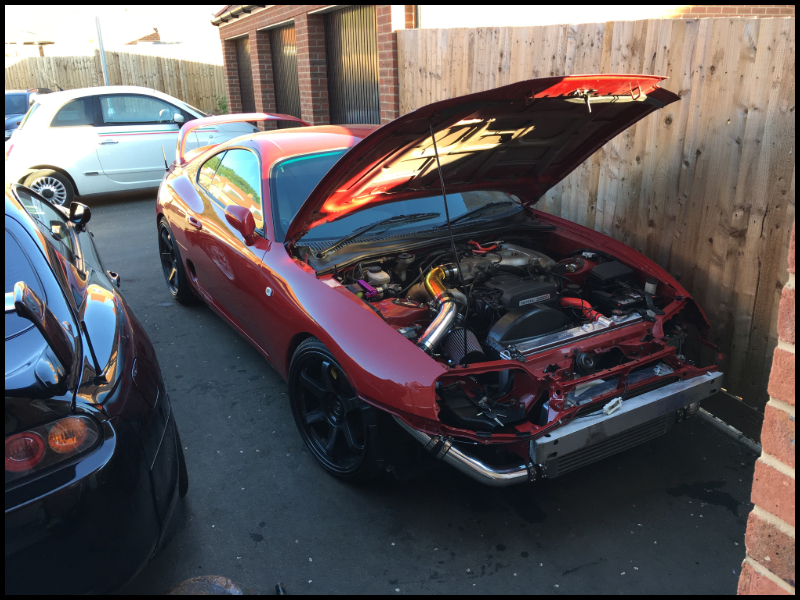
Part 17 - It all comes together As per the last update, the exhaust was removed (partially to aid with downpipes fitment and also because I needed to swap my de-cat pipe from a 2.5in to a 3in. Whilst I was there I decided to give it a good polish using some Autosol. I got a new Mishimoto radiator which fitted perfectly first time and appeared to be of much higher quality than the aforementioned Japspeed version. Started getting the hot side all fitted up. Even with the 4runner dizzy cap it was VERY tight for the t61 turbo and the leads could do with being a little longer but I managed With fitting the hot side I decided to replace all the manifold nuts, there were XSpower ones supplied with the manifold however they looked of dubious quality and so I got hold of a set of OEM Toyota ones. With the hot side well underway it was time for the cold side so to speak. The inlet was fitted up with the ACIS butterfly valve deleted. I chose to gut it out completely, tap the hole and fit a large bolt with some PTFE. The inlet being on meant I could start working on the intercooler pipework. The NA-T having inlet and exhaust on one side does compromise things slightly but I gave it a good go. This meant a slight massaging of this hole in to the wing which worked perfectly with 3in pipework ran throughout. There were a lot of small bits and pieces that needed work along the way but at times I got stuck in and took little to no pictures. Eventually it was ready. Ready for a base-map so that I could start it up, check for leaks etc. I had mapping booked for the following day so it was cut close but by the early hours of the morning we had a car. Bonnet closed and a few hours sleep (where I dreamt of 2JZ noises all night) prior to the next instalment…the mapping…the bit where it ALL went wrong.
-
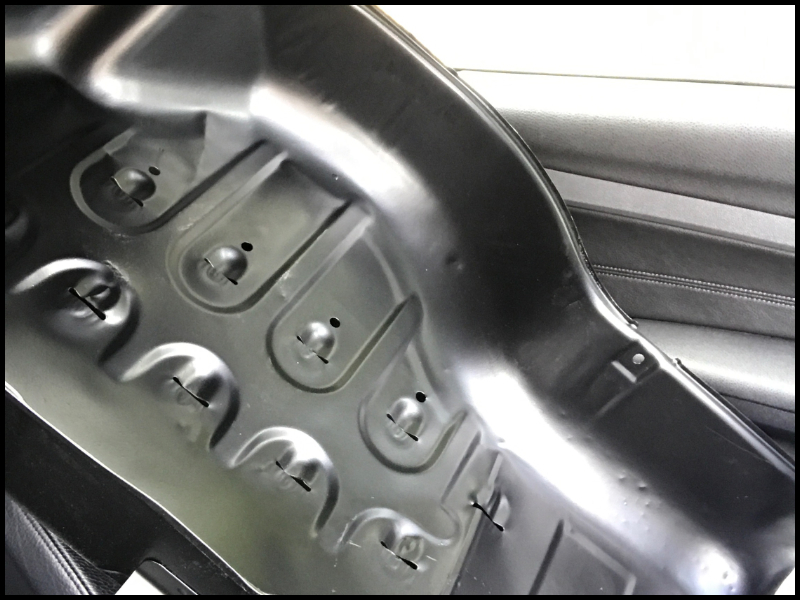
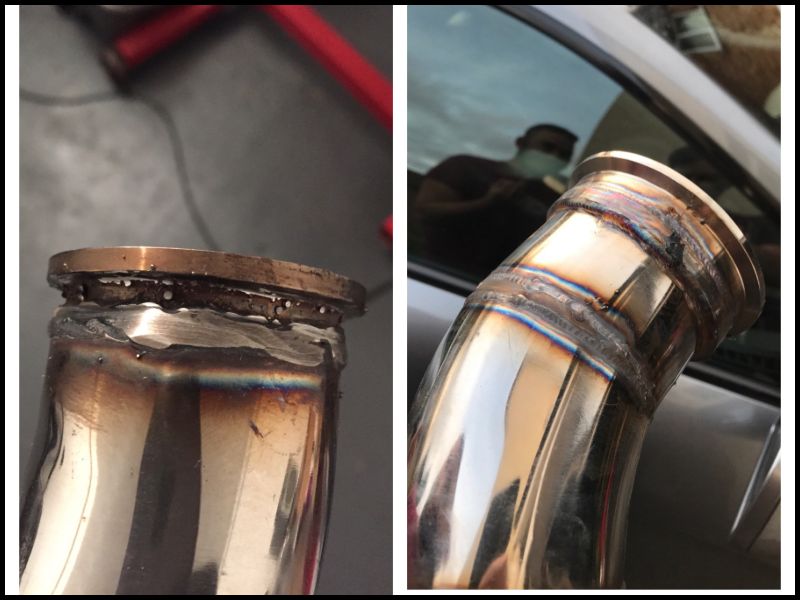
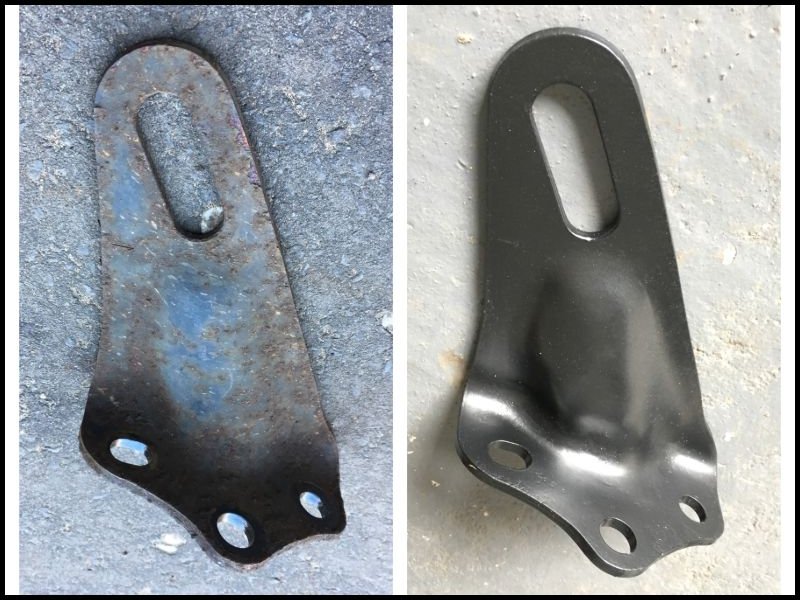
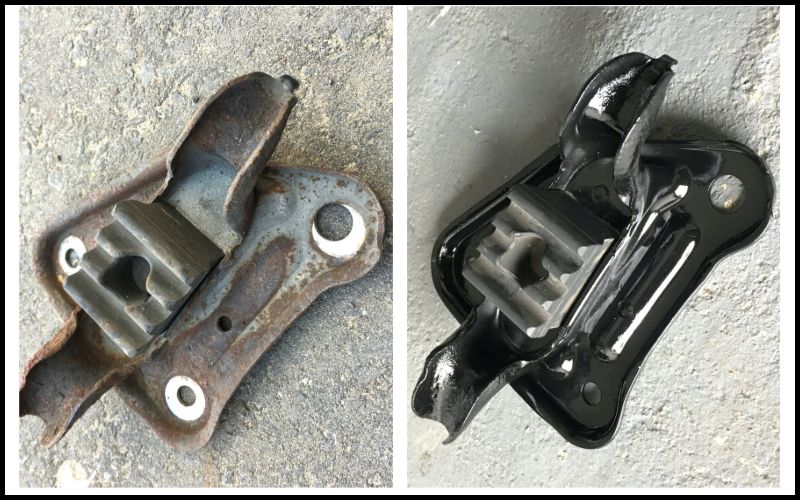
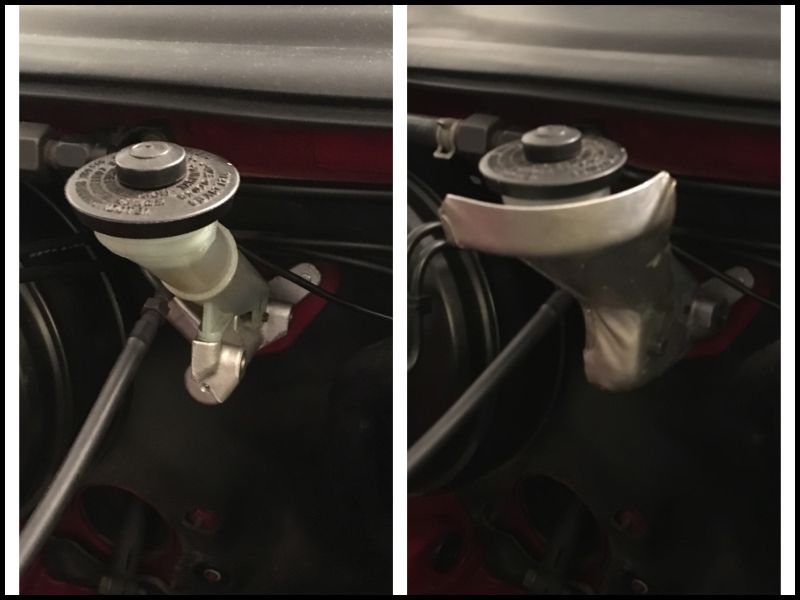
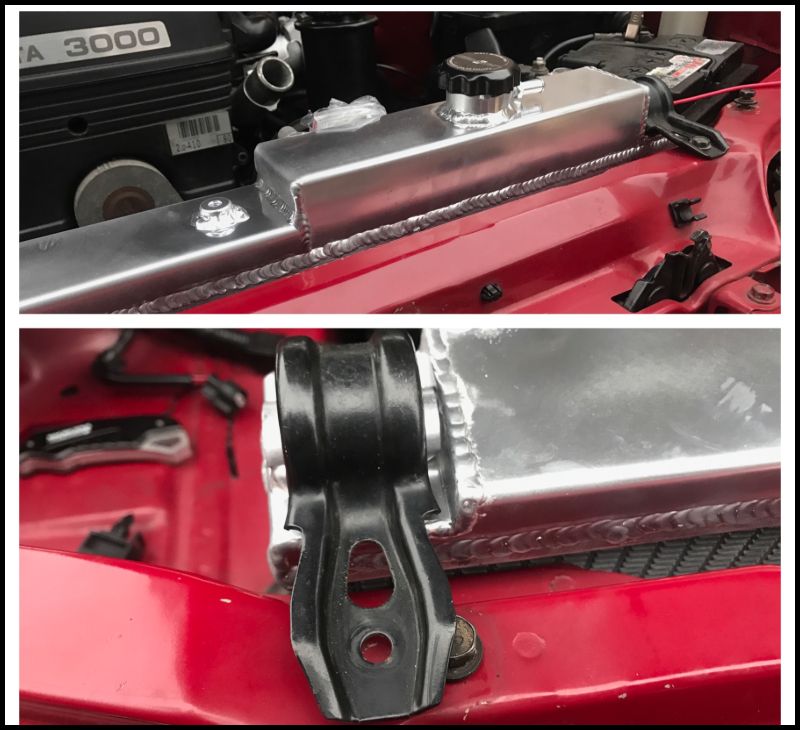
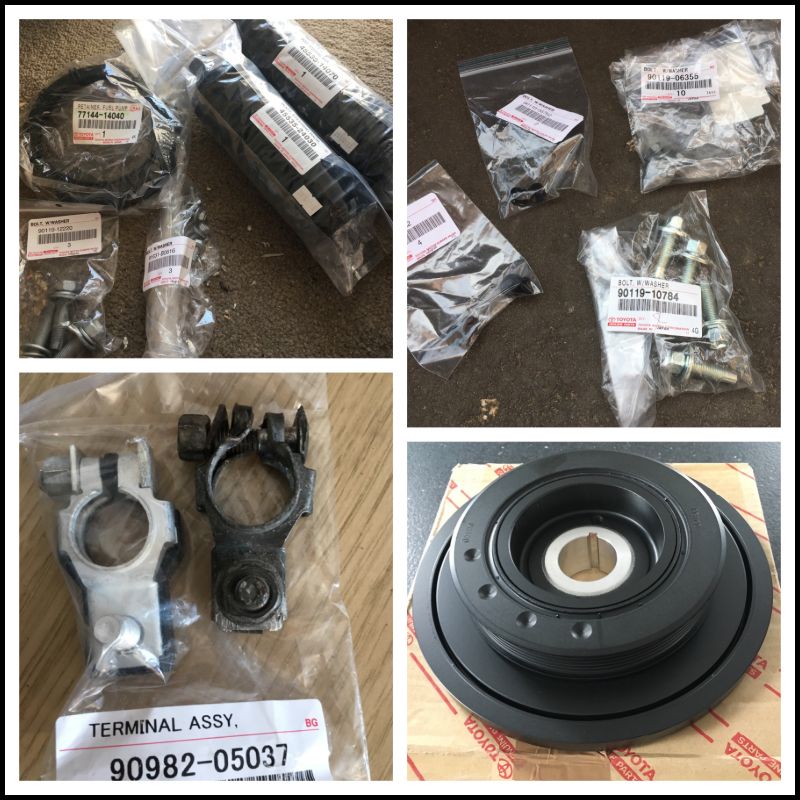
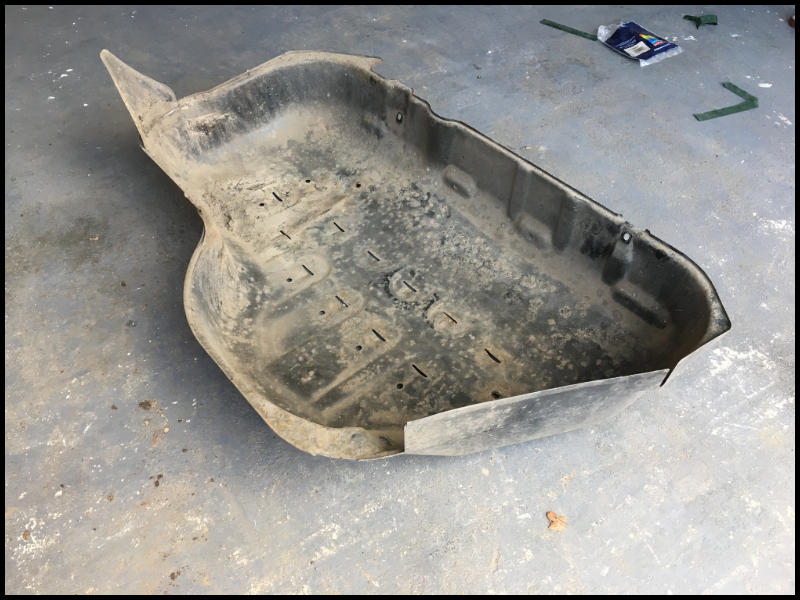
MANY MANY UPDATES INCOMING I’m going to post a lot of updates, this project has had a LOT of ups and downs. There have been times when I’ve left it sat for months and times when I’ve actually got some enjoyment out of it (all be it briefly). I’ve learnt a LOT of lessons and have misplaced my trust on more than one occasion. Anyway, I’m hoping that sharing the journey might inspire me to carry on and finish it off - - - Updated - - - Part 16 - Tidying up prior to reassembly So following on from part 15 (which was some 3 YEARS AGO) the re-assembly was taking place and the refreshed engine had been fitted. I was conscious that whilst it was in bits, cleaning up and replacing parts as needed would be wise but I was also budget conscious and so could only do some much. I firstly decided to get a few bits powder-coated as I went along, they were all sandblasted etc first; The rear towing eye was taken off whilst the exhaust was removed, that got done in an OEM looking satin black. Also had the heat shield off whilst there, decided to do this in a bright silver. The exhaust hanger was blasted but couldn’t be powder-coated due to heat/the rubber so I decided to paint it. The petrol tank guard was in surprisingly good condition with no holes whatsoever, there were one or two dents but that was all. Decided to have that powder-coated in a satin black too and it looks very OEM. Both my downpipe and screamer needed modifying. The downpipe angle was miles off and needed a different flange welding on. The screamer pipe had a 4 bolt flange instead of the small v band that my Tial wastegate had. These were welded up. I went to fit the radiator that I purchased from Japspeed. From earlier updates you may have noticed it came with a damaged hose connector but Japspeed offered a partial refund for me to rectify this (and I did) however upon fitting it…well…it didn’t fit Despite being ‘JZA80 specific’ the mounts didn’t line up and the bonnet didn’t shut. To be fair to Japspeed they refunded it despite it being sat around for quite some time so I’d have no reservations about dealing with them again. I then bought a TT heat shield for the clutch master. Toyota decided it was necessary with the stock twins in place so it will definitely help with my single turbo bolted on the side of the block. Luckily as I’d replaced this master earlier on, it was already tapped for the bolts. I got my new injectors mounted up the refurbished rail which looked all nice and shiny. They’re ID850’s if you missed it earlier on. Bought a few new bolts…well I actually bought loads but here’s a tiny selection. New battery positive (the old one didn’t clamp correctly) Also a new genuine Crank damper (as my old one completely separated haha). - There will be another update following this, I’ve got 3 years of updates to catch up on but thought it best to break it up for ease of reading.

-
PM'd mate
-
As per the title Looking for a heater vent, the central circular one in the stereo dash panel. Anybody got a good condition one lying around Thanks


.jpg.082aa236c258f87deb478eb84919788c.jpg)


.jpeg.4d78254622388f9c395394633c76c69f.jpeg)


.jpg.8f68cb19e38484d82e664821b826d16b.jpg)


.jpg.08095f70401bd77c40354be9383dd7d2.jpg)


