
DJT88
-
Posts
225 -
Joined
Content Type
Profiles
Forums
Store
Blogs
Events
Downloads
Supra Articles
Gallery
Everything posted by DJT88
-

european event Dragonball 2018 - Caen / Le Mans 17th to 20th May 2018
DJT88 replied to Burna's topic in National Events
Tickets bought! -
european event Dragonball 2018 - Caen / Le Mans 17th to 20th May 2018
DJT88 replied to Burna's topic in National Events
Yeah, can't wait! -
Dragonball 2016 - Luxembourg Break for the Border 12th to 15th May 2016
DJT88 replied to Branners's topic in Supra Chat
Group shot (Burna was having his breakfast) spot the differences Full res link pic 1 Full res link pic 2.jpg.9cf451a8c40c1153a864571b7a5015a0.jpg)
.jpg.1ef2f4a0a36230fa43234a5a6cde7b09.jpg)
-
Dragonball 2016 - Luxembourg Break for the Border 12th to 15th May 2016
DJT88 replied to Branners's topic in Supra Chat
Is there going to be a Pics thread -
Dragonball 2016 - Luxembourg Break for the Border 12th to 15th May 2016
DJT88 replied to Branners's topic in Supra Chat
Tickets purchased! -
Dragonball 2016 - Luxembourg Break for the Border 12th to 15th May 2016
DJT88 replied to Branners's topic in Supra Chat
The area around the Ring has some great driving roads as well. Nice scenery! -
Dragonball 2016 - Luxembourg Break for the Border 12th to 15th May 2016
DJT88 replied to Branners's topic in Supra Chat
Waiting on tickets without Eurotunnel. Should come after the regular tickets have gone Can't wait for another Dragonball!!! -
Just finished editing a video of my footage.
-
That was me with you and Abz through Amsterdam! It was a little crowded to say the least I too had an awesome time again on my 3rd Full dragonball! Can't wait for the German Autobahn next year Thanks to all involved in organizing and the rest of you for being part of it!
-
Do we have TomTom Route files yet?
-
And today's contestant on "NAME THAT SUPRA TRANNY"
DJT88 replied to flacopower's topic in mkiv Technical
Do you get the parts with it that connect the shifter? As in this one? edit: also, do you know the history of the box? -
Excellent looking kit, this would be my option if I ever change from stock!
-
Thanks guys! just thought I'd document this as it might be something worth doing when you've changed from headlights without this option to ones that do.
-
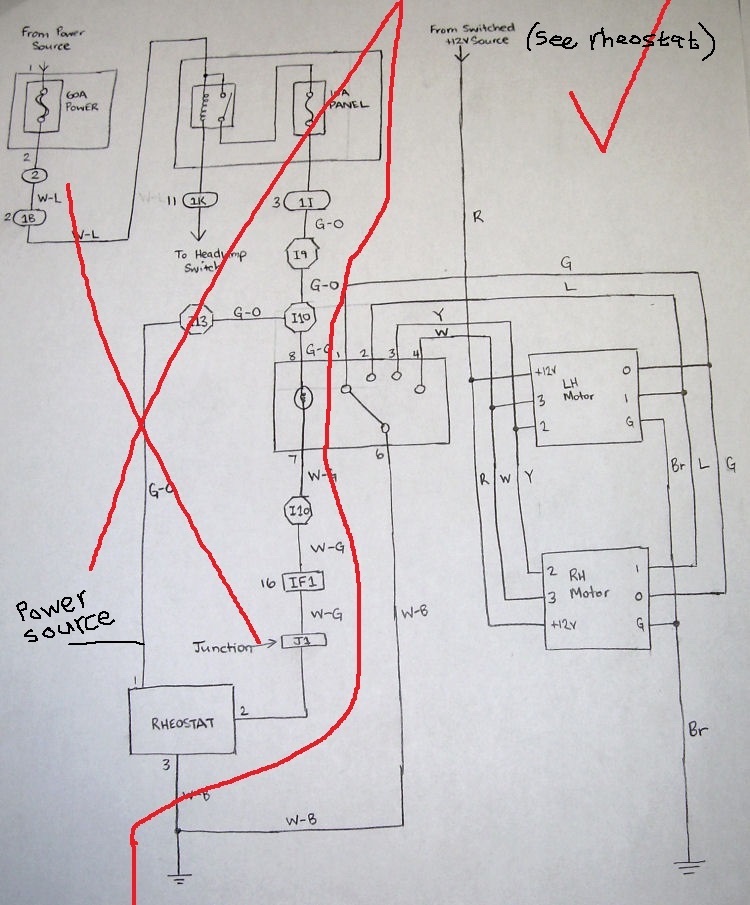
Hi fellow Supra fans. So I swapped my jspec pre-FL headlight units a few years ago. And the EU-spec lights have got electric motors for the beam adjustment. But as my car originally didn’t come with this option I was missing all the wiring and the adjustment button on the dashboard. I thought it was a shame to not be able to use this function in the car, so I went along and retrofitted this. Originally this button will be on the dash if you have this originally. I didn’t have this so bought my own button which you’ll see later. https://dl.dropboxusercontent.com/u/3472574/BeamAdjustment/%24_57 (1).JPG First of all I cut the original connectors of the head light units. https://dl.dropboxusercontent.com/u/3472574/BeamAdjustment/IMG_3794 (Medium).JPG And replaced them with my own. https://dl.dropboxusercontent.com/u/3472574/BeamAdjustment/IMG_3795 (Medium).JPG Next I ran all the wiring for it as hidden as possible through the fender and through the firewall https://dl.dropboxusercontent.com/u/3472574/BeamAdjustment/IMG_3797 (Medium).JPG https://dl.dropboxusercontent.com/u/3472574/BeamAdjustment/IMG_3799 (Medium).JPG Then had to drill a hole for the button on the dash and fit that with connectors so the panel can stil be easily removed. Note that i've fitted the red (12V) wire with a fuse connector. I've yet to calculate what would be an appropriate fuse, but for now its an 8A that came with the fuse-holder. I'd recommend putting in something much smaller (like 0,5 or 1 Amp fuse). I'm sure the electric motors don't use alot of power. https://dl.dropboxusercontent.com/u/3472574/BeamAdjustment/IMG_3801 (Medium).JPG https://dl.dropboxusercontent.com/u/3472574/BeamAdjustment/IMG_3802 (Medium).JPG https://dl.dropboxusercontent.com/u/3472574/BeamAdjustment/IMG_3803 (Medium).JPG This is the result at the head light unit. https://dl.dropboxusercontent.com/u/3472574/BeamAdjustment/IMG_3806 (Medium).JPG Here is a quick clip of the system operated. This is the schedule I found online, for if anyone else wants a go at it. For a 12v/GND source I’ve used the 12V input of the dash dimmer switch which is right there in the same dashboard panel anyway.
-
Clothing sorted! Note: If you're outside of the UK you can't register through the link above. It only allows UK addresses. However if you contact them they will ship it to you. (In my case the Netherlands) Just had to make the payment via credit card by calling them.
-
Well that was Quick!
-
For sandblasting I had the caliper in one piece and the holes plugged (cilinders in but with the old rubbers as I was going to get rid of the rubbers anyways.) For Powdercoating I took everything out and split the calipers as the guy doing it said he would plug and mask everything necessary. Isn't specified, but 40 lb-ft (a good 50 Nm) will do, as advised to me by CW Mine are still in one piece and functional. I noticed a more direct respons when braking. It feels like it takes less effort. Also thanks for the compliments
-
Thanks all! Pretty pleased with the results.
-
Hi all, just wanted to share some pictures of the brake refurb I finished this week. I think they look better than new right now. I had some trouble finding replacement o-rings for in-between the two halves of the caliper. Toyota doesn't supply these, but managed to get them through Chris Wilson (massive thanks again) I sandblasted the calipers and had them powder coated in black. The logo is a vinyl sticker. Also put new discs on as one was warped for sure. https://dl.dropboxusercontent.com/u/3472574/BrakesRevisie/Photo%2022-07-14%2021%2007%2046.jpg https://dl.dropboxusercontent.com/u/3472574/BrakesRevisie/Photo%2022-07-14%2021%2013%2011.jpg https://dl.dropboxusercontent.com/u/3472574/BrakesRevisie/IMG_2320%20%28Medium%29.JPG https://dl.dropboxusercontent.com/u/3472574/BrakesRevisie/IMG_2602%20%28Medium%29.JPG https://dl.dropboxusercontent.com/u/3472574/BrakesRevisie/IMG_2603%20%28Medium%29.JPG https://dl.dropboxusercontent.com/u/3472574/BrakesRevisie/IMG_2604%20%28Medium%29.JPG https://dl.dropboxusercontent.com/u/3472574/BrakesRevisie/IMG_2608%20%28Medium%29.JPG https://dl.dropboxusercontent.com/u/3472574/BrakesRevisie/IMG_2616%20%28Medium%29.JPG https://dl.dropboxusercontent.com/u/3472574/BrakesRevisie/IMG_2620%20%28Medium%29.JPG https://dl.dropboxusercontent.com/u/3472574/BrakesRevisie/IMG_2623%20%28Medium%29.JPG
-
RMC's Supra Cat d write off restoration ... hopefully
DJT88 replied to mclarenross's topic in mkiv Supra Projects
Looks like a thorough job -
I've used the Ferrea seals on the stock engine. Got the set from whifbitz. All good so far. Different springs and cams shouldn't matter as the size of the seals is very much the same, Ferrea and OEM.
-
I'm assuming you have a boost gauge. Do you still see the boost dropping at high rpm? because if it is in TTC it shouldn't now go up to .7 and then back to .4 later... Don't give up, it might just be an easy fix. Try understanding the way the system works and what ttc does. Then drive, and see/feel what happens.
-
Mine also smoked a puff for abuot 2-3 seconds... I was left over with this (pic), most of the seals split while removing them.. And the inlet side is a pita to rip out. http://mkivsupra.net/vbb/attachment.php?attachmentid=182412&d=1395480435
.jpg.bd9e879584e91622ebb2f5ff6d904435.jpg)
-
Managed to do this job myself using this guide mostly. Thanks very much for the clear instructions. Because I also had to do a timing belt change I made some extra room on the front of the engine. I then also spotted some leakage marks on the water pump so also replaced that for a new one. Just for reference, I also used the special snap-on tools. This was VERY usefull! I wouldn't recommend anyone doing this without some special tool to undo and redo the valve locks. Some pics, because pics are always nice. Front of engine disassembled http://mkivsupra.net/vbb/attachment.php?attachmentid=182404&d=1395478047 the look you get under the valve covers with cams removed. http://mkivsupra.net/vbb/attachment.php?attachmentid=182405&d=1395478078 Valve tool snapping the valve locks out of place http://mkivsupra.net/vbb/attachment.php?attachmentid=182406&d=1395478094 Ripped of the old valve seal, with every seal, there was some rubber left at the bottom. http://mkivsupra.net/vbb/attachment.php?attachmentid=182407&d=1395478105 Replaced the IACV pipe for a K&N filter to get rid of the ugly irritating pipe around the back of the engine. Also want to reposition the heater pipes some day. http://mkivsupra.net/vbb/attachment.php?attachmentid=182408&d=1395478129 Welded the crank sprocket when I had the chance. http://mkivsupra.net/vbb/attachment.php?attachmentid=182409&d=1395478148 Installed some new Whifbitz adjustable cam pulleys, and the new timing belt. http://mkivsupra.net/vbb/attachment.php?attachmentid=182410&d=1395478160 All closed up and running again. http://mkivsupra.net/vbb/attachment.php?attachmentid=182411&d=1395478171
.JPG.8d67c39c91022450946e354d74eb98e0.JPG)
.jpg.b8516be02e38fb676bfa6454da613717.jpg)
.JPG.d5fe08409434758d876f223e208bdf35.JPG)
.JPG.1ff06af38c42c0462dc348d7a1b95ff3.JPG)
.JPG.6b1cfe7c07d5bdd46ed671a252e1f465.JPG)
.JPG.9ce67622f2306e7160d330930bc24461.JPG)
.JPG.b07b41d012ce23b74389053b7713d331.JPG)
.jpg.e401139e60f0648f728c309009c4549e.jpg)
-
Dragonball 2014 - 16th, 17th and 18th May 2014 - Spa Weekend CHAT THREAD
DJT88 replied to Branners's topic in Supra Chat
In February I got my valve seals replaced myself! And in time for DB luckely. Really looking forward to this again. Still have the Big 13 sticker on the bonnet.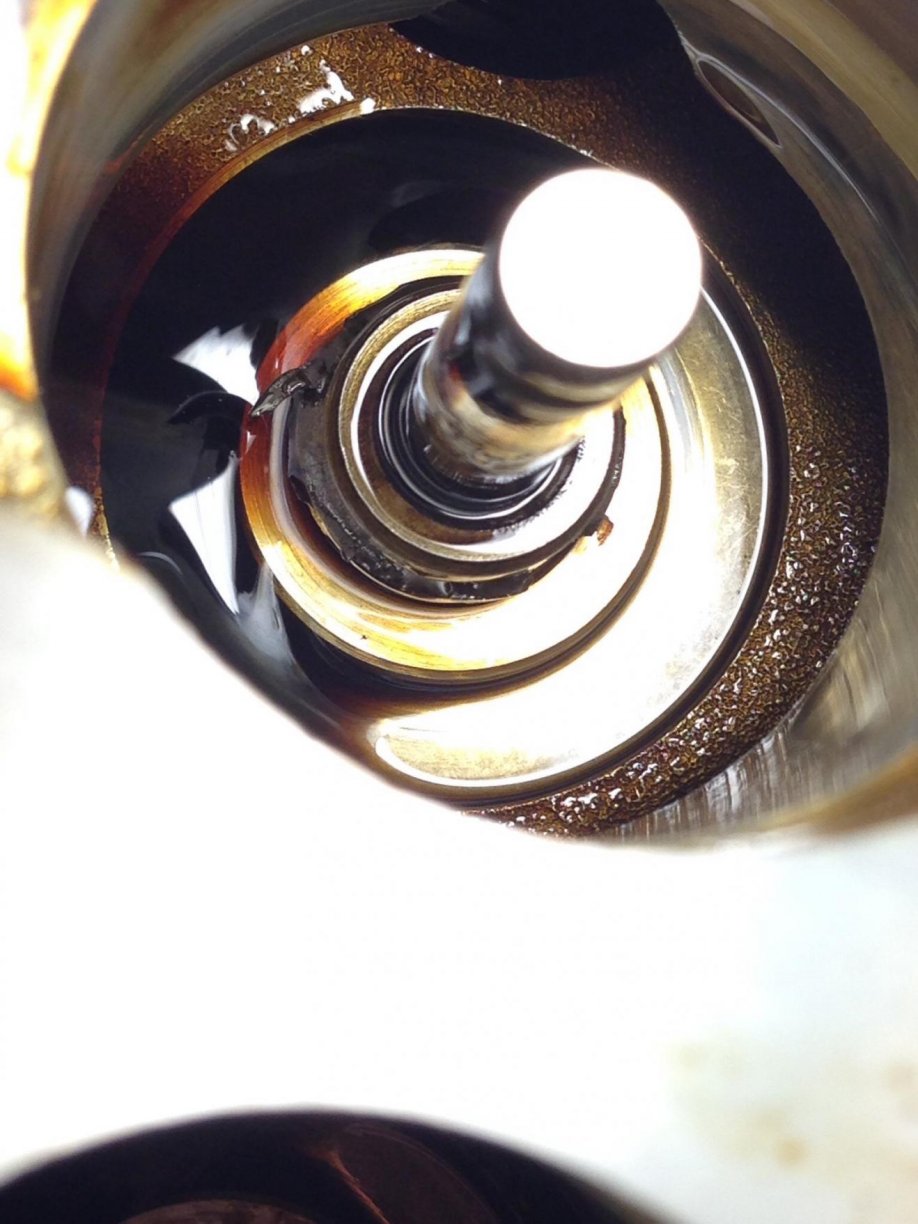
.jpg.9cf451a8c40c1153a864571b7a5015a0.jpg)
.jpg.1ef2f4a0a36230fa43234a5a6cde7b09.jpg)

.jpg.bd9e879584e91622ebb2f5ff6d904435.jpg)
.JPG.8d67c39c91022450946e354d74eb98e0.JPG)
.jpg.b8516be02e38fb676bfa6454da613717.jpg)
.JPG.d5fe08409434758d876f223e208bdf35.JPG)
.JPG.1ff06af38c42c0462dc348d7a1b95ff3.JPG)
.JPG.6b1cfe7c07d5bdd46ed671a252e1f465.JPG)
.JPG.9ce67622f2306e7160d330930bc24461.JPG)
.JPG.b07b41d012ce23b74389053b7713d331.JPG)
.jpg.e401139e60f0648f728c309009c4549e.jpg)
