
Mike2JZ
-
Posts
2660 -
Joined
-
Days Won
55
Content Type
Profiles
Forums
Store
Blogs
Events
Downloads
Supra Articles
Gallery
Everything posted by Mike2JZ
-
You need one controller not two. I dont know how many times I can repeat myself on this. Good luck.
-
The wastegate control valve controls the boost between one or both turbo's depending what RPM you are at. Hence why you dont need two boost controllers, just one connected to this valve. When you are online with both turbos, the 1.2 bar pressure you are trying to see will be generated and regulated between both turbo's. So you wont see 2 bar total. Edit: Make sure your Gizzmo pressure line is connected somewhere on your inlet manifold so you can get accurate boost readings.
-
Your understanding of the sequential system is incorrect. This is the best documentation I've ever found for how the system works. Please read and try to apply to whatever you have done. https://web.archive.org/web/20051103225530/http://www.max-boost.co.uk/max-boost/supra/turbo.htm
-
If a already solid tune is being adjusted for a new turbo, new injectors etc I could see being done in an hour or two. If a tune is being developed from the ground up then I can easily spend two days on a car mapping, both on the dyno and on the road afterwards, not including all the time analyzing logs at home to make any changes ready for the next day. The driveability mapping is where a lot of time can be sunk into. Making sure it starts and behaves like an OEM car even when it has aggressive cams, huge throttle bodies etc, dosent stall or bog when accelerating. Once you start throwing in variables like troubleshooting issues with the car, E85/Racefuel, DBW, VVTi, Motorsport features, Autobox control, traction control and some other advanced features the time needed to invest into the mapping grows quickly. Hence why it can cost so much.
-

Valve springs: small space up, down, doesn't matter?
Mike2JZ replied to dave148's topic in mkiv Technical
Not sure what shop manual you are looking at. It says it pretty clearly in the engine repair manual though.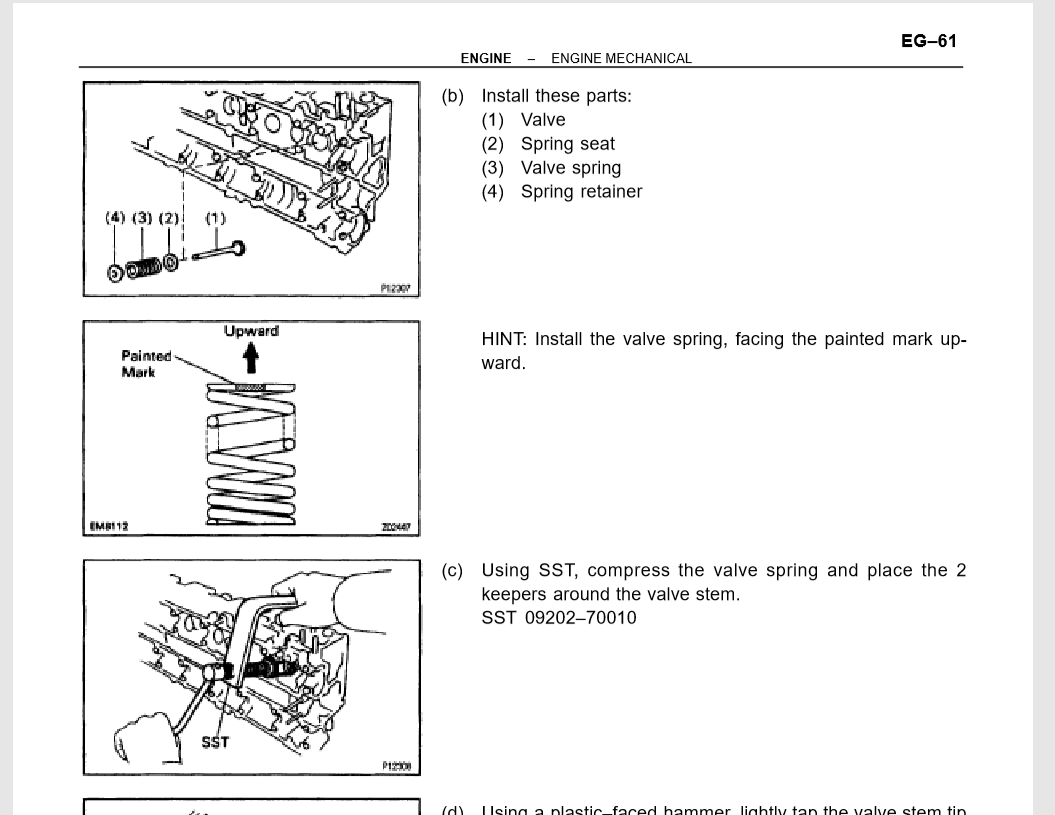
-
Valve springs: small space up, down, doesn't matter?
Mike2JZ replied to dave148's topic in mkiv Technical
OE springs have a paint mark on them. These marks need to be at the top when installing the springs. -
I've tuned with EMU's, Link, Syvecs, Haltech etc. All of them are more than capable of running a 2JZ in an acceptable manner for road/track use, although some will exceed in some areas more than others. Some of which will never be noticed by the end user. Trying to identify all the distinctive differences between each ECU platform is quite a challenge as there is a lot of areas to cover, but If I had to try and condense all the differences between each platform I would probably hone in on the fact that the cheaper ECU's are more focused and less flexible, both in terms of hardware and software. This can be a good or a bad thing depending on what you are trying to achieve. The high costs of a high end ECU like a Syvecs or Motec really comes with it's ability to really get creative with the setup of the tune and being able to have quite complex control strategies which can be adjusted at a very granular level, which may simply not be available on the lower end ECU's. For example. Using an EMU Classic, it has closed loop boost control which works fairly well and can be adjusted, but only allows for a limited amount of inputs to allow it to change from one boost map to another. A syvecs on the other hand, you have more boost control settings than you can use in most scenario's, and has a huge array of calibration switches that can alter or target different boost modes. If that wasn't enough, you can then dream up custom 2D/3D tables that can take almost any variable thats available to the ECU in order to alter the way to boost control strategy works. This example can be seen with most features on a high end versus low end ECU. I'm just happy that in 2020, even the low budget EMU classic/black are miles ahead of piggybacks and old standalone's like Greddy Emanage, AEMV1, PowerFC etc. In my opinion there is not a lot of justification to run such old hardware these days. My recommendation for finding a standalone is: a) Define a budget that includes ECU, sensors, labours and mapping. Usually double whatever you plan to spend unless your car is already well sorted and ready to go. b) Define the requirements of your car & needs. Do you want just a road car that goes from A to B, or do you need it to sustain laps round a track. Are you happy to just get in it and drive, or do you want the flexibility to change the various modes of how the engine performs. Do you want lots of safety features setup? Do you want to see the info from your ECU displayed to you somehow? c) Unless you are tuning the car yourself, find what your tuner is comfortable using and has a good track record with. No point bringing them something they have never used before. It doesn't matter how expensive or "good" your ECU is, the tool is only as good as the person using it.
-
I wanted to do this years ago but never did, must one of the few / the only build like this in the UK, should be awesome.
-
Good progress, nice choice on manifold. Been using walton on various builds, including my own, very nice quality for the money and no major issues.
-
Stuck on wiring body plugs to 1jzgte vvti from jzs171
Mike2JZ replied to Sam94's topic in mkiv Technical
Hold the phone, I lied. I do actually have some documentation that I wrote when I did the swap years ago. https://drive.google.com/file/d/14XHlSFB5uvwRSFWSZzzY_4-vM-HcIQfF/view?usp=sharing God knows what I was smoking when I wrote it all, but hopefully you can make some sense of it. Info is spread out over various tabs. The loom I was working with was from a chaser, so hopefully that matches what you have. -
Stuck on wiring body plugs to 1jzgte vvti from jzs171
Mike2JZ replied to Sam94's topic in mkiv Technical
You are going to need to get creative, its been a few years since I've put a 1JZ VVTI in a MKIV supra so I can't remember all the details. The chaser/crown engine loom is very different to the Supra. First the ECU is located in the engine bay, rather than in the engine footwell. So you will need to extend your loom to reach the footwell. Second, the chaser/crown 1JZ ECU has two ecu plugs that terminate on the engine loom side, and the other two ecu plugs terminate on the interior loom of a chaser. This is a problem as the Supra ECU has 3 ECU plugs that all terminate on the engine loom, and the interior plugs it uses are separate to the main ECU plugs. Unless you happen to have an interior loom from a chaser/crown, you will also be missing the two ecu connectors that you require. So first mission is to buy those two connectors, I think wiring specialities in USA stock them iirc. Once you have the two missing plugs, you can then get creative and wire in those connectors to the various interior functions on the MKIV Supra side. Also the fusebox wiring is completely different, so that will need some work to get working with supra fusebox location and connectors. Here you can clearly see the OEM 1JZ engine loom side versus the newly wired white/red wires that go to various places. I've lost all my resources regarding what wire does what, so can't help you there. But pinouts do exist somewhere out there on the internet, so best get searching. Also make sure you are aware that there are difference in looms between 1JZ VVTI for a Soarer, Chaser/Crown & some other variant, they use different plugs on ECU's. The above is a ballache, so if you are looking for an easier time I would suggest finding a 1JZ VVTI loom from a soarer, as this loom is almost plug and play for a MKIV Supra. Or buy a standalone and make a custom wiring harness.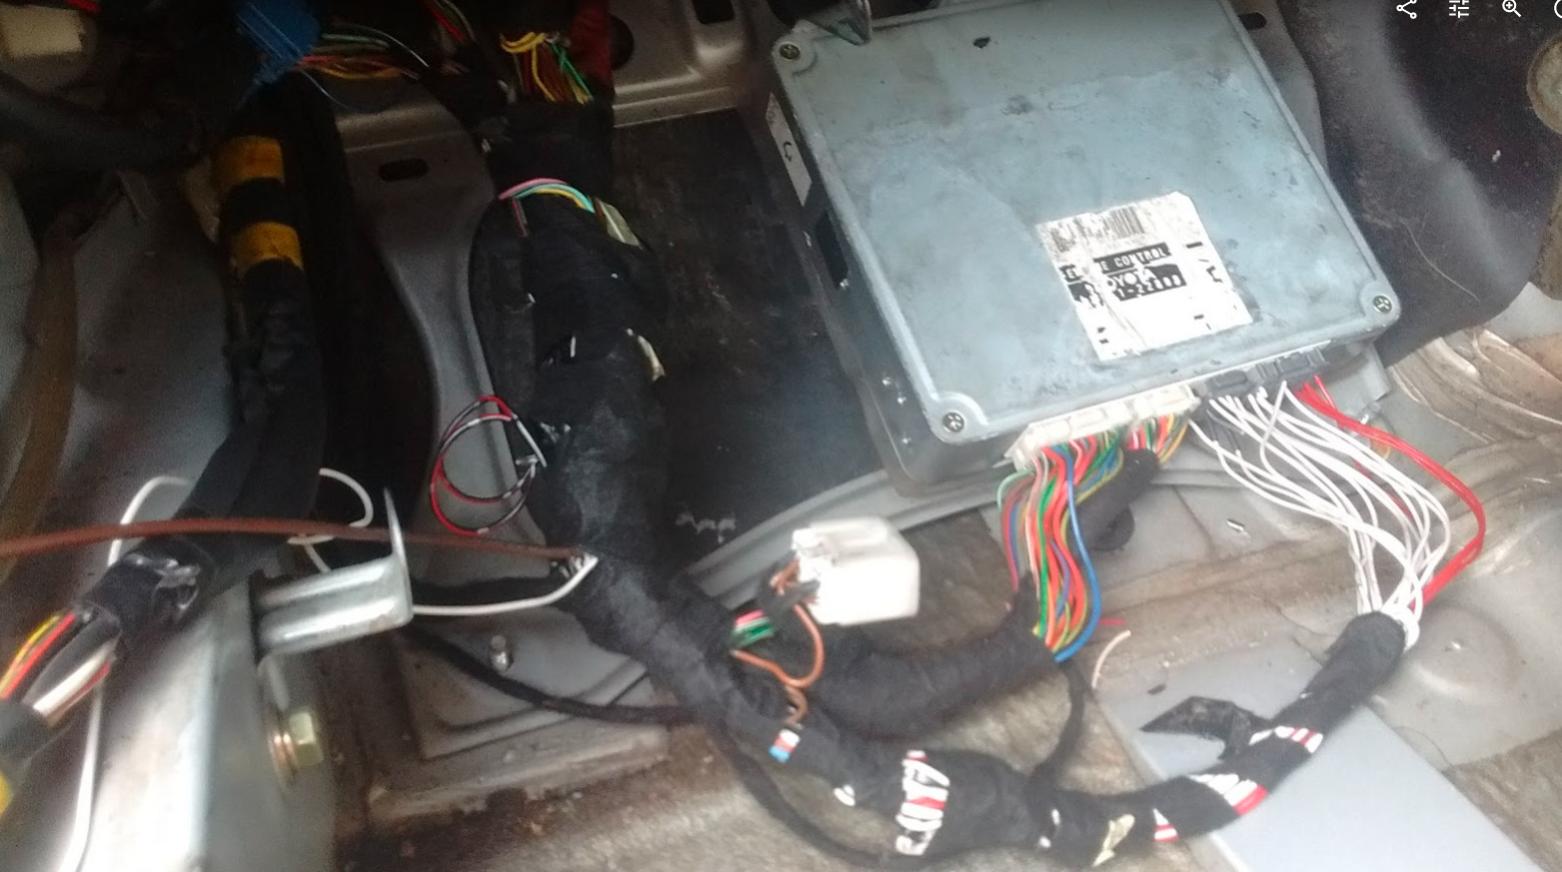
-
Burna here on the forum produces 3D printed link ECU cases, best bet will be to shoot him a message and get a set. I've installed many, does the trick nicely. Otherwise you will need to find a TT ecu case, but not always easy to find.
-
Timingbelt hitting tap on cover no 4 ***SOLVED***
Mike2JZ replied to jza800's topic in mkiv Technical
Check your bolt and the new idler bracket dosen't have any burrs or machining imperfections that could cause the problem. If nothing obvious then send it back to supplier and get them to send another brand. I can recomend using KOYO idler pulley set. I don't know what brand you have been supplied with but looks different to the KOYO. Failing that just go OEM, more expensive but guaranteed to work. -
Timingbelt hitting tap on cover no 4 ***SOLVED***
Mike2JZ replied to jza800's topic in mkiv Technical
Strange issue. Is the idler pulley genuine toyota? -
Timingbelt hitting tap on cover no 4 ***SOLVED***
Mike2JZ replied to jza800's topic in mkiv Technical
There is a washer that goes between the bracket and the oil pump. You put the bolt through the bracket, then put the washer on and install onto oil pump. If you don't have the washer the tensioner bracket will not be able to rotate and you will have problems. Have you got the washer installed? -
Ah I see. Thought you had a whole water pump assembly unit. You don't need to use sealant. Just make sure both mating surfaces are super clean and flat before installing gasket.
-
Water pump should come with an O-Ring to seal it against the block, not a gasket. The only gasket the water pump has is for the two bolt flange that the long steel hardline connects to which returns coolant back to the pump. I'd recommend using the proper O-Ring & gasket if possible, much neater and designed to work for many thousands of miles.
-
There are two breathers on the fuel tank. #1 is the the one that you have a tube with a bolt in. #2 is the one you have highlighted in red. On your new hanger you can use one AN6 fittings as your breather and connect it to #2 tube. Although AN6 may be a little awkward. You can also cap off one of the AN6 fittings, then remove your rubber hose with bolt from #1 breather, and run a sillicone tube from that to underneath the car and vent the fuel vapor that way. Or let #1 and #2 breathe in some way like it does from factory. For the fuel lines in the hanger you can either go with: In tank fuel hose (do not use regular fuel hose as it is not designed for in tank submursion) https://www.ebay.co.uk/itm/Mocal-8mm-Bore-In-Tank-Fuel-Hose-Priced-Per-Metre-ITFH-5/311910279100?hash=item489f4d27bc:g:f4QAAOSw8T9dlIFr Or https://www.ebay.co.uk/itm/FP-Convoluted-Fuel-Flex-Hose-Ends-ID-8mm-ID-8mm-Length-260mm/112621641999?hash=item1a38c5e10f:g:g88AAOSw0PJZlGuQ Fuel Pumps and 12v Do yourself a favor and ditch the Walbro255. It won't support much power. Whilst you are here doing fuel hanger stuff, just drop two 485 Walbro pumps into the tank. Will support your long term power goals better than a single 255. Your fuel hanger looks a bit weird. Allows you to run two pumps but still uses the stock fuel pump connector which is only designed for one pump. Now if you run two pumps you will have to go through the ball ache of converting that single factory connector to feed both pumps, and ground the pumps through the hanger. See this thread for what I mean. https://www.supraforums.com/threads/dual-fuel-pump-hanger-modification-pictures.657843/ You can also add another bulkhead wiring connector to run power to your second pump. In the passengerside boot of your car behind the plastic trims you will find a fuel pump relay. This relay will need to be removed and replaced with one relay for every fuel pump you plan on running. You will need to trigger the relays using your standalone, and ideally need an additional fused power line run from the battery at the front of the car to feed your second pump. Generally on larger aftermarket fuel pumps, there is no need for factory fuel pump ecu as it can cause restriction and running issues as larger pumps dont like to be run under 12v. So by installing 5 pin relays you can feed battery voltage (12v-14v) direct to the pumps when the ECU turns them on. If you are running two or more pumps you will likely need to stage the pumps based on injector duty cycle so you don't overwhelm your fuel pressure regulator at low load.
-
I've had similar in the past with an old engine of mine that had "meh" cylinder ring seal. Noticed it whilst idling after beating the crap out of it on a dyno for a bit and got it nice and hot. If smoke is blue then its burning inside combustion chamber, so it can only be rings on the way out or oil being pulled from the head. White smoke that smells foul would be oil burning on exhaust wheel of turbo. Get a compression & leakdown test and that should indicate any issues with cylinder sealing.
-
Timingbelt hitting tap on cover no 4 ***SOLVED***
Mike2JZ replied to jza800's topic in mkiv Technical
You don't need to remove the tap, and it's not normal for a belt to be touching, regardless if its a stock or aftermarket belt. Normally the only time the belt touches the tap is when the belt is not installed tightly or correctly. Please upload several photos with your belt installed showing the problem please, hard to understand from your description -
Dodgy pressure sensor can cause intermittent or all out failure causing the low pressure error code. For the temperature sensor check your wiring down near the AC rad. The evaporator temp sensor will be down there.
-
Help identifying brackets and a wire/connector
Mike2JZ replied to Big Mark's topic in mkiv Technical
Are you using a stock engine loom or a custom loom (tweak, wiring speciality etc)? The wiring colors on the engine loom side are different from factory. That white plug often relates to some autobox & trac control controls, the pinout for which will change depending on what year, spec & model supra you have. Unless you are running the stock Auto gearbox and stock ecu, then that white plug normally becomes redundant when going standalone. -
http://www.mkivsupra.net/vbb/memberlist.php?&pp=30&order=desc&sort=lastvisit Filter by Last Visit. Plenty of active people from what I can see Mike2JZ - Zimbabwe
-
+1 for SGS. Much sturdier than MM
-
Whats your AFR on boost


