
Stan
-
Posts
481 -
Joined
Content Type
Profiles
Forums
Store
Blogs
Events
Downloads
Supra Articles
Gallery
Everything posted by Stan
-
I assume you can't put your hardtop in the boot if you have this?
-
Right I dunno how my fog conversion is set up but I know there is a resistor inline somewhere on each side, and it makes my inner brake lights turn on as a fog (I still get the warning light however). I did have to change a bulb the other day but apart from that haven't fiddled with the wires. Thing is, today I took the car out, and noticed that whenever I pressed my brake pedal, my main heater control lights dimmed, and the dash bulbs turned on - as if I'd switched the headlights on So basically if I press my brake, it acts as if I've switched my headlights on and backlights the dash (and dims the brighter bulbs) What's going on????
-
Stillen front, only a couple of them about I think 18" Braid Interlagos wheels
-
Gutted to hear this, I love his books, didn't even know he was ill
-
Hi all Whilst fitting a new bulb into one of my rear clusters and testing them (with the headlights on - as that filament had gone), I noticed that my rear LED centre brake light comes on with the main headlights, but it glows brighter like you'd expect it to when you brake (ie works the same as the normal bulbs) Are they wired up like this as normal, or has someone put a resistor in to make the LED strip light up along with the main lights? And if so - is it legal (as it kinda looks to someone else like I'm always braking at night)
-
If you want to drive up the A140 and come to Long Stratton you can have a ride in my auto TT aero to experience how good the auto box is Funnily enough I thought about looking at the exact same car before I got mine as it was advertised on pistonheads a few months ago and was nearby, glad I didn't in the end from the sounds of things!
-
Maybe a champion pie eater owned it beforehand?
-
I've got one beside the battery and 1 under the air filter (aftermarket filter), but I think I'll be moving them at some point so it looks a bit neater
-

Anyone got a used Sigma alarm key fob they dont need anymore...
Stan replied to ManwithSupra's topic in Off Topic
Both mine are snapped like that as well! -
Nice build up, do you have any higher res pics at all?
-
Damn, you do choose a pic with the most random background as possible! I just did this quickly, dunno if it's what you're after: http://img81.imageshack.us/img81/697/newsupewl3.jpg
-
I've got the same sticker, so not chav as it's OEM
-
They are powered by a 12v source, hence the wires going to them
-
I think I might upgrade mine to some LED strip lights and just cut the existing wires in that case, and I'll stick one on the passenger side as well
-
See here for some pics http://www.mkivsupra.net/vbb/showthread.php?t=138834 I am tempted but dunno if it'd be too bright
-
Haha don't worry, you might have gathered I'm a bit obsessed by cleaning... so I'm well aware of VXR Marc and his detailing related threads
-
That was one of the things that sold it for me..... joining the club (before I brought the soop) and seeing the cards arrive in the post, and me going "that could be mine soon!" I think I'll give some autosol a go then to see what happens...
-
Hmmm interesting, hadn't considered doing that. I was going to try and get it with my rotary but it's too big (the rotary + pad). I just think I'm gonna damage the exhaust cut out of the bumper if I use a polishing pad
-
That is so weird, I was looking at replacing my lights with LEDs so was measuring them all up yesterday, and I stuck my head under the dash and found the same thing. Mine was cable-tied on to something under the dash (right next to where the dash trim panel is), so I assumed it was aftermarket.... is it Toyota OEM then?
-
Pretty bad to be honest, I don't want to put Soop Doggs cleaning to shame, but I have an inkling he wasn't as gentle as I am when cleaning (ie 2 buckets, running hose, and washmitt) I think black just picks up swirl marks very easily, so unless you have the car perfectly clean beforehand, you'll inflict them back into the paintwork (plus I believe Astral Black is single stage, which means it marks easier) I've got quite a few 'polishes' from Chemical Guys that remove swirls, I just tend to favour Poorboys for the initial work. However I would recommend any Chemical Guys product for removing swirls (assuming you are using a machine polisher). I think they have changed their range recently from the products I have, but anything from here would be good: http://www.chemicalguysuk.com/category_s/24.htm http://www.chemicalguysuk.com/category_s/4.htm
-
Can't do a lot more with the zorst tbh, have polished it loads and it still has that brown look to it. I'm planning on attacking it with a wire brush when I get one to see if I can do any better with that. Rear parking sensor (although weirdly only on one side of the car) Nah, my job is a bit stranger I took the pics on an industrial estate just round the corner from me
-
Well after owning it for almost a month now, I have only just got round to giving it a proper clean (to my standards ) For those that are interested, the procedure was: Foamed with Chemical Guys Maxi Suds II Washed with Chemical Guys Extreme Wash and Washmitt Clayed with Meguiars Clay Washed with Chemical Guys Citrus Wash & Gloss and washmitt Swirl removal with Poorboys SSR 2.5 and 2.0 on Edge cutting pads using a Silverline Rotary Machine Polished with Chemical Guys Spiderweb Scratch and Swirl Remover on a Edge finishing pad using a Silverline Rotary Glazed with Chemical Guys Wet Mirror Finish Sealed with Chemical Guys Jetseal Waxed with Chemical Guys 50:50 Concours paste wax (2 coats) Final Buff with Meguiars Ultimate Quik Detailer Wheels polished with Chemical Guys Metal Shine Tyres dressed with Chemical Guys Silk Shine Dressing Glass cleaned with Chemical Guys Window Cleaner Leather cleaned with Autoglym Leather Cleaner and Leather Care Cream Exterior Plastics cleaned with Meguiars PlastX Interior Plastics dressed with Meguairs NXT Tech Protect Pics don't do it justice since it wasn't too sunny out, but the last pic should give you an idea about how good the finish is http://img380.imageshack.us/img380/3241/img0019dd0.jpg http://img55.imageshack.us/img55/9118/img0029oa6.jpg http://img140.imageshack.us/img140/6552/img0030gq5.jpg http://img171.imageshack.us/img171/4894/img0033rg6.jpg http://img171.imageshack.us/img171/2163/img0028tj3.jpg http://img384.imageshack.us/img384/4700/img0031gl3.jpg Still needs polishing again in a couple of small places, and the engine bay needs looking at, but I really need to set aside a full day to do those areas, however I'm happy with what I achieved today (even if I am a little knackered!! )
-
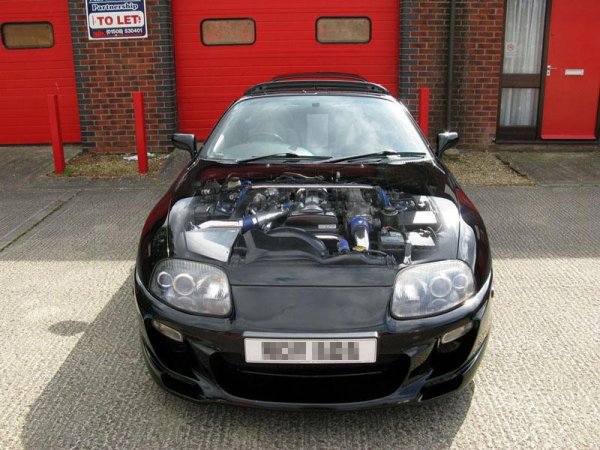
From the album: 1995 Toyota Supra GZ Aerotop Twin Turbo Auto
-
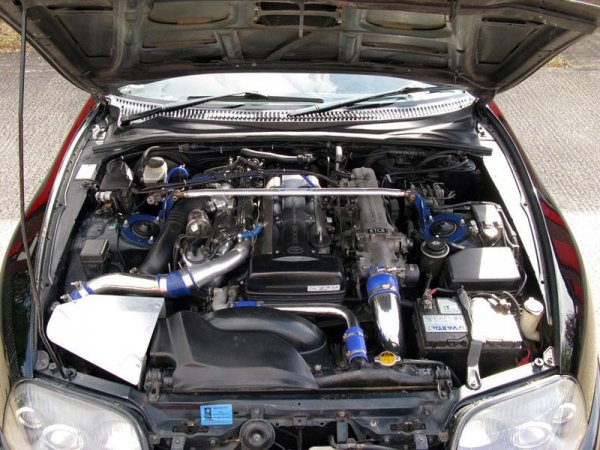
From the album: 1995 Toyota Supra GZ Aerotop Twin Turbo Auto
-
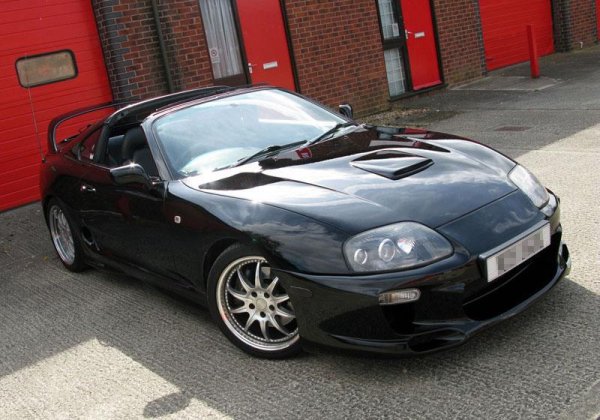
From the album: 1995 Toyota Supra GZ Aerotop Twin Turbo Auto


